In the previous tutorial, I introduced to you all basic knowledge about Constructor Injection in Spring using an XML file. In this tutorial, I will show more information about it to help you can use it easily!
Let’s consider the following example.
I have a Student class:
|
1 2 3 4 5 6 7 8 9 10 11 12 13 14 15 16 |
package com.huongdanjava.springconstructorinjection; public class Student { private String name; public Student(String name) { this.name = name; } @Override public String toString() { return "Student [name=" + name + "]"; } } |
and Clazz class.
|
1 2 3 4 5 6 7 8 9 10 11 12 13 14 15 16 17 18 |
package com.huongdanjava.springconstructorinjection; public class Clazz { private String name; private Student student; public Clazz(String name, Student student) { this.name = name; this.student = student; } @Override public String toString() { return "Clazz [name=" + name + ", student=" + student + "]"; } } |
As you see, class Clazz defined a constructor with 2 arguments, one is a Student object and another one is a variable type String. These arguments are dependency objects, so how can we inject these objects into the Clazz object using this constructor?
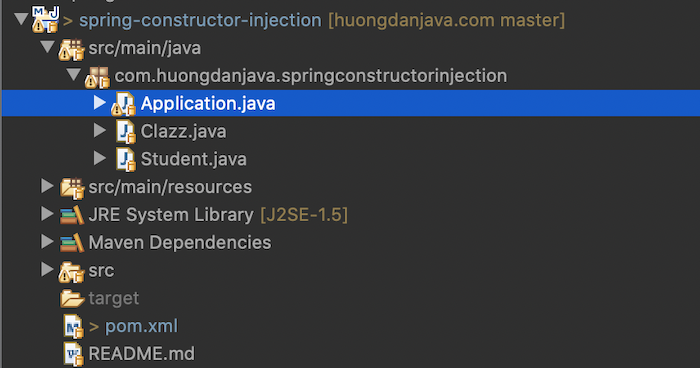
First of all, to easily understand, I will create an example Maven project:

I will use Java 17 for this example application:
|
1 2 3 4 |
<properties> <maven.compiler.source>17</maven.compiler.source> <maven.compiler.target>17</maven.compiler.target> </properties> |
Spring dependency is as follows:
|
1 2 3 4 5 |
<dependency> <groupId>org.springframework</groupId> <artifactId>spring-context</artifactId> <version>6.0.2</version> </dependency> |
The Application class has the following content:
|
1 2 3 4 5 6 7 8 9 10 11 12 13 14 15 |
package com.huongdanjava.springconstructorinjection; import org.springframework.beans.factory.BeanFactory; import org.springframework.context.support.ClassPathXmlApplicationContext; public class Application { public static void main(String[] args) { BeanFactory context = new ClassPathXmlApplicationContext("spring.xml"); Clazz clazz = (Clazz) context.getBean("clazz"); System.out.println(clazz.toString()); } } |
OK, let’s get started.
To inject the Student object into the Clazz object, first, we need to initialize the Student object in the Spring container! For example, I want to initialize a Student object with the name “Khanh”, I will declare as below:
|
1 2 3 |
<bean id="student" class="com.huongdanjava.springconstructorinjection.Student"> <constructor-arg value="Khanh" /> </bean> |
With this declaration, Spring will call the constructor:
|
1 2 3 |
public Student(String name) { this.name = name; } |
to initialize the Student object.
In this declaration, I used <constructor-arg> tag with the attribute value to assign the value to the name variable. This <constructor-arg> is used to define the arguments in the constructor of the objects in the Spring container. It has a lot of attributes but there are 2 common attributes: value and ref.
The value attribute is used in case the ingested value is a text, a number, a boolean value, … The ref attribute is used to refer to another bean that has been initialized in the Spring container.
OK, we have just done the declaration Student object, now we will continue with the Clazz object.
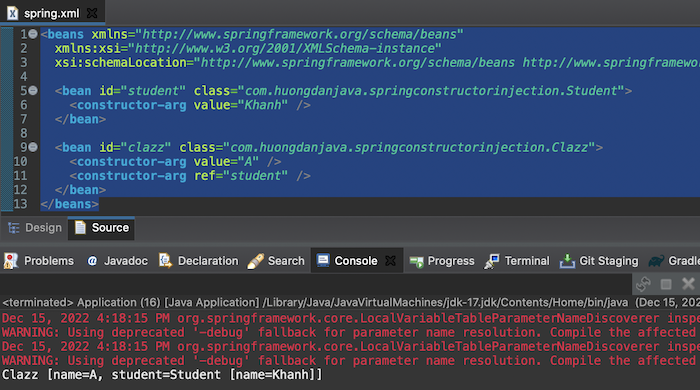
To declare a Clazz object, we will use <constructor-arg> with 2 attributes ref and value in the order as below:
|
1 2 3 4 |
<bean id="clazz" class="com.huongdanjava.springconstructorinjection.Clazz"> <constructor-arg value="A" /> <constructor-arg ref="student" /> </bean> |
Result:

If you want to declare the arguments in any order, you can declare them as below:
|
1 2 3 4 |
<bean id="clazz" class="com.huongdanjava.springconstructorinjection.Clazz"> <constructor-arg index="1" ref="student" /> <constructor-arg index="0" value="A" /> </bean> |
The value of the index starts from 0.
Besides that, instead of using <constructor-arg> tag, Spring also supports us with another simple way to work with Constructor Injection. That is: using the namespace c, xmlns:c=”http://www.springframework.org/schema/c”.
This namespace allows us can declare constructor arguments of objects inside the <bean> tag as attributes. There is no XSD schema file for this namespace. To use it, you only need to declare in the XML configuration file of Spring as below:
|
1 2 3 4 5 6 |
<beans xmlns="http://www.springframework.org/schema/beans" xmlns:xsi="http://www.w3.org/2001/XMLSchema-instance" xmlns:c="http://www.springframework.org/schema/c" xsi:schemaLocation="http://www.springframework.org/schema/beans http://www.springframework.org/schema/beans/spring-beans.xsd"> </beans> |
then using the following syntax to inject the dependency objects.
If you use the name of arguments in the constructor to inject the dependency objects, you should declare an attribute in <bean> tag beginning with “c:”, next is the name of the argument, and end with “-ref” in-case the dependency object is other beans in Spring container, then assign for it a value. For example, I can declare the Student object as below:
|
1 2 |
<bean id="student" class="com.huongdanjava.springconstructorinjection.Student" c:name="Khanh"> </bean> |
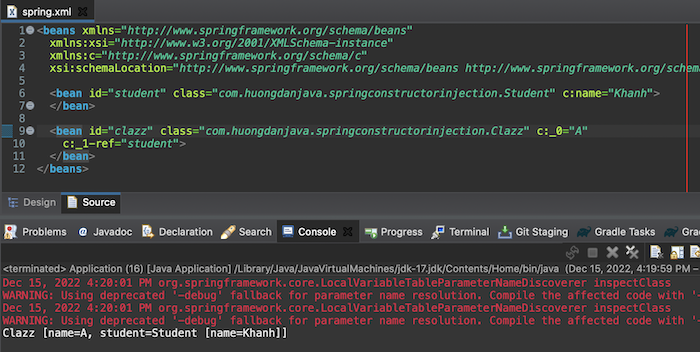
If you use the index to inject the dependency objects, let declare an attribute in <bean> tag beginning with “c:_”, next the index, and finally is “-ref” in case the dependency object is other beans in Spring container, then assign it a value. For example, I can declare the Clazz object as below:
|
1 2 |
<bean id="clazz" class="com.huongdanjava.springconstructorinjection.Clazz" c:_0="A" c:_1-ref="student"> </bean> |
The result will be the same as above:


