I introduced Refresh Token grant type in OAuth 2.0 in the tutorial about Grant types in OAuth 2.0. In this tutorial, I will show you how we get a new access token using refresh token with Keycloak!
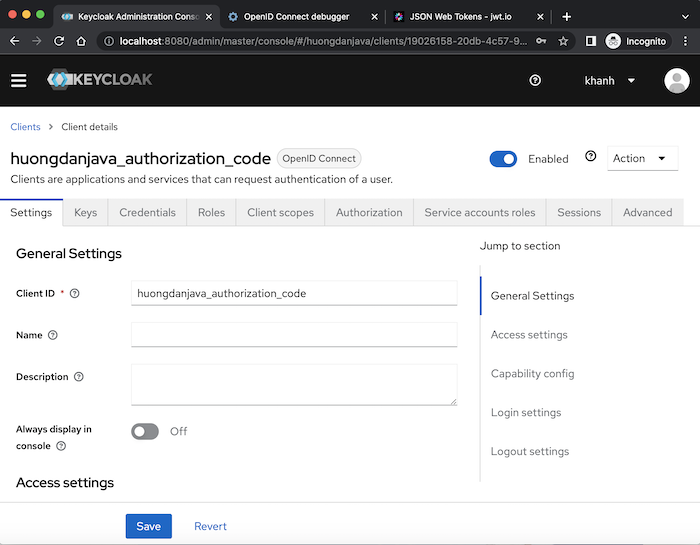
First, I will create a new client in Keycloak with the Authorization Code grant type as an example:

Perform get access token for this client, you will see the following results:
|
1 2 3 4 5 6 7 8 9 10 11 |
{ "access_token": "eyJhbGciOiJSUzI1NiIsInR5cCIgOiAiSldUIiwia2lkIiA6ICJwUEstV2pnSUJuZzRjRmc1VktLRG9jQ0Q5V3VJUElzWERSSDhjSm5fRHQwIn0.eyJleHAiOjE2NjYwNTI5MTksImlhdCI6MTY2NjA1MjYxOSwiYXV0aF90aW1lIjoxNjY2MDUyNjExLCJqdGkiOiJiZGU5NDRiZC04YzUyLTQxMjYtOGE4YS0xOGY2MjZkNDgxYTAiLCJpc3MiOiJodHRwOi8vbG9jYWxob3N0OjgwODAvcmVhbG1zL2h1b25nZGFuamF2YSIsImF1ZCI6ImFjY291bnQiLCJzdWIiOiJjZjQ3NTBlMC01NjlkLTQyMWUtYTM3MC0zMzRhMGY1MGUwYmYiLCJ0eXAiOiJCZWFyZXIiLCJhenAiOiJodW9uZ2RhbmphdmFfYXV0aG9yaXphdGlvbl9jb2RlIiwibm9uY2UiOiI4MHZ3NXIxdjJ3YSIsInNlc3Npb25fc3RhdGUiOiIzMTg4ZWY1My1iMTM0LTRiNjktYTQ0NS0zZDk3OGM4ZDE4MzYiLCJhY3IiOiIxIiwicmVhbG1fYWNjZXNzIjp7InJvbGVzIjpbIm9mZmxpbmVfYWNjZXNzIiwidW1hX2F1dGhvcml6YXRpb24iLCJkZWZhdWx0LXJvbGVzLWh1b25nZGFuamF2YSJdfSwicmVzb3VyY2VfYWNjZXNzIjp7ImFjY291bnQiOnsicm9sZXMiOlsibWFuYWdlLWFjY291bnQiLCJtYW5hZ2UtYWNjb3VudC1saW5rcyIsInZpZXctcHJvZmlsZSJdfX0sInNjb3BlIjoib3BlbmlkIHByb2ZpbGUgZW1haWwiLCJzaWQiOiIzMTg4ZWY1My1iMTM0LTRiNjktYTQ0NS0zZDk3OGM4ZDE4MzYiLCJlbWFpbF92ZXJpZmllZCI6ZmFsc2UsIm5hbWUiOiJLaGFuaCBOZ3V5ZW4iLCJwcmVmZXJyZWRfdXNlcm5hbWUiOiJodW9uZ2RhbmphdmEiLCJnaXZlbl9uYW1lIjoiS2hhbmgiLCJmYW1pbHlfbmFtZSI6Ik5ndXllbiIsImVtYWlsIjoiaHVvbmdkYW5qYXZhLmNvbUBnbWFpbC5jb20ifQ.FGTrJqD69-KiYu5oQOftQJ_gQ9EuBskQX7ofHUOAXB1XkYs_X1OxbEZZlt1wN0nLpET160sq1TJPH2LF_MNXZilR8FnC_r0RyfaNq5le-BIN-Fg2Q9wc2NfKwE-nERyJzU64Rvo87YZRyAyQB-h1V39Xdm0yJhpdo0SG6tKCAj-fDGiUVSlQB0zZUMdXihK3zdo8MCaAPjRpRbP-l2nsCUCgX7kcGMTZwcgIPoa0pjXg1rO-8PK418pgOE8sYR5upSPoRH2B_ve0NI2B5UaIa1ncoAmreaVx56R3YvPimhkcTjPr8LsuGSba0SsshWk_-xmuwy0qatVJVuSYJMfHaQ", "expires_in": 300, "refresh_expires_in": 1800, "refresh_token": "eyJhbGciOiJIUzI1NiIsInR5cCIgOiAiSldUIiwia2lkIiA6ICI5M2JkNjBiMC04MDkyLTQzNDctYjkyMS02OTI3Nzc2MWMyOTMifQ.eyJleHAiOjE2NjYwNTQ0MTksImlhdCI6MTY2NjA1MjYxOSwianRpIjoiNTI4YzJmOTMtNWRhOC00ODUzLTlkZDUtZmE5NjM0NDU4ZjNkIiwiaXNzIjoiaHR0cDovL2xvY2FsaG9zdDo4MDgwL3JlYWxtcy9odW9uZ2RhbmphdmEiLCJhdWQiOiJodHRwOi8vbG9jYWxob3N0OjgwODAvcmVhbG1zL2h1b25nZGFuamF2YSIsInN1YiI6ImNmNDc1MGUwLTU2OWQtNDIxZS1hMzcwLTMzNGEwZjUwZTBiZiIsInR5cCI6IlJlZnJlc2giLCJhenAiOiJodW9uZ2RhbmphdmFfYXV0aG9yaXphdGlvbl9jb2RlIiwibm9uY2UiOiI4MHZ3NXIxdjJ3YSIsInNlc3Npb25fc3RhdGUiOiIzMTg4ZWY1My1iMTM0LTRiNjktYTQ0NS0zZDk3OGM4ZDE4MzYiLCJzY29wZSI6Im9wZW5pZCBwcm9maWxlIGVtYWlsIiwic2lkIjoiMzE4OGVmNTMtYjEzNC00YjY5LWE0NDUtM2Q5NzhjOGQxODM2In0.U_gBHcEBjwsAoFuIfwHnIhInHGw5f6M0b-zTPvDepIg", "token_type": "Bearer", "id_token": "eyJhbGciOiJSUzI1NiIsInR5cCIgOiAiSldUIiwia2lkIiA6ICJwUEstV2pnSUJuZzRjRmc1VktLRG9jQ0Q5V3VJUElzWERSSDhjSm5fRHQwIn0.eyJleHAiOjE2NjYwNTI5MTksImlhdCI6MTY2NjA1MjYxOSwiYXV0aF90aW1lIjoxNjY2MDUyNjExLCJqdGkiOiJmNzRhMDczOS03YWE1LTQ5NWMtYmFlZi1jZThhN2RkNDZmYmIiLCJpc3MiOiJodHRwOi8vbG9jYWxob3N0OjgwODAvcmVhbG1zL2h1b25nZGFuamF2YSIsImF1ZCI6Imh1b25nZGFuamF2YV9hdXRob3JpemF0aW9uX2NvZGUiLCJzdWIiOiJjZjQ3NTBlMC01NjlkLTQyMWUtYTM3MC0zMzRhMGY1MGUwYmYiLCJ0eXAiOiJJRCIsImF6cCI6Imh1b25nZGFuamF2YV9hdXRob3JpemF0aW9uX2NvZGUiLCJub25jZSI6Ijgwdnc1cjF2MndhIiwic2Vzc2lvbl9zdGF0ZSI6IjMxODhlZjUzLWIxMzQtNGI2OS1hNDQ1LTNkOTc4YzhkMTgzNiIsImF0X2hhc2giOiJ1LVJzdEtxVEloWUZoUnRJSDJ6Zld3IiwiYWNyIjoiMSIsInNpZCI6IjMxODhlZjUzLWIxMzQtNGI2OS1hNDQ1LTNkOTc4YzhkMTgzNiIsImVtYWlsX3ZlcmlmaWVkIjpmYWxzZSwibmFtZSI6IktoYW5oIE5ndXllbiIsInByZWZlcnJlZF91c2VybmFtZSI6Imh1b25nZGFuamF2YSIsImdpdmVuX25hbWUiOiJLaGFuaCIsImZhbWlseV9uYW1lIjoiTmd1eWVuIiwiZW1haWwiOiJodW9uZ2RhbmphdmEuY29tQGdtYWlsLmNvbSJ9.ngowkiPnnnc1ivNf3fbA0F3jXS3hSdsjZPbL5InLJriuszPUWd8KGqQESLCduRb4sBFntz1AOqa_mX5HH846IP2WEBybK9NFN6HOCFutdpulL1h_aFeRqw4faMxYdr3zh1pqENf76pcu9YyF0QjJ42Lk0LjogyEXWfMiXBgcSSU5wwgHfBu7NKt_gyCznnMm-cZygH5PrM-ql0fs54OGnFe6rnlyrT3Oo_78PypZv6NIDooYw_JtyzSrmf1SS3uEGtObCKHyINHo-Kzk7QgAsz_cScW6l0EAGFeOt-mJwC_3m4gmRuXQBVjEHDri9isKaufYJVKLL7HeOxf9jkU1VQ", "not-before-policy": 0, "session_state": "3188ef53-b134-4b69-a445-3d978c8d1836", "scope": "openid profile email" } |
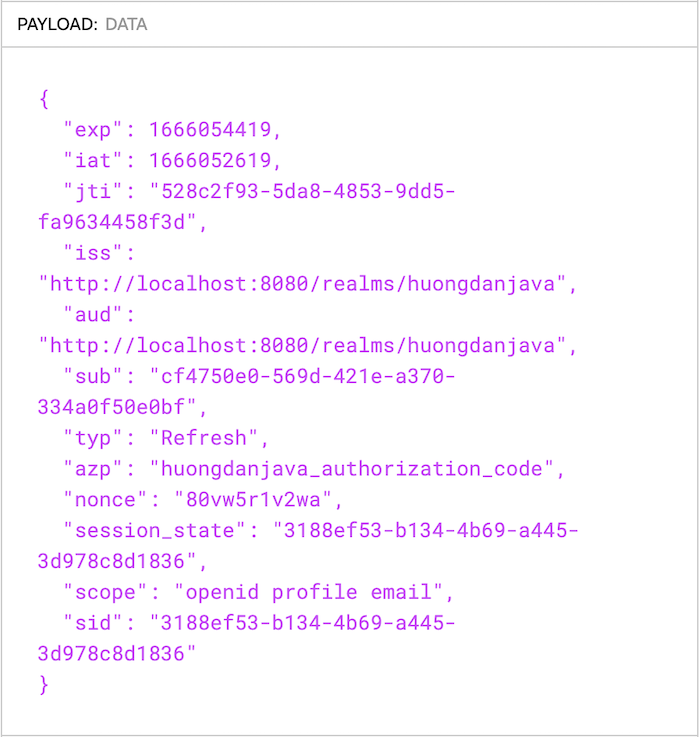
The content of the refresh token if I decode it using https://jwt.io/ is basically as follows:

Please pay attention to the “typ” claim in the content of the refresh token above! Here, the value of this claim is Refresh, we also have some other types of refresh tokens, such as Offline,…
The refresh token will always be returned along with the access token, so we can get a new access token without the user having to log in again.
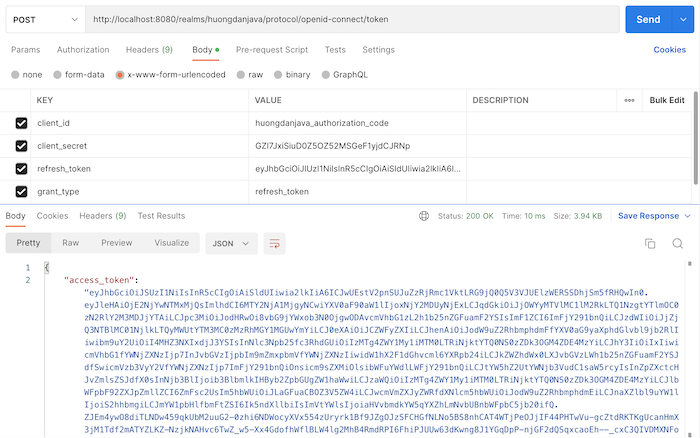
To get a new access token with a refresh token, in the request to get the access token, you just need to pass grant_type=refresh_token, the value of the refresh token that we had in the previous request to get the access token, client ID and client secret.
With this example of mine, you can get a new access token by requesting the following:

As you can see, with the Refresh Token grant type, we don’t need the user to log in anymore.
A refresh token will always have an expiration time, the default of Keycloak is 30 minutes! Every time a new access token is issued, the refresh token will be re-issued, and you can use the latest one for a longer expiration time.
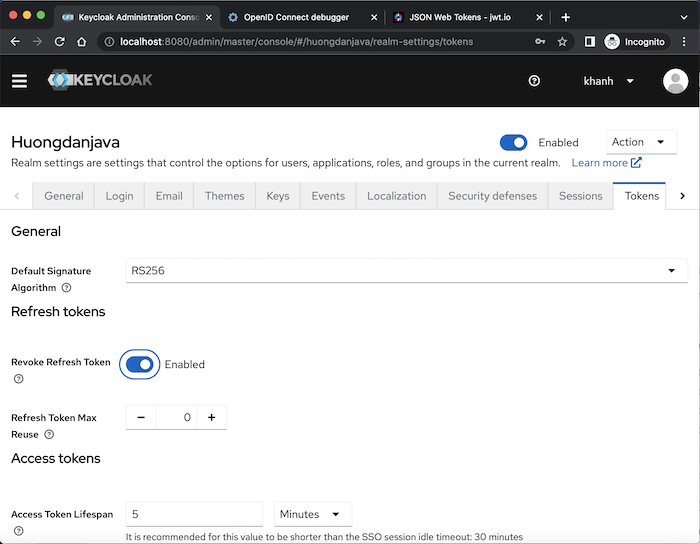
We can use a refresh token to request the access token multiple times. However, you can limit the number of times a refresh token can be used, by going to the Tokens tab, Refresh tokens section of Realm Settings, configuring the Revoke Refresh Token field. If you turn on this field, you can configure how many times a refresh token is reused:

By default, you can only use the refresh token once!


Srinivas
This is super helpful. Thank you so much