Hibernate, as I say in this tutorial, besides implementing the JPA specification, also implements its own framework for connecting and manipulating with database management systems. In this first tutorial about Hibernate, I will go straight to an example of using Hibernate to get database data, then you guys can imagine about the Hibernate and how it works. What is the difference with Hibernate implementations for JPA?
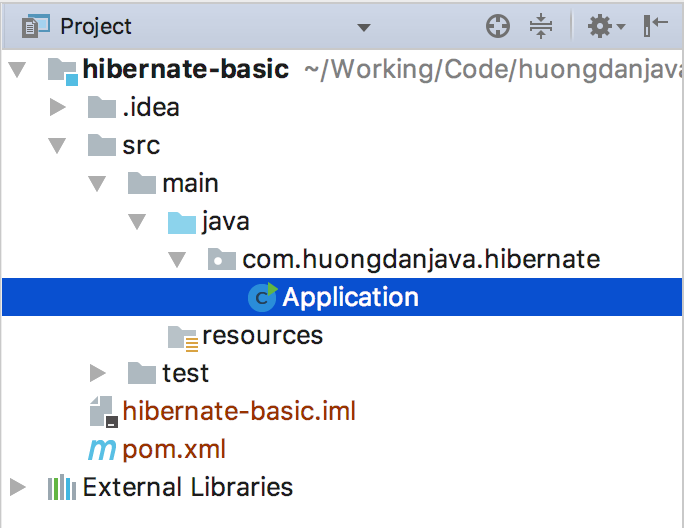
OK, I will first create a Maven project as an example:

In particular, the Hibernate dependency is as follows:
|
1 2 3 4 5 |
<dependency> <groupId>org.hibernate</groupId> <artifactId>hibernate-core</artifactId> <version>5.2.12.Final</version> </dependency> |
In this tutorial, I will use MySQL database so I will also add MySQL Driver dependency as follows:
|
1 2 3 4 5 |
<dependency> <groupId>mysql</groupId> <artifactId>mysql-connector-java</artifactId> <version>6.0.6</version> </dependency> |
Project Lombok:
|
1 2 3 4 5 6 |
<dependency> <groupId>org.projectlombok</groupId> <artifactId>lombok</artifactId> <version>1.16.18</version> <scope>provided</scope> </dependency> |
In this example, we will define a database containing the information of the class and the students of that class as follows:
|
1 2 3 4 5 |
CREATE TABLE `clazz` ( `id` int(11) NOT NULL AUTO_INCREMENT, `name` varchar(45) NOT NULL, PRIMARY KEY (`id`) ) ENGINE=InnoDB DEFAULT CHARSET=utf8; |
|
1 2 3 4 5 6 7 8 9 10 11 |
CREATE TABLE `students` ( `id` int(11) NOT NULL AUTO_INCREMENT, `name` varchar(45) NOT NULL, `code` varchar(10) NOT NULL, `date_of_birth` datetime DEFAULT NULL, `email` varchar(100) DEFAULT NULL, `clazz_id` int(11) NOT NULL, PRIMARY KEY (`id`), KEY `student_clazz_idx` (`clazz_id`), CONSTRAINT `student_clazz` FOREIGN KEY (`clazz_id`) REFERENCES `clazz` (`id`) ON DELETE NO ACTION ON UPDATE NO ACTION ) ENGINE=InnoDB DEFAULT CHARSET=utf8; |
The preparation steps are finished, now we start going to the main part.
First, in order to work with clazz and students tables in the database, we will map the tables and columns of these tables to Java object first (ORM).
|
1 2 3 4 5 6 7 8 9 10 11 12 13 14 15 16 17 18 19 20 21 22 23 24 25 |
package com.huongdanjava.hibernate; import javax.persistence.Column; import javax.persistence.Entity; import javax.persistence.GeneratedValue; import javax.persistence.GenerationType; import javax.persistence.Id; import javax.persistence.Table; import lombok.Getter; import lombok.Setter; @Entity @Table @Getter @Setter public class Clazz { @Id @GeneratedValue(strategy = GenerationType.IDENTITY) private Long id; @Column private String name; } |
|
1 2 3 4 5 6 7 8 9 10 11 12 13 14 15 16 17 18 19 20 21 22 23 24 25 26 27 28 29 30 31 32 33 34 35 36 37 38 39 |
package com.huongdanjava.hibernate; import java.util.Date; import javax.persistence.Column; import javax.persistence.Entity; import javax.persistence.GeneratedValue; import javax.persistence.GenerationType; import javax.persistence.Id; import javax.persistence.Table; import lombok.Getter; import lombok.Setter; @Entity @Table @Getter @Setter public class Students { @Id @GeneratedValue(strategy = GenerationType.IDENTITY) private Long id; @Column private String name; @Column private String code; @Column(name = "date_of_birth") private Date dateOfBirth; @Column private String email; @Column(name = "clazz_id") private Long clazzId; } |
Next, to work with Hibernate we need to have a configuration file. In this file, we will declare the type of database we will use, the information needed for Hibernate to connect to that database, and the Java objects we mapped from the tables in the database.
|
1 2 3 4 5 6 7 8 9 10 11 12 13 14 15 16 17 |
<?xml version="1.0" encoding="utf-8"?> <!DOCTYPE hibernate-configuration PUBLIC "-//Hibernate/Hibernate Configuration DTD 3.0//EN" "http://hibernate.sourceforge.net/hibernate-configuration-3.0.dtd"> <hibernate-configuration> <session-factory> <property name="connection.url">jdbc:mysql://localhost:3306/hibernateexample</property> <property name="connection.username">root</property> <property name="connection.password">123456</property> <property name="connection.driver_class">com.mysql.jdbc.Driver</property> <property name="dialect">org.hibernate.dialect.MySQLDialect</property> <property name="show_sql">true</property> <property name="format_sql">true</property> <mapping class="com.huongdanjava.hibernate.Clazz"/> <mapping class="com.huongdanjava.hibernate.Students"/> </session-factory> </hibernate-configuration> |
As you can see, the database, username, password, and information about Java objects are detailed in the Hibernate configuration file. In addition, we can also declare additional information such as display SQL statement, SQL statement format, … I will talk more about these in the next tutorial about Hibernate.
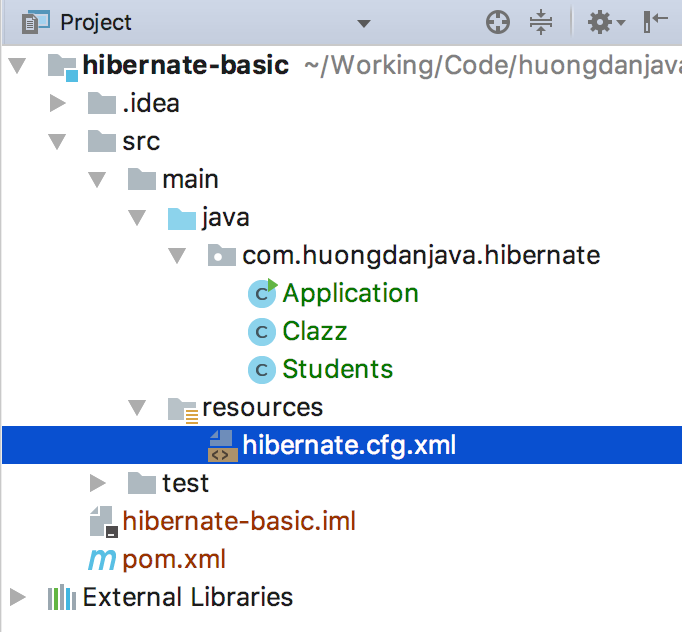
Normally, we place the Hibernate configuration file in the /src/main/resources/ directory of the project.

OK, we already have the configuration file, so now how to put those configurations to use in our project?
Hibernate supports us to do that by using the Configuration object to put our configuration into an object that implements the SessionFactory interface.
|
1 2 3 4 5 6 7 8 9 10 11 12 13 |
package com.huongdanjava.hibernate; import org.hibernate.SessionFactory; import org.hibernate.cfg.Configuration; public class HibernateUtil { private static final SessionFactory SESSION_FACTORY = new Configuration().configure().buildSessionFactory(); public static SessionFactory getSessionFactory() { return SESSION_FACTORY; } } |
And now we can use the SessionFactory object in our application.
First, we need to open a session to work with Hibernate by:
|
1 |
Session session = HibernateUtil.getSessionFactory().openSession(); |
To start working, we will open a new Transaction:
|
1 |
session.beginTransaction(); |
For example, to add a new class, we will initialize the new Clazz object,
|
1 |
Clazz clazz = new Clazz(); |
Add a name to this Clazz object:
|
1 |
clazz.setName("ABC"); |
And now you can use the Session object to store the Clazz object on the database.
|
1 2 |
session.save(clazz); session.getTransaction().commit(); |
It’s simple, isn’t it? To test whether our Clazz object has been saved to the database yet? You can continue to code:
|
1 2 3 4 5 6 |
Query<Clazz> q = session.createQuery("From Clazz "); List<Clazz> resultList = q.list(); for (Clazz next : resultList) { System.out.println("Clazz name: " + next.getName()); } |
The entire code is as follows:
|
1 2 3 4 5 6 7 8 9 10 11 12 13 14 15 16 17 18 19 20 21 22 23 24 25 26 27 |
package com.huongdanjava.hibernate; import org.hibernate.Session; import org.hibernate.query.Query; import java.util.List; public class Application { public static void main(String[] args) { Session session = HibernateUtil.getSessionFactory().openSession(); session.beginTransaction(); Clazz clazz = new Clazz(); clazz.setName("ABC"); session.save(clazz); session.getTransaction().commit(); Query<Clazz> q = session.createQuery("From Clazz "); List<Clazz> resultList = q.list(); for (Clazz next : resultList) { System.out.println("Clazz name: " + next.getName()); } } } |
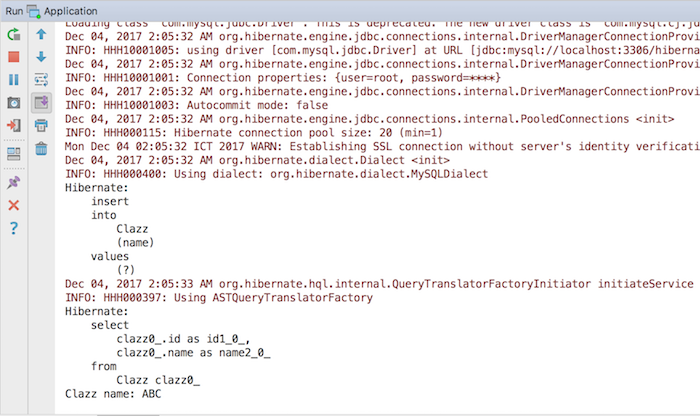
Result:

Okay, here comes your initial visualization of how we’re going to work with Hibernate, right? In the next article, I will explain some basic concepts for you to know better.


