Debezium is an open-source distributed platform used to capture all changes related to the database. Any changes related to inserting, updating, deleting data in the database table, Debezium will capture and you can use this information to do whatever you want. In this tutorial, I will introduce you to the basic information about Debezium so that you can use it in your applications!
The first thing I need to tell you is about how to use Debezium.
How to use Debezium
Currently, we can use Debezium in 3 different ways:
The first way is we will use Debezium with Apache Kafka Connect:

We will install Debezium Source Connector for the database that we want to capture into Apache Kafka Connect. This Connector will be responsible for capturing and publishing data changes in the database into Apache Kafka Topic. If you want to push data changes in this Apache Kafka Topic to other systems, you can use Apache Kafka Connect’s Sink Connectors.
The current databases that Debezium supports are:
- MongoDB
- MySQL
- PostgreSQL
- SQL Server
- Oracle
- Db2
- Cassandra
- Vitess
- Spanner
- JDBC
- Informix
The second way is to use the Debezium Server.

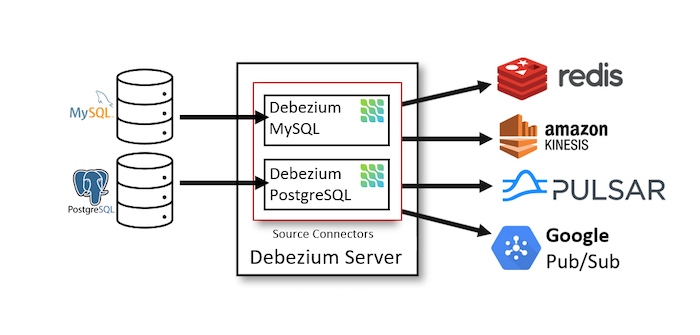
Debezium Server supports Source Connectors by default to connect to databases to capture data changes. After capturing data changes, Debezium will publish this data to message brokers or event brokers using Sink Connectors.
I have listed the databases that Debezium currently supports above. The list of event brokers or message brokers corresponding to the Sink Connectors supported by Debezium is as follows:
- Amazon Kinesis
- Google Cloud Pub/Sub
- Pub/Sub Lite
- HTTP Client
- Apache Pulsar
- Azure Event Hubs
- Redis (Stream)
- NATS Streaming
- NATS JetStream
- Apache Kafka
- Pravega
- Infinispan
- Apache RocketMQ
- RabbitMQ Stream
- RabbitMQ Native Stream
You can also implement a new Sink Connector to publish data changes captured by Debezium to other destinations!
The third way is to use the Debezium Engine.
With this method, we will use Debezium as a library in the application. We do not need to use Apache Kafka or start Debezium Server, but only need to use code in the application to consume the data changes in the database that we want.
Now, I will use the Debezium Server as an example for you to easily visualize!
Capture data changes with Debezium Server
You can download the latest version of Debezium Server here. The latest release version at the time I wrote this tutorial is 3.0.0.Final.
Before setting up to start Debezium, we need to set up the database that we need to capture data changes and the destination where we want to publish this data first!
I will use PostgreSQL database to capture data changes, and Apache Kafka to receive these data changes, for example!
For the PostgreSQL configuration part so that Debezium can capture data changes, please refer to this tutorial! I have listed the detailed steps for configuration and I will use PostgreSQL’s built-in logical decoding output plugin, pgoutput!
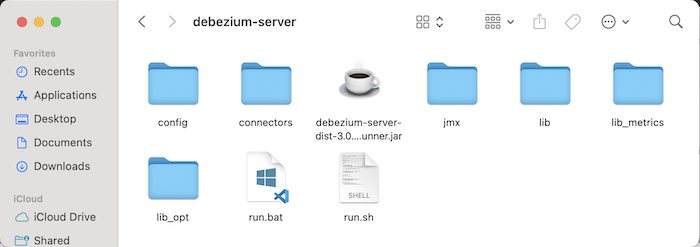
After downloading the Debezium installation file, please unzip it:

In the config folder of Debezium Server, you will see some example .properties files that we can use to configure connectors with Debezium.
To make an example for this tutorial, I will duplicate the application.properties.example file and rename it to application.properties. I will configure a connector to the PostgreSQL database with the Debezium Server using this application.properties file.
There are 2 parts that we need to configure for a connector, which are the Source and the Sink. The concepts of Source and Sink in Debezium are the same as in Apache Kafka Connect! Source is the system that emits data and Sink is the system that receives this data.
In my example, Source is a PostgreSQL database, you can configure the information about Source with a PostgreSQL database like me, as follows:
|
1 2 3 4 5 6 7 8 9 10 11 12 13 14 15 16 |
debezium.source.connector.class=io.debezium.connector.postgresql.PostgresConnector debezium.source.database.hostname=localhost debezium.source.database.port=5432 debezium.source.database.user=postgres debezium.source.database.password=123456 debezium.source.database.dbname=debezium_example debezium.source.topic.prefix=debezium debezium.source.offset.storage.file.filename=data/offsets.dat debezium.source.offset.flush.interval.ms=0 debezium.source.schema.history.internal=io.debezium.storage.file.history.FileSchemaHistory debezium.source.schema.history.internal.file.filename=data/schema-history.dat debezium.source.plugin.name=pgoutput |
In addition to the database connection information to the PostgreSQL database, we also need to declare the Debezium connector class that will handle the PostgreSQL database, which is io.debezium.connector.postgresql.PostgresConnector.
The debezium.source.topic.prefix property is used to define the prefix for all Apache Kafka topics that will receive data changes from this connector. If you define multiple connectors, the value of this property must be unique for each connector. This is a required property, although you may be deploying Debezium with non-Kafka, we must also declare this property! If not declared, when running the Debezium server, there will be an error.
There are 2 important configurations that you can see above: offset and schema history.
- Offset will contain information about the records that Debezium has processed. If there are new data changes, Debezium will not process the old records anymore. For non-Kafka deployment, we can store this offset information using a file or memory or using a database table or a Redis server. By default, Debezium will use the file as I declared the filename information above. If you use a file like I did above, you need to make sure the data directory exists, Debezium will automatically create the necessary files.
- The history schema will store information about the database schema over time. For non-Kafka deployment, you can use a file or memory or a Redis server or a RocketMQ server. By default, this history schema will use Apache Kafka to store it! For non-Kafka deployment, for example, using a file as I configured above, you need to declare the class name that will handle this history schema. For my example, I have declared the io.debezium.storage.file.history.FileSchemaHistory class for the debezium.source.schema.history.internal property.
By default, Debezium will use the file search output by the logical decoding output plugin decoderbufs of PostgreSQL, so you need to configure the debezium.source.plugin.name property with the value of pgoutput for Debezium to use the output file of the pgoutput plugin! I will use the pgoutput plugin so I have declared it as above.
For the debezium_example database, I define a table as follows:
|
1 2 3 4 |
CREATE TABLE student ( id bigint NOT NULL PRIMARY KEY, name VARCHAR (100) ) |
For the Sink part, I will use Apache Kafka. I will declare it as follows:
|
1 2 3 4 |
debezium.sink.type=kafka debezium.sink.kafka.producer.bootstrap.servers=127.0.0.1:9092 debezium.sink.kafka.producer.key.serializer=org.apache.kafka.common.serialization.StringSerializer debezium.sink.kafka.producer.value.serializer=org.apache.kafka.common.serialization.StringSerializer |
The Sink Type will have the value of kafka and in addition to the information about the Kafka server, you also need to configure the properties kafka.producer.key.serializer and kafka.producer.value.serializer of Apache Kafka!
The entire content of my application.properties file is as follows:
|
1 2 3 4 5 6 7 8 9 10 11 12 13 14 15 16 17 18 19 20 21 |
debezium.source.connector.class=io.debezium.connector.postgresql.PostgresConnector debezium.source.database.hostname=localhost debezium.source.database.port=5432 debezium.source.database.user=postgres debezium.source.database.password=123456 debezium.source.database.dbname=debezium_example debezium.source.topic.prefix=debezium_example debezium.source.offset.storage.file.filename=data/offsets.dat debezium.source.offset.flush.interval.ms=0 debezium.source.schema.history.internal=io.debezium.storage.file.history.FileSchemaHistory debezium.source.schema.history.internal.file.filename=data/schema-history.dat debezium.source.plugin.name=pgoutput debezium.sink.type=kafka debezium.sink.kafka.producer.bootstrap.servers=127.0.0.1:9092 debezium.sink.kafka.producer.key.serializer=org.apache.kafka.common.serialization.StringSerializer debezium.sink.kafka.producer.value.serializer=org.apache.kafka.common.serialization.StringSerializer |
Now we can start the Debezium server.
Open Terminal or Console, in the Debezium installation folder, run the following command:
|
1 |
./run.sh |
on Linux, macOS or:
|
1 |
./run.bat |
on Windows.
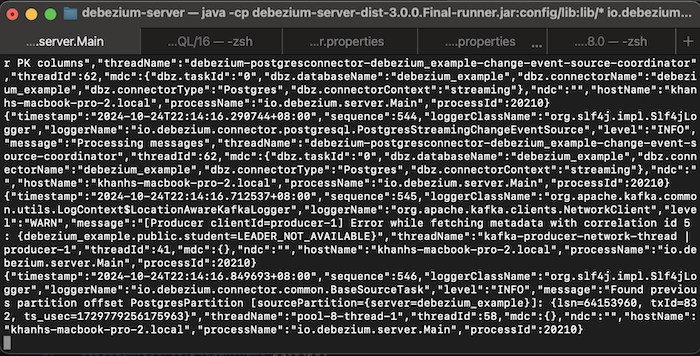
You will see the results like me, as follows:

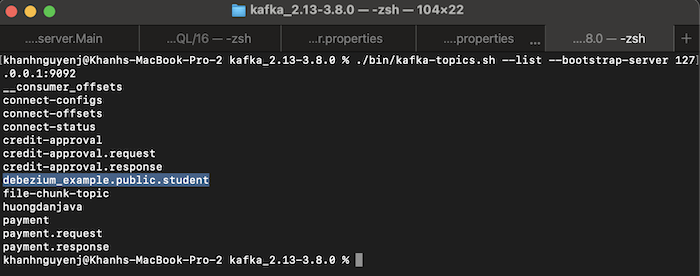
Check the topics in the Apache Kafka server, you will also see a new topic created, my example is as follows:

In our example, the topic in Apache Kafka was created by Debezium using the following naming convention:
- First is the value of the topic.prefix property that we configured in the application.properties file
- Next is the schema name
- And finally, the table name where the data will be captured by Debezium
Now, if you try to add a new record to the PostgreSQL student table, you will see a message published to Debezium Server to the Apache Kafka Topic as follows:
|
1 2 3 4 5 6 7 8 9 10 11 12 13 14 15 16 17 18 19 20 21 22 23 24 25 26 27 28 29 30 31 32 33 34 35 36 37 38 39 40 41 42 43 44 45 46 47 48 49 50 51 52 53 54 55 56 57 58 59 60 61 62 63 64 65 66 67 68 69 70 71 72 73 74 75 76 77 78 79 80 81 82 83 84 85 86 87 88 89 90 91 92 93 94 95 96 97 98 99 100 101 102 103 104 105 |
{ "schema": { "type": "struct", "fields": [ { "type": "struct", "fields": [ { "type": "int64", "optional": false, "field": "id" }, { "type": "string", "optional": true, "field": "name" } ], "optional": true, "name": "debezium_example.public.student.Value", "field": "before" }, { "type": "struct", "fields": [ { "type": "int64", "optional": false, "field": "id" }, { "type": "string", "optional": true, "field": "name" } ], "optional": true, "name": "debezium_example.public.student.Value", "field": "after" }, { "type": "struct", "fields": [ { "type": "string", "optional": false, "field": "version" }, { "type": "string", "optional": false, "field": "connector" }, { "type": "string", "optional": false, "field": "name" }, { "type": "int64", "optional": false, "field": "ts_ms" }, { "type": "string", "optional": true, "name": "io.debezium.data.Enum", "version": 1, "parameters": { "allowed": "true,last,false,incremental" }, "default": "false", "field": "snapshot" }, { "type": "string", "optional": false, "field": "db" }, { "type": "string", "optional": true, "field": "sequence" }, { "type": "int64", "optional": true, "field": "ts_us" }, { "type": "int64", "optional": true, "field": "ts_ns" }, { "type": "string", "optional": false, "field": "schema" }, { "type": "string", "optional": false, "field": "table" }, { "type": "int64", "optional": true, "field": "txId" }, { "type": "int64", "optional": true, "field": "lsn" }, { "type": "int64", "optional": true, "field": "xmin" } ], "optional": false, "name": "io.debezium.connector.postgresql.Source", "field": "source" }, { "type": "struct", "fields": [ { "type": "string", "optional": false, "field": "id" }, { "type": "int64", "optional": false, "field": "total_order" }, { "type": "int64", "optional": false, "field": "data_collection_order" } ], "optional": true, "name": "event.block", "version": 1, "field": "transaction" }, { "type": "string", "optional": false, "field": "op" }, { "type": "int64", "optional": true, "field": "ts_ms" }, { "type": "int64", "optional": true, "field": "ts_us" }, { "type": "int64", "optional": true, "field": "ts_ns" } ], "optional": false, "name": "debezium_example.public.student.Envelope", "version": 2 }, "payload": { "before": null, "after": { "id": 2, "name": "Khanh" }, "source": { "version": "3.0.0.Final", "connector": "postgresql", "name": "debezium_example", "ts_ms": 1729780744026, "snapshot": "false", "db": "debezium_example", "sequence": "[null,\"64154288\"]", "ts_us": 1729780744026695, "ts_ns": 1729780744026695000, "schema": "public", "table": "student", "txId": 833, "lsn": 64154288, "xmin": null }, "transaction": null, "op": "c", "ts_ms": 1729780744093, "ts_us": 1729780744093672, "ts_ns": 1729780744093672000 } } |
The above message is divided into 2 parts: schema and payload. The schema part defines the schema for the payload part. As you can see, in the payload part of the above message, because we add a new record, the value of the op attribute, which stands for operation, will be c, which stands for create. The before attribute will be null, and the after attribute is the information of the record that we just added.
In addition, there is a lot of other information about the database, schema, and table that you can see above.
When we update, you will see a new message with similar content as follows:
|
1 2 3 4 5 6 7 8 9 10 11 12 13 14 15 16 17 18 19 20 21 22 23 24 25 26 27 28 29 30 |
{ "schema": { ... }, "payload": { "before": null, "after": { "id": 3, "name": "Khanh Nguyen" }, "source": { "version": "3.0.0.Final", "connector": "postgresql", "name": "debezium_example", "ts_ms": 1730156708096, "snapshot": "false", "db": "debezium_example", "sequence": "[\"64157160\",\"64157448\"]", "ts_us": 1730156708096090, "ts_ns": 1730156708096090000, "schema": "public", "table": "student", "txId": 837, "lsn": 64157448, "xmin": null }, "transaction": null, "op": "u", "ts_ms": 1730156708181, "ts_us": 1730156708181839, "ts_ns": 1730156708181839000 } } |
With this message, the op attribute will have the value u, which stands for update.
You may notice that the before attribute, which is intended to store the previous value of the record we just updated, is also null. The reason is that the REPLICA IDENTITY configuration (a configuration related to how much information will be available in case a record is UPDATED or DELETE in the database) at the table level of the PostgreSQL database, by default will only save the previous value for the primary key columns. If the primary key columns have a change in value, the previous value of this column will be assigned to the before attribute. You can see more here to understand more about the REPLICA IDENTITY configuration of the PostgreSQL database!
You can change this default configuration to record all previous values of all columns by running the following SQL statement for the table where we want to capture data changes:
|
1 |
ALTER TABLE <table_name> REPLICA IDENTITY FULL; |
My example is as follows:
|
1 |
ALTER TABLE public.student REPLICA IDENTITY FULL; |
Now if I change the value of a record in the student table, I will see a message like this:
|
1 2 3 4 5 6 7 8 9 10 11 12 13 14 15 16 17 18 19 20 21 22 23 24 25 26 27 28 29 30 |
{ "schema": { ... }, "payload": { "before": { "id": 3, "name": "Khanh Nguyen" }, "after": { "id": 3, "name": "Khanh Nguyen Huu" }, "source": { "version": "3.0.0.Final", "connector": "postgresql", "name": "debezium_example", "ts_ms": 1730159058629, "snapshot": "false", "db": "debezium_example", "sequence": "[\"64158040\",\"64169032\"]", "ts_us": 1730159058629592, "ts_ns": 1730159058629592000, "schema": "public", "table": "student", "txId": 839, "lsn": 64169032, "xmin": null }, "transaction": null, "op": "u", "ts_ms": 1730159059030, "ts_us": 1730159059030450, "ts_ns": 1730159059030450000 } } |
As you can see, the previous value of the record is also assigned to the before attribute.
So we have successfully implemented data change capture for the PostgreSQL database!


