Apache Kafka Connect is an Apache Kafka tool for data integration, which helps us stream data between different data systems with Apache Kafka. It can help you ingest all data from a database or collect metrics information of your application into an Apache Kafka topic, making this data available for streaming to other data systems with low latency. In this tutorial, I will introduce you to the basic knowledge of Apache Kafka Connect so that you can use it in your applications!
Install Apache Kafka Connect
The first thing I need to tell you is that Apache Kafka Connect is already integrated and built with Apache Kafka, so once you have downloaded and installed Apache Kafka, you do not need to download Apache Kafka Connect again.
Similar to Apache Kafka, Apache Kafka Connect also has a configuration file called connect-distributed.properties, located in the config directory of Apache Kafka. If you want to edit any configuration, you can edit this file!
We can start Apache Connect using the following command:
|
1 |
./bin/connect-distributed.sh ./config/connect-distributed.properties |
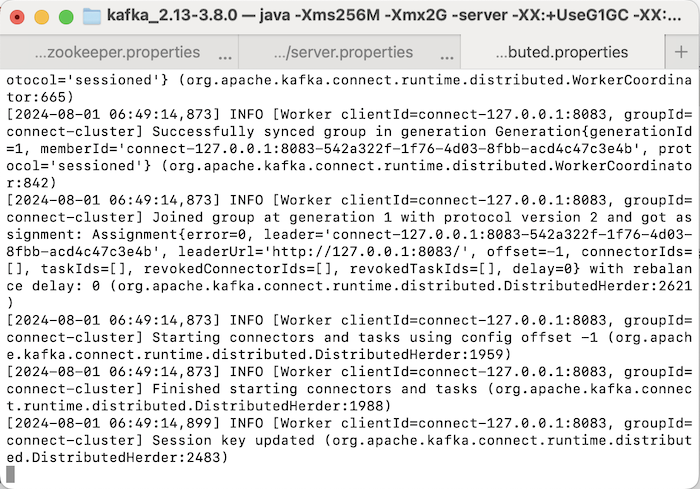
The result when I run the above command is as follows:
Apache Kafka Connect will run on port 8083 by default and the result when I check the version of Apache Kafka Connect using the URL http://localhost:8083 is as follows:
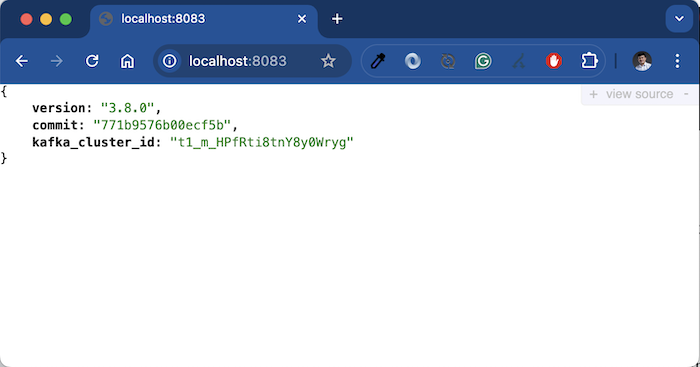
So we have successfully started Apache Kafka Connect!
Basic Concepts of Apache Kafka Connect
To work with Apache Kafka Connect, you need to grasp the following basic concepts:
- Connectors: The main object that connects and streams data between data systems and Apache Kafka. We have 2 types of Connectors: Source Connector and Sink Connector. The Source Connector is the data system that emits data and the Sink Connector is the data system that receives this data!
You can visualize how Apache Kafka Connect works in the following figure:

- Tasks: Used by Connectors to stream data to and from Apache Kafka.
- Workers: Running processes used by Connectors to execute Tasks.
- Converters: Code used to translate data between Apache Kafka Connect and data systems
- Transforms: You can add logic code to filter, transform data before data is sent to Connectors or before Connectors send data.
- Dead Letter Queue: Used in case of data processing errors.
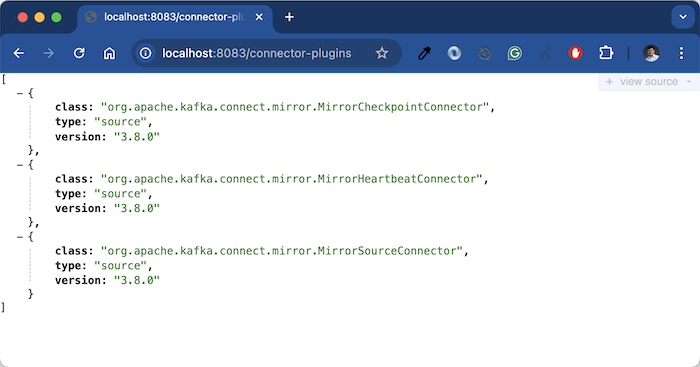
Connectors will be installed into Apache Kafka Connect using Connector plugins. By default, Apache Kafka Connect supports the following Connector plugins:
You can download and install other Connector plugins here https://www.confluent.io/hub/.
Install the Apache Kafka Connect Connector plugin
I will guide you on how to install the File Chunk Source Connector, a connector that helps us split any file into chunks, and then copy these chunks into an Apache Kafka topic. You can download this plugin from https://www.confluent.io/hub/ as follows:
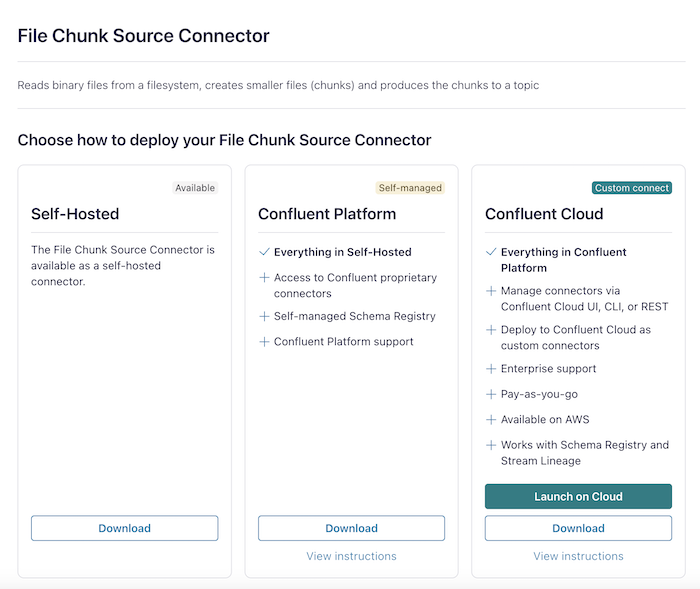
To install on your local machine, you can download the installation file in the “Self-Hosted” section!
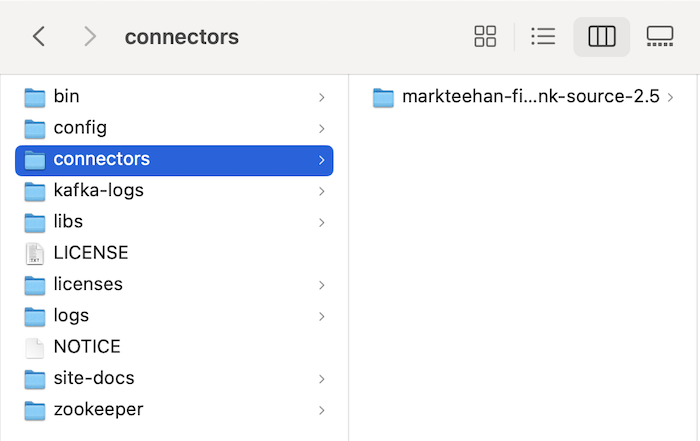
After downloading and unzipping the installation file of the File Chunk Source Connector plugin, create a new connectors folder in the Apache Kafka installation folder and copy the unzipped folder of the File Chunk Source Connector plugin into:
Next, you need to configure this connectors directory as the plugins directory of Apache Kafka Connect, by updating the plugin.path property in your connect-distributed.properties file, as follows:
|
1 |
plugin.path=/Users/khanhnguyenj/Downloads/kafka_2.13-3.8.0/connectors |
You can add paths to multiple directories if you want!
Now restart Apache Kafka Connect and go to http://localhost:8083/connector-plugins, you will see the following result:
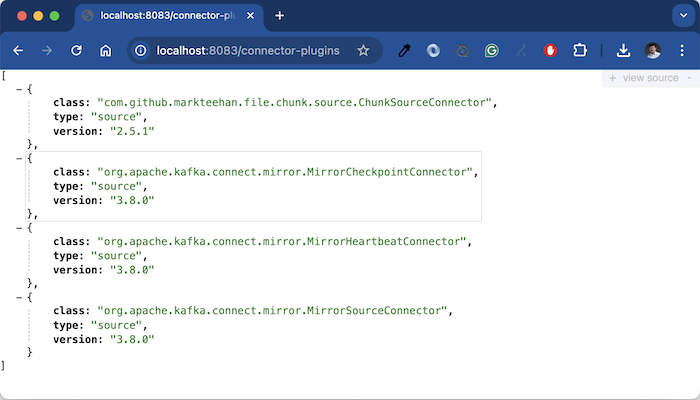
So we have successfully installed the File Chunk Source Connector plugin!
To see how Apache Kafka Connect works, I will also install the File Chunk Sink Connector:
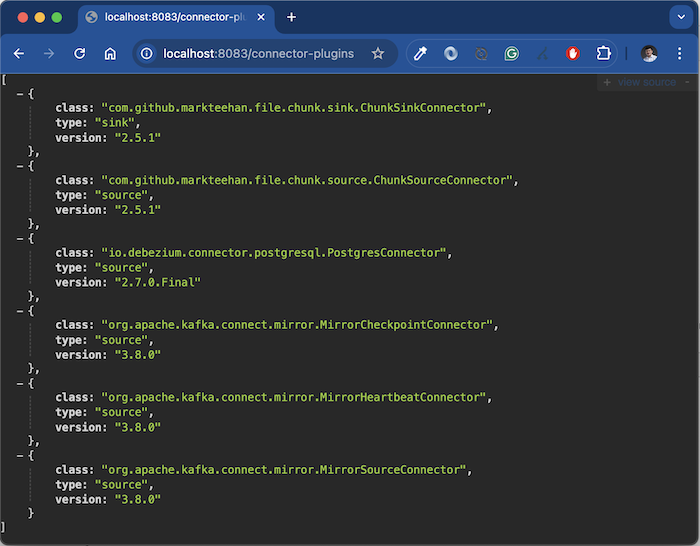
This File Chunk Sink Connector will subscribe to the topic containing the contents of the files in chunks form published by the File Chunk Source Connector above, then recreate the original file in another directory.
Next, I will create a new topic in Apache Kafka to receive the data published by the File Chunk Source Connector and also let the File Chunk Sink Connector subscribe to receive the data:
|
1 |
./bin/kafka-topics.sh --create --topic file-chunk-topic --partitions 1 --bootstrap-server localhost:9092 |
Above, we have only installed the Connector plugins, so that the File Chunk Source Connector and File Chunk Sink Connector can work, we need to install them into Apache Kafka Connect.
We will submit a POST request to http://localhost:8083/connectors to install a Connector with Apache Kafka Connect.
The body content of this POST request will be the configuration for that Connector.
For the File Chunk Source Connector, you can submit a POST request with the following configuration content:
|
1 2 3 4 5 6 7 8 9 10 11 12 13 14 15 16 |
{ "name": "uploader", "config": { "topic": "file-chunk-topic", "connector.class": "com.github.markteehan.file.chunk.source.ChunkSourceConnector", "files.dir": "/tmp/upload", "input.file.pattern": ".*", "tasks.max": "1", "file.minimum.age.ms": "2000", "binary.chunk.size.bytes": "300000", "cleanup.policy.maintain.relative.path": "true", "input.path.walk.recursively": "true", "finished.file.retention.mins": "10", "topic.partitions": "1" } } |
I will not go into detail about the above configurations, just to put it simply, I have configured this File Chunk Source Connector to read the contents of all files in the /tmp/upload directory, split the contents of these files into small chunks and publish them in the “file-chunk-topic” topic!
If you want to know more details about the above configurations, you can read more here!
For the File Chunk Sink Connector, you can also submit a POST request with the following content:
|
1 2 3 4 5 6 7 8 9 10 11 12 13 14 15 16 17 |
{ "name": "downloader", "config": { "topics": "file-chunk-topic", "connector.class": "com.github.markteehan.file.chunk.sink.ChunkSinkConnector", "tasks.max": "1", "files.dir": "/tmp/download", "binary.chunk.size.bytes": "300000", "auto.register.schemas": "false", "schema.ignore": "true", "schema.generation.enabled": "false", "key.converter.schemas.enable": "false", "value.converter.schemas.enable": "false", "schema.compatibility": "NONE", "topic.partitions": "1" } } |
The File Chunk Sink Connector will subscribe to the topic “file-chunk-topic” to receive the contents of all files, then produce the original file and put it in a folder named merged in the /tmp/download folder.
Make sure the /tmp/upload and /tmp/download folders exist before you install the Connectors on your devices! If you have not created them before, restart Apache Kafka Connect after installing these Connectors!
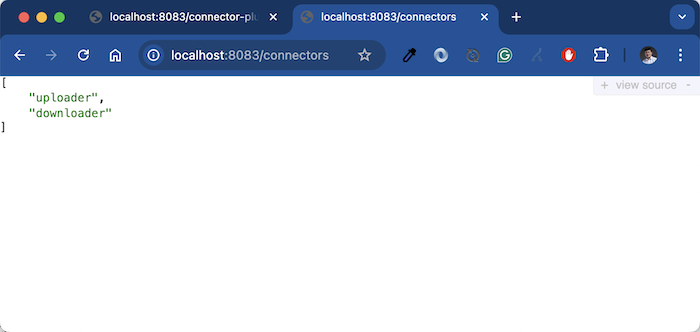
Check all the Connectors installed in Apache Kafka Connect at this time, you will see the same result as me, as follows:
Now copy a file into the /tmp/upload folder and check the /tmp/download/merged folder, you will see the result like me, as follows:

So we have successfully copied the files with File Chunk Source Connector and File Chunk Sink Connector!