I have introduced to you database migration using Liquibase. Flyway does the same thing but in a much simpler way. It does not need to use a lock table during migration. How is the specification? Let’s find out together in this tutorial!
First, I will create a new Maven project as an example:
with Flyway and PostgreSQL JDBC driver dependencies as follows:
|
1 2 3 4 5 6 7 8 9 10 11 12 13 14 15 16 |
<dependency> <groupId>org.flywaydb</groupId> <artifactId>flyway-core</artifactId> <version>10.19.0</version> </dependency> <dependency> <groupId>org.flywaydb</groupId> <artifactId>flyway-database-postgresql</artifactId> <version>10.19.0</version> <scope>runtime</scope> </dependency> <dependency> <groupId>org.postgresql</groupId> <artifactId>postgresql</artifactId> <version>42.7.4</version> </dependency> |
I also use Java 21 for this example:
|
1 2 |
<maven.compiler.source>21</maven.compiler.source> <maven.compiler.target>21</maven.compiler.target> |
With Flyway, we can use SQL files or Java code to perform database migrations, usually, I use SQL files because it’s much simpler. In this tutorial, I will use an SQL file as an example, if you want to use Java code, you can read more here.
With SQL files, Flyway, after having a connection to the database, will read these SQL files in a directory that we configure, the default is the src/main/resources/db/migration directory to do the migration.
The names of the SQL files need to follow a certain naming convention.
Flyway allows us to migrate with a new version of the database structure with a new SQL file or we can use only one SQL file with repeatable migration or undo a certain version. Note that undo migration is only available for the Flyway Teams edition version! You can also declare a new file and write SQL script to remove the information you want to remove, without using undo migration.
Here is an example of the name of the SQL file:
- V2021.07.31,00000__Init if adding a new version
- R__People_view.sql if repeatable migration
- U2__Add_people.sql if undo version.
The file name will start with the letter V or R or U depending on how you want to do the migration like in the example above. Next will be the version, the naming convention for the version, you can refer here. I usually use the version according to the date of the year like the example above.
The separator between the two parts of the SQL file name is 2 underscore characters “__”, the part after these 2 underscores is a description of the changes you make in this SQL file.
As an example for this tutorial, I will create a new SQL file with the name V2021.08.07.000__Init with the content of creating a new student table as follows:
|
1 2 3 4 |
CREATE TABLE student ( ID INT PRIMARY KEY, name VARCHAR(250) NOT NULL ); |
Now, I will create a new main class to see how Flyway works.
The content of this class is initially as follows:
|
1 2 3 4 5 6 7 8 9 |
package com.huongdanjava.flyway; public class Application { public static void main(String[] args) { } } |
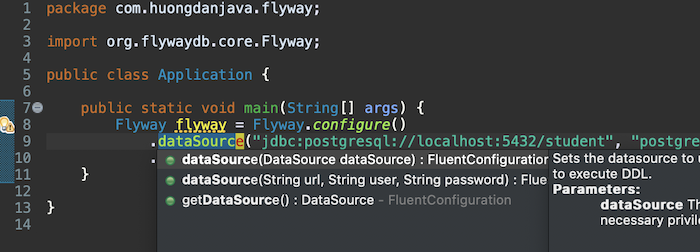
We will use the object of the Flyway class, and initialize it with the Datasource information connected to the database to prepare for the migration, as follows:
|
1 2 3 |
Flyway flyway = Flyway.configure() .dataSource("jdbc:postgresql://localhost:5432/student", "postgres", "123456") .load(); |
If you already have Datasource information, you can also use another overloaded method to use this Datasource:
no need to declare databaseURL, username, and password like me.
To run the migration, we will call the migrate() method of the Flyway object as follows:
|
1 |
flyway.migrate(); |
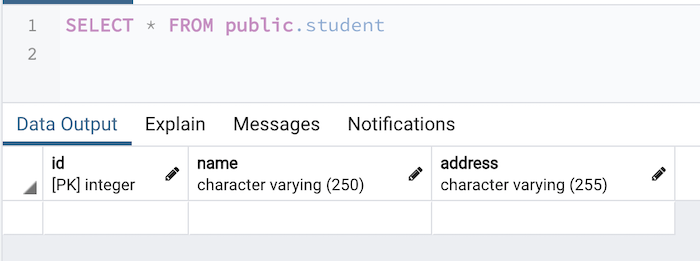
Now, if you run this example, and then check the database, you will see the following results:

In addition to the student table that we have declared in the SQL file, Flyway also creates another table similar to Liquibase to manage all the versions we have run. This table is called flyway_schema_history, used to keep track of history:
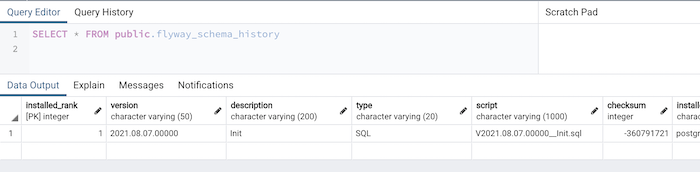
As you can see, Flyway extracts version information from the name of the SQL file. It also uses a column to store the SQL file’s checksum to check which SQL files have run and which have not. You must not change the content of the files that Flyway has run the migration, if there are any changes, Flyway will immediately report an error.
If you want to add a new version, just create a new SQL file according to the naming convention that I mentioned above!
For example, if I add a new address column for the student table, I will create a new SQL file with the name V2021.08.0700001__add_student_address and the following content:
|
1 2 |
ALTER TABLE student ADD COLUMN address VARCHAR(255); |
Result: