Routing is a way for us to move between pages in a web application. In this tutorial, I will guide you all how we routing in Angular.
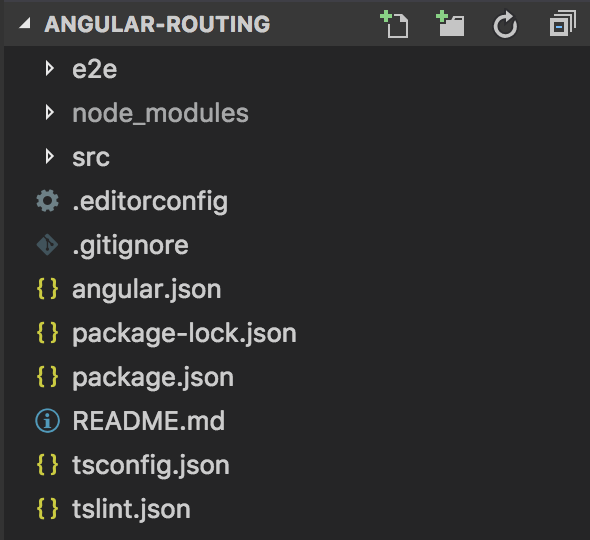
First, I will create an Angular project as an example:
Run the application, you will see the results as follows:

Now, I will split the content of the app.component.html file into two pages: a home.component.html page that has the content resemble with the current app.component.html page and the other page huongdanjava.component.html which has the contents resemble the above section including “Welcome to app!” and the Angular logo, the bottom is the words “Here is the link to Huong Dan Java” and link to my Huong Dan Java website. Details of the contents of the file will change now as follows:
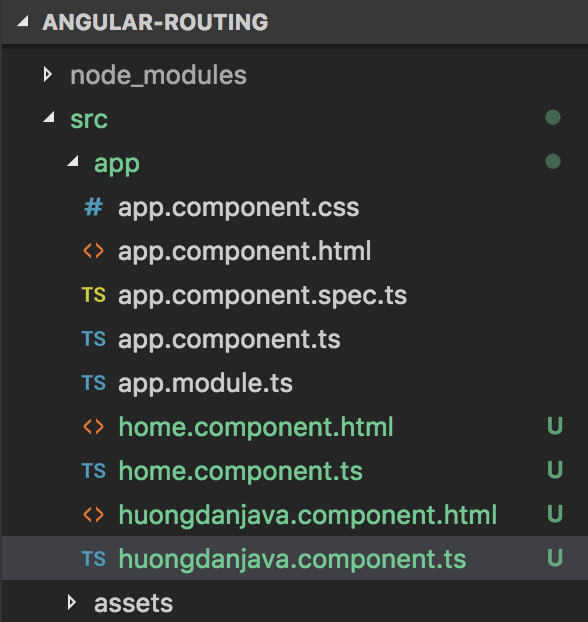
home.component.html:
|
1 2 3 4 5 6 7 8 9 10 11 12 |
<h2>Here are some links to help you start: </h2> <ul> <li> <h2><a target="_blank" rel="noopener" href="https://angular.io/tutorial">Tour of Heroes</a></h2> </li> <li> <h2><a target="_blank" rel="noopener" href="https://github.com/angular/angular-cli/wiki">CLI Documentation</a></h2> </li> <li> <h2><a target="_blank" rel="noopener" href="https://blog.angular.io/">Angular blog</a></h2> </li> </ul> |
home.component.ts:
|
1 2 3 4 5 6 7 8 |
import { Component } from "@angular/core"; @Component({ selector: 'app-body', templateUrl: './home.component.html' }) export class HomeComponent { } |
huongdanjava.component.html:
|
1 2 3 4 5 6 |
<h2>Here are the link to Huong Dan Java: </h2> <ul> <li> <h2><a target="_blank" rel="noopener" href="https://huongdanjava.com/">Huong Dan Java</a></h2> </li> </ul> |
huongdanjava.component.ts:
|
1 2 3 4 5 6 7 8 |
import { Component } from "@angular/core"; @Component({ selector: 'app-body', templateUrl: './huongdanjava.component.html' }) export class HuongDanJavaComponent { } |
At this point the contents of the app.component.html file will look like this:
|
1 2 3 4 5 6 7 8 |
<!--The content below is only a placeholder and can be replaced.--> <div style="text-align:center"> <h1> Welcome to {{ title }}! </h1> <img width="300" alt="Angular Logo" src="data:image/svg+xml;base64,PHN2ZyB4bWxucz0iaHR0cDovL3d3dy53My5vcmcvMjAwMC9zdmciIHZpZXdCb3g9IjAgMCAyNTAgMjUwIj4KICAgIDxwYXRoIGZpbGw9IiNERDAwMzEiIGQ9Ik0xMjUgMzBMMzEuOSA2My4ybDE0LjIgMTIzLjFMMTI1IDIzMGw3OC45LTQzLjcgMTQuMi0xMjMuMXoiIC8+CiAgICA8cGF0aCBmaWxsPSIjQzMwMDJGIiBkPSJNMTI1IDMwdjIyLjItLjFWMjMwbDc4LjktNDMuNyAxNC4yLTEyMy4xTDEyNSAzMHoiIC8+CiAgICA8cGF0aCAgZmlsbD0iI0ZGRkZGRiIgZD0iTTEyNSA1Mi4xTDY2LjggMTgyLjZoMjEuN2wxMS43LTI5LjJoNDkuNGwxMS43IDI5LjJIMTgzTDEyNSA1Mi4xem0xNyA4My4zaC0zNGwxNy00MC45IDE3IDQwLjl6IiAvPgogIDwvc3ZnPg=="> </div> <app-body></app-body> |
The content of the AppComponent class needs to be revised as follows:
|
1 2 3 4 5 6 7 8 9 10 11 12 13 14 15 16 17 18 19 20 |
import { BrowserModule } from '@angular/platform-browser'; import { NgModule } from '@angular/core'; import { AppComponent } from './app.component'; import { HomeComponent } from './home.component'; import { HuongDanJavaComponent } from './huongdanjava.component'; @NgModule({ declarations: [ AppComponent, HomeComponent, HuongDanJavaComponent ], imports: [ BrowserModule ], providers: [], bootstrap: [ AppComponent ] }) export class AppModule { } |
At this point, if you run the application again, you will not see anything. But if you right click, select Inspect in Google Chrome and move to the Console tab you will see the following error:
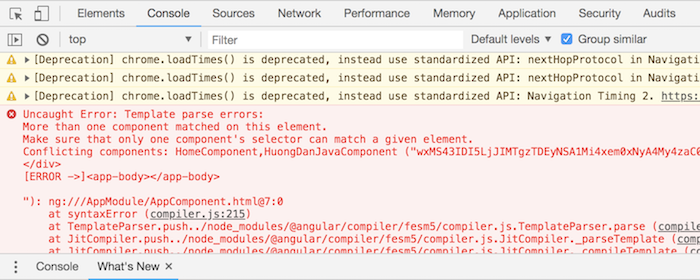
This is because we are currently defining two components with the same selector value. No problem, you can ignore this error now. Now, we will apply routing to our Angular application!
In an Angular application, the RouterModule module assumes the role of the routing object.
To use this module, we need to import it into our application, defining the routing: what URL corresponds to which component, and finally export it for our application to use.
Details, I will create a file called app-routing.module.ts in the src/app directory:
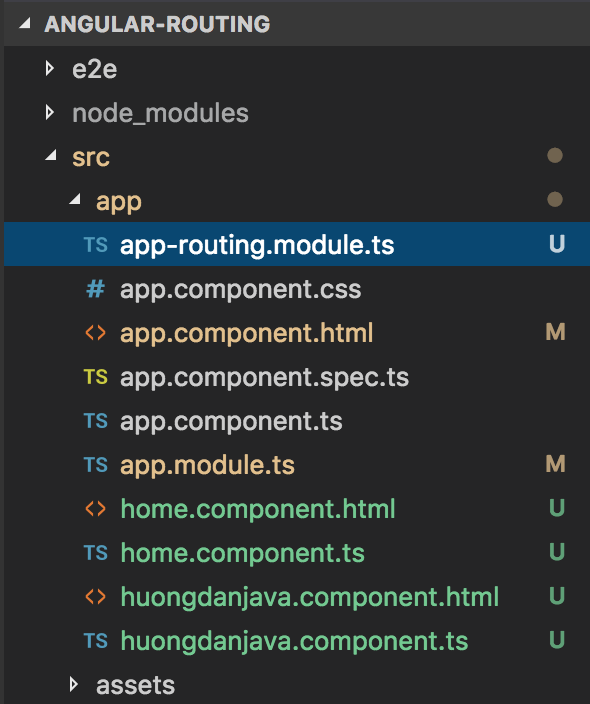
then define a new module using Angular’s RouterModule:
|
1 2 3 4 5 6 7 8 9 10 11 12 13 14 15 16 17 18 19 |
import { NgModule } from '@angular/core'; import { RouterModule, Routes } from '@angular/router'; import { HomeComponent } from './home.component'; import { HuongDanJavaComponent } from './huongdanjava.component'; const routes: Routes = [ { path: 'home', component: HomeComponent }, { path: 'huongdanjava', component: HuongDanJavaComponent }, ] @NgModule({ imports: [ RouterModule.forRoot(routes) ], exports: [ RouterModule ] }) export class AppRoutingModule { } |
As you can see from the above, I used the Routes class to define information about the URLs that correspond to the components in our application. The “home” path will correspond to HomeComponent and the “huongdanjava” path will correspond to the HuongDanJavaComponent that it has defined.
After defining the URL information with the component, we need to pass this information to the RouterModule with the static method forRoot(). Then export the RouterModule to our application.
After we have defined the AppRoutingModule module, we need to import it into the AppModule:
|
1 2 3 4 5 6 7 8 9 10 11 12 13 14 15 16 17 18 19 20 21 22 |
import { BrowserModule } from '@angular/platform-browser'; import { NgModule } from '@angular/core'; import { AppComponent } from './app.component'; import { HomeComponent } from './home.component'; import { HuongDanJavaComponent } from './huongdanjava.component'; import { AppRoutingModule } from './app-routing.module'; @NgModule({ declarations: [ AppComponent, HomeComponent, HuongDanJavaComponent ], imports: [ BrowserModule, AppRoutingModule ], providers: [], bootstrap: [ AppComponent ] }) export class AppModule { } |
then replace the <app-body> tag in the app.component.html file with the <router-outlet> tag of Angular so that the RouterModule can know what component content should be used when we go to different URL pages.
The contents of the app.component.html file will now look like this:
|
1 2 3 4 5 6 7 8 |
<!--The content below is only a placeholder and can be replaced.--> <div style="text-align:center"> <h1> Welcome to {{ title }}! </h1> <img width="300" alt="Angular Logo" src="data:image/svg+xml;base64,PHN2ZyB4bWxucz0iaHR0cDovL3d3dy53My5vcmcvMjAwMC9zdmciIHZpZXdCb3g9IjAgMCAyNTAgMjUwIj4KICAgIDxwYXRoIGZpbGw9IiNERDAwMzEiIGQ9Ik0xMjUgMzBMMzEuOSA2My4ybDE0LjIgMTIzLjFMMTI1IDIzMGw3OC45LTQzLjcgMTQuMi0xMjMuMXoiIC8+CiAgICA8cGF0aCBmaWxsPSIjQzMwMDJGIiBkPSJNMTI1IDMwdjIyLjItLjFWMjMwbDc4LjktNDMuNyAxNC4yLTEyMy4xTDEyNSAzMHoiIC8+CiAgICA8cGF0aCAgZmlsbD0iI0ZGRkZGRiIgZD0iTTEyNSA1Mi4xTDY2LjggMTgyLjZoMjEuN2wxMS43LTI5LjJoNDkuNGwxMS43IDI5LjJIMTgzTDEyNSA1Mi4xem0xNyA4My4zaC0zNGwxNy00MC45IDE3IDQwLjl6IiAvPgogIDwvc3ZnPg=="> </div> <router-outlet></router-outlet> |
Now if you run the application and access to http://localhost: 4200/ then you will see the following result:
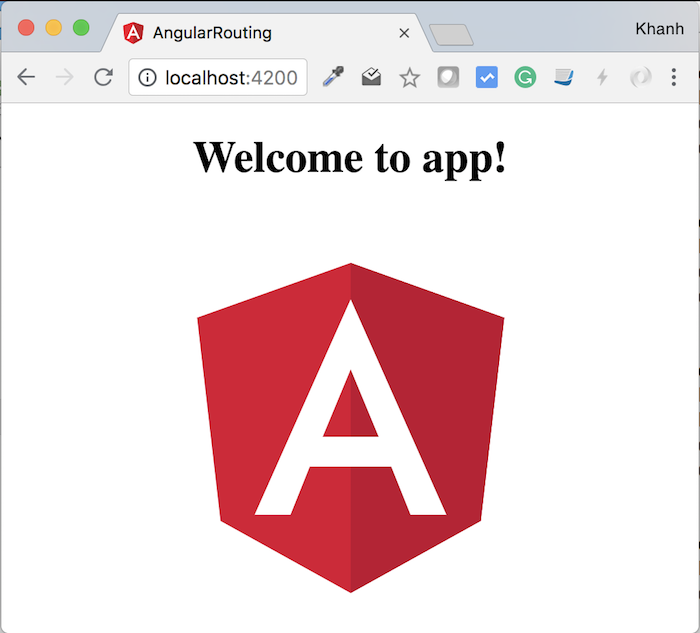
As you can see, the content in the bottom is no longer displayed. Only if you request to http://localhost:4200/home or http://localhost:4200/huongdanjava then you can see. Eg:
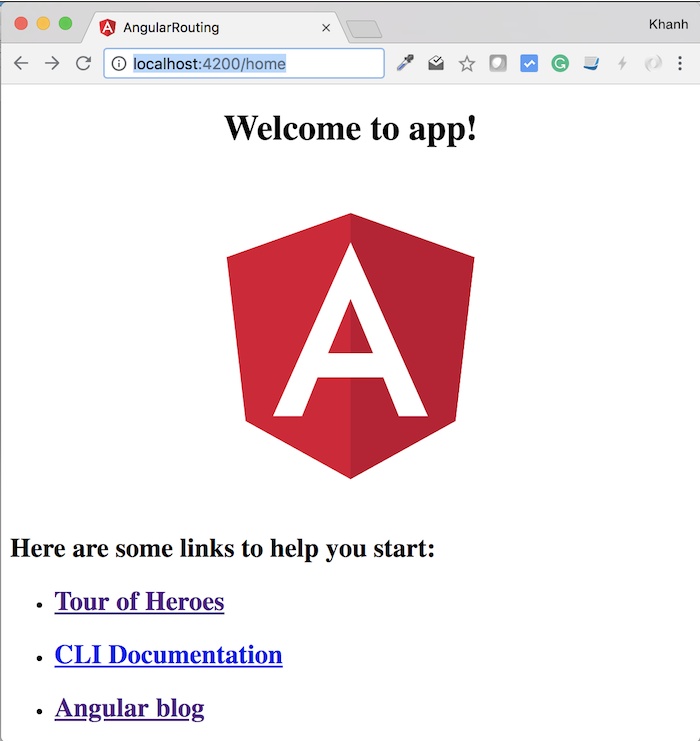
Or:

This is because we currently only define the URL in the Angular’s RouterModule for the two components: HomeComponent and HuongDanJavaComponent.
If you want to define the URL http://localhost:4200/ using HomeComponent then you can define the following in the Routes class:
|
1 2 3 4 5 6 7 8 9 10 11 12 13 14 15 16 17 18 19 20 |
import { NgModule } from '@angular/core'; import { RouterModule, Routes } from '@angular/router'; import { HomeComponent } from './home.component'; import { HuongDanJavaComponent } from './huongdanjava.component'; const routes: Routes = [ { path: '', component: HomeComponent }, { path: 'home', component: HomeComponent }, { path: 'huongdanjava', component: HuongDanJavaComponent }, ] @NgModule({ imports: [ RouterModule.forRoot(routes) ], exports: [ RouterModule ] }) export class AppRoutingModule { } |
then, if you request the URL http://localhost:4200/, you will see the contents of HomeComponent.
In case if you want the user to request a URL that does not exist in your Angular application, the default content of the HomeComponent will be returned. Then you can configure the class Routes as follows:
|
1 2 3 4 5 6 7 8 9 10 11 12 13 14 15 16 17 18 19 20 21 |
import { NgModule } from '@angular/core'; import { RouterModule, Routes } from '@angular/router'; import { HomeComponent } from './home.component'; import { HuongDanJavaComponent } from './huongdanjava.component'; const routes: Routes = [ { path: '', component: HomeComponent }, { path: 'home', component: HomeComponent }, { path: 'huongdanjava', component: HuongDanJavaComponent }, { path: '**', pathMatch: 'full', redirectTo: '/' } ] @NgModule({ imports: [ RouterModule.forRoot(routes) ], exports: [ RouterModule ] }) export class AppRoutingModule { } |
The last thing I want to say to you in this tutorial is: to use the URLs that we have defined in the Routes class, you need to use the Angular routerLink directive in the HTML <a> tag.
For example, now I want to add 2 links to navigate between the “home” and “huongdanjava” pages in app.component.html, I will add the following:
|
1 2 3 4 5 6 7 8 9 10 |
<!--The content below is only a placeholder and can be replaced.--> <div style="text-align:center"> <h1> Welcome to {{ title }}! </h1> <img width="300" alt="Angular Logo" src="data:image/svg+xml;base64,PHN2ZyB4bWxucz0iaHR0cDovL3d3dy53My5vcmcvMjAwMC9zdmciIHZpZXdCb3g9IjAgMCAyNTAgMjUwIj4KICAgIDxwYXRoIGZpbGw9IiNERDAwMzEiIGQ9Ik0xMjUgMzBMMzEuOSA2My4ybDE0LjIgMTIzLjFMMTI1IDIzMGw3OC45LTQzLjcgMTQuMi0xMjMuMXoiIC8+CiAgICA8cGF0aCBmaWxsPSIjQzMwMDJGIiBkPSJNMTI1IDMwdjIyLjItLjFWMjMwbDc4LjktNDMuNyAxNC4yLTEyMy4xTDEyNSAzMHoiIC8+CiAgICA8cGF0aCAgZmlsbD0iI0ZGRkZGRiIgZD0iTTEyNSA1Mi4xTDY2LjggMTgyLjZoMjEuN2wxMS43LTI5LjJoNDkuNGwxMS43IDI5LjJIMTgzTDEyNSA1Mi4xem0xNyA4My4zaC0zNGwxNy00MC45IDE3IDQwLjl6IiAvPgogIDwvc3ZnPg=="> </div> <a routerLink="/home">Home</a><p></p> <a routerLink="/huongdanjava">Huong Dan Java</a> <router-outlet></router-outlet> |
Then you will see two links appear when we visit http://localhost:4200:

Clicking on the URLs on the corresponding content of the pages will be returned.


