I’ve introduced you to the Model Context Protocol (MCP), which allows LLM models to access data after the cut-off point or personal data using a common standard. There are many pre-built MCP servers available. If you want to build your own MCP server using Java, you can use Spring AI MCP Server Starter. How exactly do you do this? Let’s find out together in this tutorial!
First, I’ll create a new Spring Boot project with the Model Context Protocol Server dependency as follows:
Spring AI MCP Server supports three transport mechanisms, including:
- Standard Input/Output (STDIO): Simply put, this transport means the server communicates with the client using standard input (STDIN) and standard output (STDOUT) instead of sockets (TCP/UDP), HTTP, or other network protocols. This STDIO transport is suitable for applications using the command line or desktop applications.
- Spring MVC (Server-Sent Events)
- Spring WebFlux (Reactive SSE)
By default, it supports STDIO transport with the spring-ai-starter-mcp-server dependency, but if you want to use HTTP transport with Server-Sent Events, you can use the spring-ai-starter-mcp-server-webmvc dependency, or HTTP transport with Reactive Server-Sent Events, you can also use the spring-ai-starter-mcp-server-webflux dependency. For example, in this tutorial, I’ll be using the STDIO transport, so I’ll disable the web application type for my Spring Boot, using the spring.main.web-application-type property as follows:
|
1 |
spring.main.web-application-type=none |
We’ll also need to disable the Spring Boot banner and console log because this information will be sent to the client if we leave it printed, using the following properties:
|
1 2 |
spring.main.banner-mode=off logging.pattern.console= |
There are two types of MCP servers we can build using Spring AI MCP Server: Synchronous Server and Asynchronous Server. A Synchronous server handles requests/responses synchronously, while an asynchronous server handles them non-blocking, asynchronously. You declare the type of MCP server you want to build using the property spring.ai.mcp.server.type with the value sync or async. For my example, I will implement a Synchronous server, so I will declare it as follows:
|
1 |
spring.ai.mcp.server.type=sync |
Now I will build tools for my MCP server example.
To build tools using Spring AI MCP Server, you can declare a bean of a class with methods annotated with the @Tool annotation. For example:
|
1 2 3 4 5 6 7 8 9 10 11 12 13 14 15 16 17 18 19 20 21 22 23 24 25 26 27 28 29 30 |
package com.huongdanjava.springboot.springai; import java.util.HashMap; import java.util.Map; import org.springframework.ai.tool.annotation.Tool; import org.springframework.stereotype.Service; @Service public class HuongDanJava { private Map<String, Integer> users = new HashMap<>(); @Tool(name = "addUser", description = "Add a user with an age to the list. Need to specify user name and age of user") public String addUser(String name, int age) { users.put(name, age); return "Welcome, " + name; } @Tool(name = "getAge", description = "Base on the name in the input, return age of user") public String getAge(String name) { try { int age = users.get(name); return String.format("%s is %s years old", name, age); } catch (Exception e) { return "No user found!"; } } } |
For this example, I’m exposing two tools: “addUser” and “getAge”!
For each tool, there’s a corresponding method:
- With the @Tool annotation, you need to declare two attributes: name and description. The name attribute is used to register with the MCP Host, while the description helps the LLM models understand the tool’s purpose and select the correct tool based on the user’s prompt.
- The method parameters will be passed the correct values by the LLM models based on the user’s prompt. After processing the business logic, the method will return a result. The LLM models will use this result to return the user’s response in the most natural language possible.
After defining the tools, you need to expose them to the MCP client by declaring a bean for a list of ToolCallbacks, as follows:
|
1 2 3 4 |
@Bean List<ToolCallback> toolCallbacks(HuongDanJava huongDanJava) { return List.of(ToolCallbacks.from(huongDanJava)); } |
Now, I will build my MCP Server and use Claude Desktop to test the results.
You can reread the tutorial Introduction to Model Context Protocol to understand how to configure an MCP Server with Claude Desktop!
I will configure my MCP Server with Claude Desktop as follows:
|
1 2 3 4 5 6 7 8 9 10 11 12 |
{ "mcpServers": { ... "huongdanjava": { "command": "/Users/khanhnguyenj/.sdkman/candidates/java/21.0.4-tem/bin/java", "args": [ "-jar", "/Users/khanhnguyenj/Documents/code/huongdanjava.com/spring-boot-spring-ai-mcp-server/target/spring-boot-spring-ai-mcp-server-0.0.1-SNAPSHOT.jar" ] } } } |
The file /Users/khanhnguyenj/Documents/code/huongdanjava.com/spring-boot-spring-ai-mcp-server/target/spring-boot-spring-ai-mcp-server-0.0.1-SNAPSHOT.jar is the MCP server file that I built above!
After restarting Claude Desktop, you will see the list of tools included in Claude Desktop as follows:
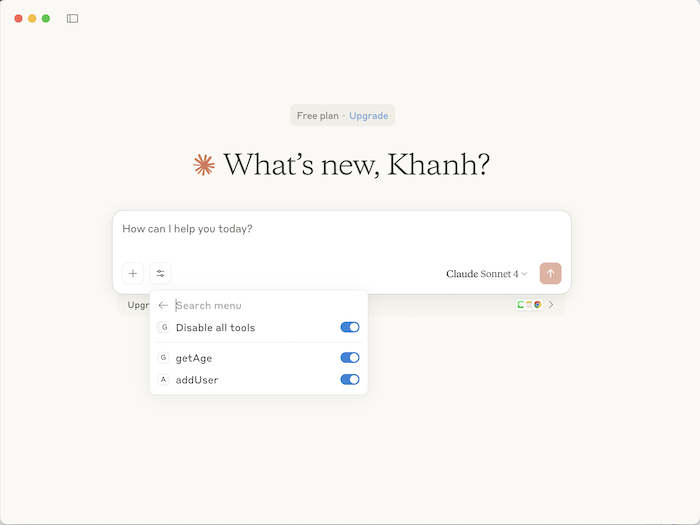
Now you can use Claude Desktop to perform the tasks you want.
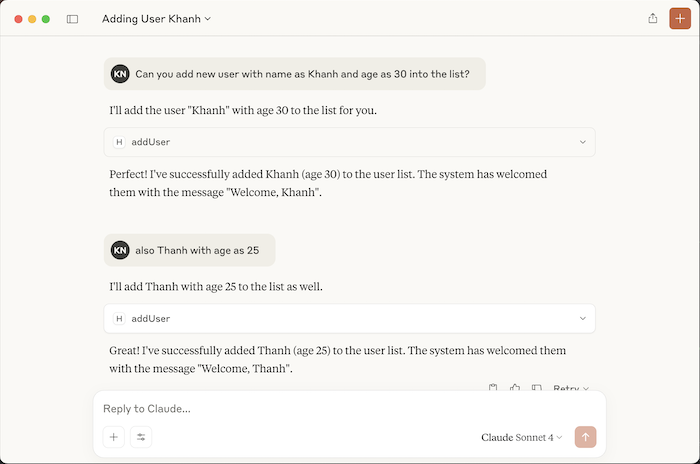
For example, I requested it to add some users with age information, and the result was as follows:
and then we retrieved the age information of these users, with the following results:
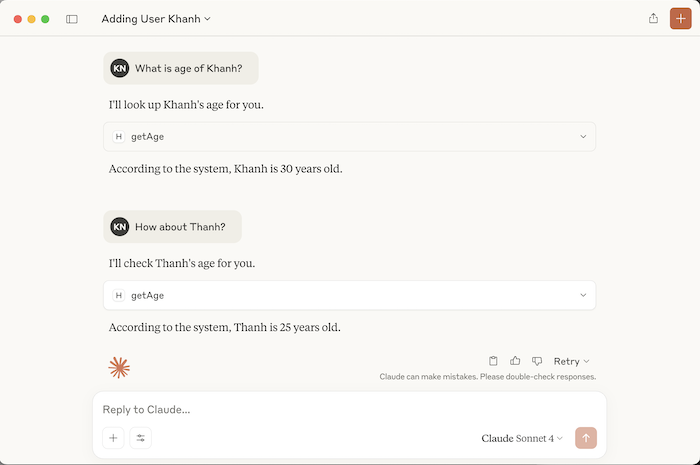
Perfect, right? Claude Desktop can record information and retrieve the information we want. It responded with results in very natural language.