In the past, when Apache Maven was not available, if you worked with Java applications that used external libraries, you had to manually download those libraries and add them to the classpath so that your application could use them. Using Apache Maven, you will no longer need to do that manually. Apache Maven is a tool used to download and manage libraries (also known as dependencies) that your application needs to use. Instead of having to manually download each dependency like before, you just need to declare the information of the dependencies and their versions, Apache Maven will automatically download them for us. In addition, Apache Maven also helps us automate the build of source code (compile → test → package → deploy). In this tutorial, we will learn the basics of Apache Maven together!
First, to use Apache Maven, you must install it! If you are using macOS, you can refer here.
All Maven projects must have a file named pom.xml. POM stands for Project Object Model!
When you create a new Maven project using IntelliJ IDE, for example, the initial content of the pom.xml file is usually as follows:
|
1 2 3 4 5 6 7 8 9 10 11 12 13 14 15 16 17 |
<?xml version="1.0" encoding="UTF-8"?> <project xmlns="http://maven.apache.org/POM/4.0.0" xmlns:xsi="http://www.w3.org/2001/XMLSchema-instance" xsi:schemaLocation="http://maven.apache.org/POM/4.0.0 http://maven.apache.org/xsd/maven-4.0.0.xsd"> <modelVersion>4.0.0</modelVersion> <groupId>com.huongdanjava.apachemaven</groupId> <artifactId>apache-maven-example</artifactId> <version>1.0-SNAPSHOT</version> <properties> <maven.compiler.source>25</maven.compiler.source> <maven.compiler.target>25</maven.compiler.target> <project.build.sourceEncoding>UTF-8</project.build.sourceEncoding> </properties> </project> |
This pom.xml file will need to define the content according to the XSD schema file at http://maven.apache.org/xsd/maven-4.0.0.xsd!
The outermost root tag will be the <project> tag. This is a required tag for us to start defining the dependency information of the Maven project.
Inside this <project> tag, there are 4 other required tags, you also need to declare:
- <modelVersion>
- <groupId>
- <artifactId>
- <version>
The <modelVersion> tag defines the version of the POM model. This version is related to the format and structure of the pom.xml file! The latest version of POM model is 4.1.0 with Apache Maven 4, but currently, Apache Maven 4 does not have a final release, so we will often use Apache Maven 3 with POM model version 4.0.0!
The <groupId> tag is usually used to set the value of the organization or website domain name. It is used to define which organization or website the library or application using this Maven project belongs to.
The <artifactId> tag defines the name of the application or library being developed using this Maven project.
The <version> tag defines the version of the application or library.
To declare the libraries that your application needs to use, we use the <dependency> tags. These <dependency> tags will be in the <dependencies> tag as follows:
|
1 2 3 4 5 6 7 8 9 10 11 12 13 14 15 16 17 18 19 20 21 22 23 24 25 26 27 28 29 30 31 |
<?xml version="1.0" encoding="UTF-8"?> <project xmlns="http://maven.apache.org/POM/4.0.0" xmlns:xsi="http://www.w3.org/2001/XMLSchema-instance" xsi:schemaLocation="http://maven.apache.org/POM/4.0.0 http://maven.apache.org/xsd/maven-4.0.0.xsd"> <modelVersion>4.0.0</modelVersion> <groupId>com.huongdanjava.apachemaven</groupId> <artifactId>apache-maven-example</artifactId> <version>1.0-SNAPSHOT</version> <properties> <maven.compiler.source>25</maven.compiler.source> <maven.compiler.target>25</maven.compiler.target> <project.build.sourceEncoding>UTF-8</project.build.sourceEncoding> </properties> <dependencies> <dependency> <groupId>org.projectlombok</groupId> <artifactId>lombok</artifactId> <version>1.18.38</version> </dependency> <dependency> <groupId>org.mapstruct</groupId> <artifactId>mapstruct</artifactId> <version>1.6.3</version> </dependency> </dependencies> </project> |
The information of each dependency will also include groupId, artifactId and version!
When you run the Apache Maven command, it will read the contents of this pom.xml file, based on the information of the dependencies you declare, it will know which libraries you need to use for your application, what version, how to build the source code. Then, it will automatically do everything for us.
You will wonder where Apache Maven will download the libraries we declare, right? It will download from the Remote Maven Repository, also known as the place where these libraries are stored! The default will be from this Maven Repository https://repo.maven.apache.org/maven2/
After downloading, Apache Maven will cache these libraries in the default directory, called Local Maven Repository, at the path ~/.m2/repository. Thanks to that, if another application, another library, uses the same groupId, same artifactId, same version dependencies, Apache Maven will not have to download anymore, because it has already downloaded to the Local Maven Repository.
After defining the libraries that your application needs to use, you can use some commands with the following goal to download dependencies and build source code for your project:
- “mvn clean”: delete previously built files
- “mvn compile”: compiles Java source code
- “mvn test”: run JUnit tests
- “mvn package”: package JAR or WAR files for the application
- “mvn install”: Download and install dependencies into the Local Maven Repository
- “mvn deploy”: Upload libraries to the Remote Maven Repository
You can combine the goals together to run at once, it is not necessary to separate them! For example, we can run “mvn clean install” or “mvn clean package”.
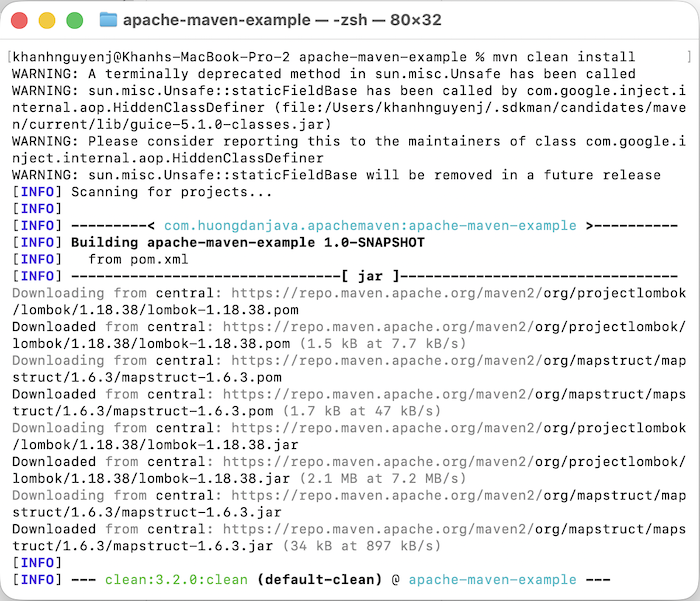
With the pom.xml file defined as above, after you run the command “mvn clean install”, for example, you will see Apache Maven automatically download and install these dependencies to the Local Maven Repository as follows:
These are just the basics of Apache Maven. There are many things we can do to build source code with Apache Maven. I will introduce them to you in other tutorials!