In the previous tutorials Manage Apache Kafka using KafkaAdmin class of Spring for Apache Kafka and Send messages to Apache Kafka using the KafkaTemplate class of Spring for Apache Kafka, I have guided you on how to work with Apache Kafka using Spring’s Spring for Apache Kafka module. Spring Boot also supports Apache Kafka by automatically configuring the necessary information so that we can easily work with Apache Kafka using Spring. How is it in detail? Let’s find out together in this tutorial!
First, I will create a new Spring Boot project with Spring for Apache Kafka:

for example.
Manage topics
As you know, we will use the KafkaAdmin class to manage topics in Apache Kafka. With the auto-configuration mechanism of Spring Boot, you just need to configure the information of the Apache Kafka server using the following property:
|
1 2 3 |
spring: kafka: bootstrap-servers: localhost:9092 |
is to be able to ingest the bean of the KafkaAdmin class to use.
For example, if I configure the bean of the NewTopic class:
|
1 2 3 4 |
@Bean public NewTopic topic1() { return new NewTopic("huongdanjava", 1, (short) 1); } |
then when running the application, you will also see a new topic created.
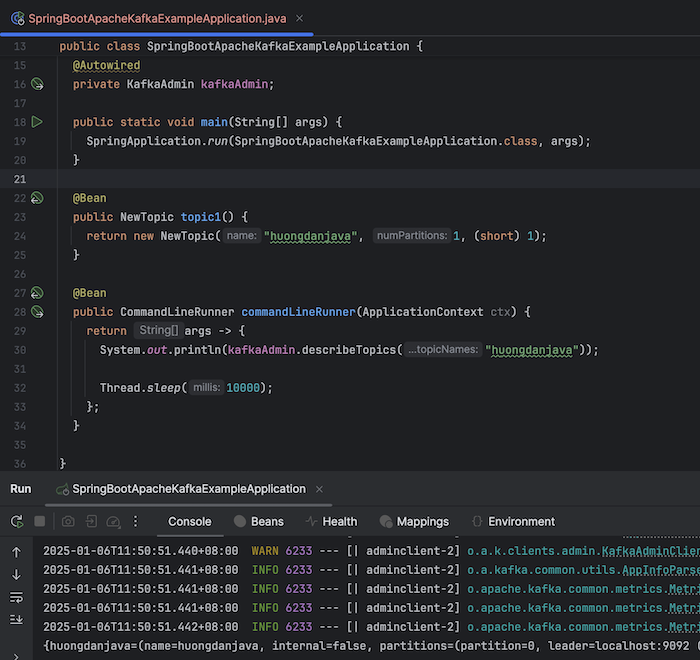
Get topic information using the KafkaAdmin class as follows:
|
1 2 3 4 5 6 7 8 9 10 11 12 13 14 15 16 17 18 19 20 21 22 23 24 25 26 27 28 29 30 31 32 33 34 35 36 |
package com.huongdanjava.springboot.apachekafka; import org.apache.kafka.clients.admin.NewTopic; import org.springframework.beans.factory.annotation.Autowired; import org.springframework.boot.CommandLineRunner; import org.springframework.boot.SpringApplication; import org.springframework.boot.autoconfigure.SpringBootApplication; import org.springframework.context.ApplicationContext; import org.springframework.context.annotation.Bean; import org.springframework.kafka.core.KafkaAdmin; @SpringBootApplication public class SpringBootApacheKafkaExampleApplication { @Autowired private KafkaAdmin kafkaAdmin; public static void main(String[] args) { SpringApplication.run(SpringBootApacheKafkaExampleApplication.class, args); } @Bean public NewTopic topic1() { return new NewTopic("huongdanjava", 1, (short) 1); } @Bean public CommandLineRunner commandLineRunner(ApplicationContext ctx) { return args -> { System.out.println(kafkaAdmin.describeTopics("huongdanjava")); Thread.sleep(10000); }; } } |
You will see the same result as the previous post:
Send a message to a topic
With the KafkaTemplate class, you just need to configure some additional properties to be able to ingest the bean of the KafkaTemplate class for use:
|
1 2 3 4 5 6 |
spring: kafka: bootstrap-servers: localhost:9092 producer: key-serializer: org.apache.kafka.common.serialization.StringSerializer value-serializer: org.apache.kafka.common.serialization.StringSerializer |
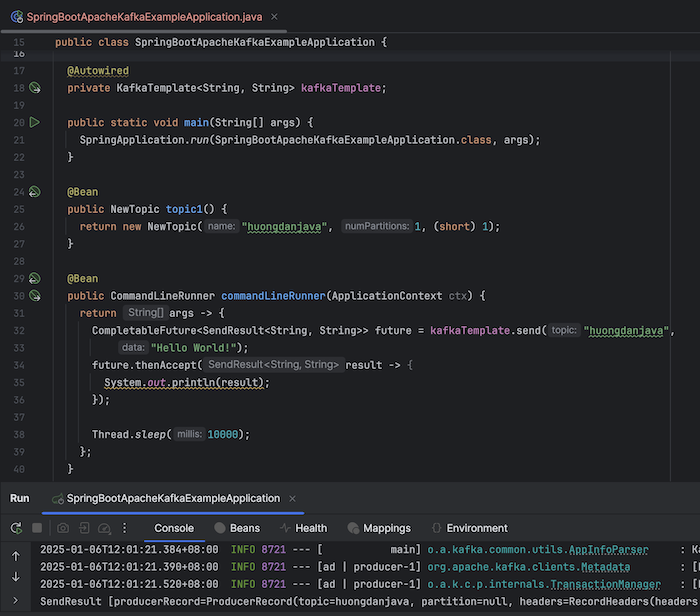
For example:
|
1 2 3 4 5 6 7 8 9 10 11 12 13 14 15 16 17 18 19 20 21 22 23 24 25 26 27 28 29 30 31 32 33 34 35 36 37 38 39 40 41 42 |
package com.huongdanjava.springboot.apachekafka; import java.util.concurrent.CompletableFuture; import org.apache.kafka.clients.admin.NewTopic; import org.springframework.beans.factory.annotation.Autowired; import org.springframework.boot.CommandLineRunner; import org.springframework.boot.SpringApplication; import org.springframework.boot.autoconfigure.SpringBootApplication; import org.springframework.context.ApplicationContext; import org.springframework.context.annotation.Bean; import org.springframework.kafka.core.KafkaTemplate; import org.springframework.kafka.support.SendResult; @SpringBootApplication public class SpringBootApacheKafkaExampleApplication { @Autowired private KafkaTemplate<String, String> kafkaTemplate; public static void main(String[] args) { SpringApplication.run(SpringBootApacheKafkaExampleApplication.class, args); } @Bean public NewTopic topic1() { return new NewTopic("huongdanjava", 1, (short) 1); } @Bean public CommandLineRunner commandLineRunner(ApplicationContext ctx) { return args -> { CompletableFuture<SendResult<String, String>> future = kafkaTemplate.send("huongdanjava", "Hello World!"); future.thenAccept(result -> { System.out.println(result); }); Thread.sleep(10000); }; } } |
Result:
Receive messages
Spring Boot supports the following properties for consumers, which help us easily consume messages from the Apache Kafka server in Spring Boot applications. Specifically as follows:
|
1 2 3 4 5 6 7 8 9 10 |
spring: kafka: bootstrap-servers: localhost:9092 producer: key-serializer: org.apache.kafka.common.serialization.StringSerializer value-serializer: org.apache.kafka.common.serialization.StringSerializer consumer: group-id: huongdanjava key-deserializer: org.apache.kafka.common.serialization.StringDeserializer value-deserializer: org.apache.kafka.common.serialization.StringDeserializer |
Just declare these properties, Spring Boot will initialize the bean for the class implementing the KafkaListenerContainerFactory interface and the bean for the ConsumerFactory class.
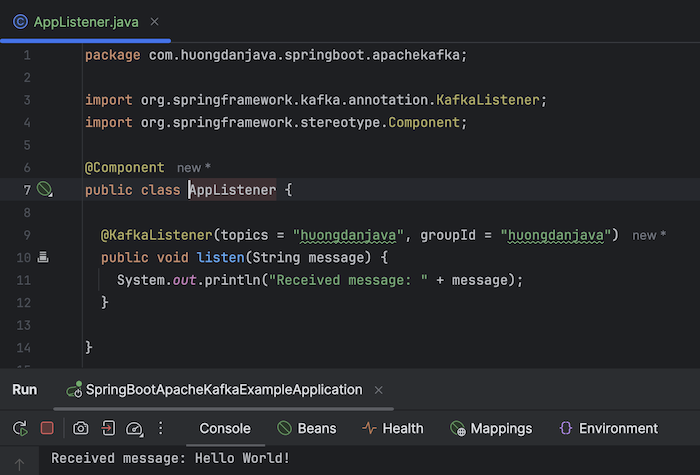
Now you just need to define the class containing the method annotated with the @KafkaListener annotation. My example is as follows:
|
1 2 3 4 5 6 7 8 9 10 11 12 13 14 |
package com.huongdanjava.springboot.apachekafka; import org.springframework.kafka.annotation.KafkaListener; import org.springframework.stereotype.Component; @Component public class AppListener { @KafkaListener(topics = "huongdanjava", groupId = "huongdanjava") public void listen(String message) { System.out.println("Received message: " + message); } } |
The result if I run the application, send a message “Hello World!” to Apache Kafka server using the example in the tutorial Send messages to Apache Kafka using the KafkaTemplate class of Spring for Apache Kafka, is as follows: