The load balancer is used to help our application handle a large number of requests from users. We will deploy our application to many different machines, behind a load balancer, requests from users will call to the load balancer and will be forwarded by the load balancer to one of these machines… Nginx is one of the web servers that can help us implement the load balancer! How is it in detail? In this tutorial, I will guide you to deploy a load balancer application using Nginx with Docker!
As an example for this tutorial, I will use Docker Compose to simulate a deployment model using a load balancer. I will deploy the example application in the tutorial Introduction about Docker Compose on 3 different containers using the same PostgreSQL, an Nginx container as a load balancer to forward the user’s request to 1 of these 3 containers:
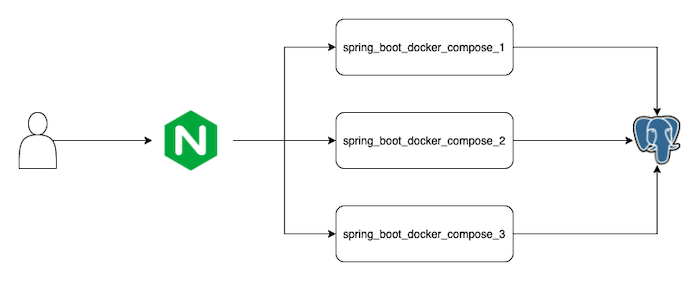
Example application
With the example application, to know which instance Ngnix is forwarding the user’s request to, I will add the code in the helloDockerCompose() method of the request “/hello” to print the logline “Received request …” as follows:
|
1 2 3 4 5 6 7 8 9 10 11 12 13 14 15 16 17 18 19 20 21 22 23 24 25 26 27 28 29 30 31 32 33 34 35 36 37 38 |
package com.huongdanjava.springboot; import javax.sql.DataSource; import org.slf4j.Logger; import org.slf4j.LoggerFactory; import org.springframework.beans.factory.annotation.Autowired; import org.springframework.boot.SpringApplication; import org.springframework.boot.autoconfigure.SpringBootApplication; import org.springframework.boot.jdbc.metadata.HikariDataSourcePoolMetadata; import org.springframework.web.bind.annotation.RequestMapping; import org.springframework.web.bind.annotation.RestController; import com.zaxxer.hikari.HikariDataSource; @SpringBootApplication @RestController public class SpringBootDockerComposeApplication { private static final Logger LOGGER = LoggerFactory.getLogger(SpringBootDockerComposeApplication.class); @Autowired private DataSource dataSource; @RequestMapping("/hello") public String helloDockerCompose() { LOGGER.info("Received request ..."); Integer idleConnection = new HikariDataSourcePoolMetadata((HikariDataSource) dataSource).getIdle(); return "Hello Docker Compose! Idle connection to database is " + idleConnection; } public static void main(String[] args) { SpringApplication.run(SpringBootDockerComposeApplication.class, args); } } |
When we run the application, we will take a look at the Docker Compose Console to see which container the request is being forwarded to.
Let’s rebuild the Docker Image for our example application.
The configuration of the example application for 3 containers corresponding to 3 services in the docker-compose.yml file, in the tutorial Introduction about Docker Compose will be as follows:
|
1 2 3 4 5 6 7 8 9 10 11 12 13 14 15 16 17 18 19 20 21 22 23 24 25 26 27 28 29 30 31 32 33 34 35 36 37 38 39 40 41 42 43 44 45 46 47 |
spring_boot_docker_compose_1: image: spring-boot-docker-compose container_name: spring_boot_docker_compose_1 depends_on: - postgresql environment: DATABASE_USERNAME: "khanh" DATABASE_PASSWORD: "123456" DATABASE_HOST: "postgresql" DATABASE_NAME: "test" DATABASE_PORT: 5432 ports: - 8081:8080 networks: - huongdanjava spring_boot_docker_compose_2: image: spring-boot-docker-compose container_name: spring_boot_docker_compose_2 depends_on: - postgresql environment: DATABASE_USERNAME: "khanh" DATABASE_PASSWORD: "123456" DATABASE_HOST: "postgresql" DATABASE_NAME: "test" DATABASE_PORT: 5432 ports: - 8082:8080 networks: - huongdanjava spring_boot_docker_compose_3: image: spring-boot-docker-compose container_name: spring_boot_docker_compose_3 depends_on: - postgresql environment: DATABASE_USERNAME: "khanh" DATABASE_PASSWORD: "123456" DATABASE_HOST: "postgresql" DATABASE_NAME: "test" DATABASE_PORT: 5432 ports: - 8083:8080 networks: - huongdanjava |
Each container will expose different ports including 8081, 8082, and 8083.
The configuration of the PostgreSQL database in the docker-compose.yaml file will be kept as it is!
Nginx
Before going into the details of how to configure the load balancer with Nginx, we will briefly review some of the algorithms used to implement the load balancer. We have the following basic algorithms:
- Round Robin: requests from users will be forwarded to all machines in turn in order. It means that our application is deployed to how many machines, the user’s request will, in turn, be forwarded to all these machines. The first request will go to machine 1, the second request will go to machine 2, … after the last machine is used, the next request will go to machine 1.
- Weighted Round Robin: similar to the Round Robin algorithm, but the application deployment machines will have different configurations. The machine with the higher configuration will be given a higher weight and receive more requests!
- Dynamic Round Robin: this algorithm is the same as Weighted Round Robin but with the difference that the weights of the machines will not be fixed. The configuration of the machines will be checked continuously, so the weights will change continuously.
- Fastest: this algorithm is based on the response time of the machine in the load balancer setup. The machine with the faster response time will be selected to forward the request.
- Least Connections: the machine with the fewest connections will be forwarded the request.
In this tutorial, I will use the Round Robin algorithm with Nginx!
I will build a custom Nginx Docker image with a Dockerfile with the following content:
|
1 2 3 4 5 |
FROM nginx:latest RUN rm /etc/nginx/conf.d/default.conf COPY nginx.conf /etc/nginx/conf.d/default.conf |
in which, the nginx.conf file has the following content:
|
1 2 3 4 5 6 7 8 9 10 11 |
upstream apps { server 172.17.0.1:8081; server 172.17.0.1:8082; server 172.17.0.1:8083; } server { location / { proxy_pass http://apps; } } |
In the above nginx.conf file, I used Nginx’s reverse proxy with the upstream directive to implement the load balancer. When a request from the user arrives, this request will be forwarded to one of the 3 servers declared inside this upstream directive. By default, Nginx supports the round-robin algorithm, so you do not need to declare anything other than the information of 3 servers.
When starting containers, 172.17.0.1 is the default IP address of these containers, so as you can see, I use 172.17.0.1 for 3 containers of the example application, with different ports, as declared in the docker-compose.yaml file.
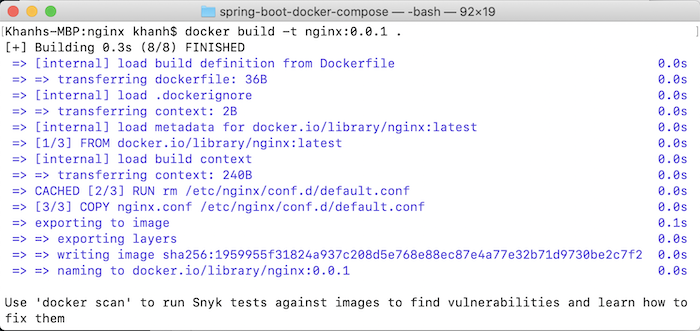
You need to build this custom Docker image with the following command:
|
1 |
docker build -t nginx:0.0.1 . |
Result:
Once you have the Nginx Docker Image, you can declare a service for Nginx in the docker-compose.yaml file as follows:
|
1 2 3 4 |
nginx: image: nginx:0.0.1 ports: - 80:80 |
At this point, we have completed the configuration to deploy the load balancer for our example application. The content of the docker-compose.yaml file now looks like this:
|
1 2 3 4 5 6 7 8 9 10 11 12 13 14 15 16 17 18 19 20 21 22 23 24 25 26 27 28 29 30 31 32 33 34 35 36 37 38 39 40 41 42 43 44 45 46 47 48 49 50 51 52 53 54 55 56 57 58 59 60 61 62 63 64 65 66 67 68 69 |
services: postgresql: image: postgres:16.3 container_name: postgres environment: POSTGRES_PASSWORD: "123456" POSTGRES_USER: "khanh" POSTGRES_DB: "test" volumes: - /Users/khanhnguyenj/data:/var/lib/postgresql/data networks: - huongdanjava spring_boot_docker_compose_1: image: spring-boot-docker-compose container_name: spring_boot_docker_compose_1 depends_on: - postgresql environment: DATABASE_USERNAME: "khanh" DATABASE_PASSWORD: "123456" DATABASE_HOST: "postgresql" DATABASE_NAME: "test" DATABASE_PORT: 5432 ports: - 8081:8080 networks: - huongdanjava spring_boot_docker_compose_2: image: spring-boot-docker-compose container_name: spring_boot_docker_compose_2 depends_on: - postgresql environment: DATABASE_USERNAME: "khanh" DATABASE_PASSWORD: "123456" DATABASE_HOST: "postgresql" DATABASE_NAME: "test" DATABASE_PORT: 5432 ports: - 8082:8080 networks: - huongdanjava spring_boot_docker_compose_3: image: spring-boot-docker-compose container_name: spring_boot_docker_compose_3 depends_on: - postgresql environment: DATABASE_USERNAME: "khanh" DATABASE_PASSWORD: "123456" DATABASE_HOST: "postgresql" DATABASE_NAME: "test" DATABASE_PORT: 5432 ports: - 8083:8080 networks: - huongdanjava nginx: image: nginx:0.0.1 ports: - 80:80 networks: huongdanjava: driver: bridge |
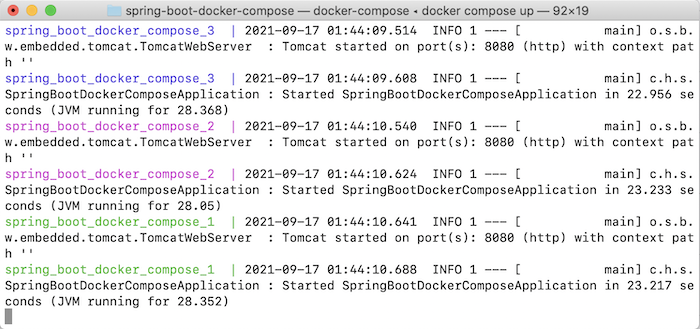
Run this file with “docker compose up”, you will see the following output:
 Now, if you request http://localhost/hello for the first time, you will see the Docker Compose Console with the following results:
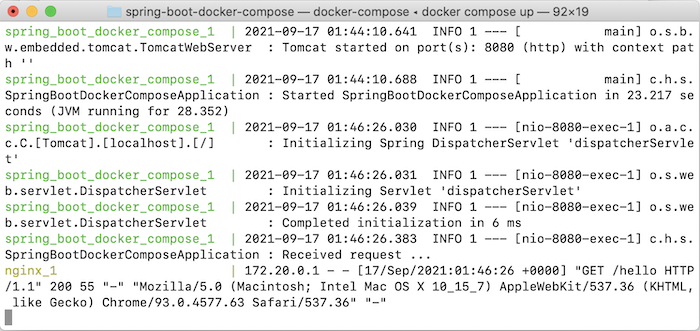
The spring_boot_docker_compose_1 container handled this request.
2nd:
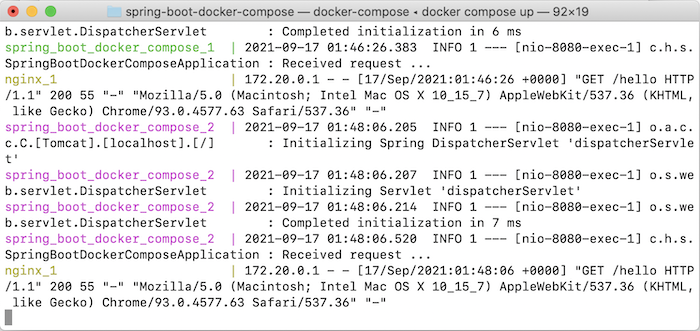
This time the spring_boot_docker_compose_2 container handles the request.
3rd:

And the fourth will go back to spring_boot_docker_compose_1:
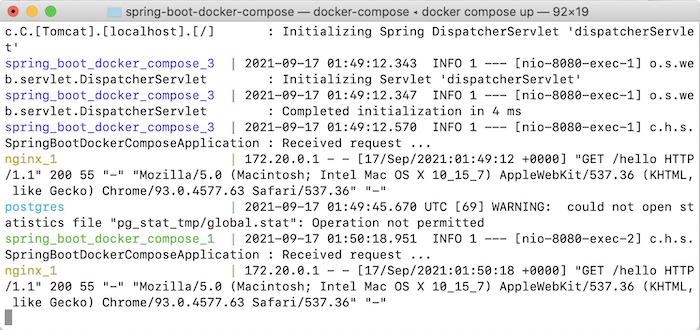
Just like our expectation!