In the previous tutorial, we created and ran a basic Vaadin application using the Vaadin plugin in Eclipse. Some of you already known about Vaadin can understand how the Vaadin application is running but there maybe some of you who have never heard about Vaadin. So, in this tutorial, let’s say more about the main component of a Vaadin application, which will receive user requests, process and return results to the user.
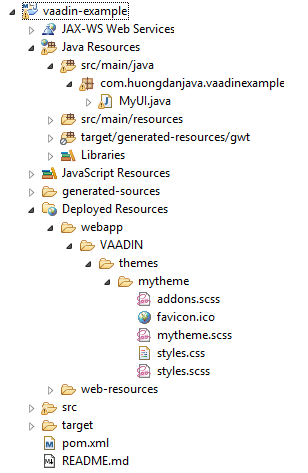
OK, my project structure is as follows:

MyUI class is the main component that I want to talk about here.
The content of this class is as follows:
|
1 2 3 4 5 6 7 8 9 10 11 12 13 14 15 16 17 18 19 20 21 22 23 24 25 26 27 28 29 30 31 32 33 34 35 36 37 38 39 40 41 42 43 44 45 46 47 48 49 50 |
package com.huongdanjava.vaadinexample; import javax.servlet.annotation.WebServlet; import com.vaadin.annotations.Theme; import com.vaadin.annotations.VaadinServletConfiguration; import com.vaadin.server.VaadinRequest; import com.vaadin.server.VaadinServlet; import com.vaadin.ui.Button; import com.vaadin.ui.Label; import com.vaadin.ui.TextField; import com.vaadin.ui.UI; import com.vaadin.ui.VerticalLayout; /** * This UI is the application entry point. A UI may either represent a browser * window (or tab) or some part of a html page where a Vaadin application is * embedded. * <p> * The UI is initialized using {@link #init(VaadinRequest)}. This method is * intended to be overridden to add component to the user interface and * initialize non-component functionality. */ @Theme("mytheme") public class MyUI extends UI { @Override protected void init(VaadinRequest vaadinRequest) { final VerticalLayout layout = new VerticalLayout(); final TextField name = new TextField(); name.setCaption("Type your name here:"); Button button = new Button("Click Me"); button.addClickListener(e -> { layout.addComponent(new Label("Thanks " + name.getValue() + ", it works!")); }); layout.addComponents(name, button); layout.setMargin(true); layout.setSpacing(true); setContent(layout); } @WebServlet(urlPatterns = "/*", name = "MyUIServlet", asyncSupported = true) @VaadinServletConfiguration(ui = MyUI.class, productionMode = false) public static class MyUIServlet extends VaadinServlet { } } |
This class is the primary class of all UI components in a Vaadin application.
When we create a Vaadin application, and when a user accesses our Vaadin application, a web page is generated using the code contained in a method of this class. That is the init() method.
|
1 2 3 4 5 |
public class MyUI extends UI { @Override protected void init(VaadinRequest vaadinRequest) { } } |
The MyUI class defines all of the Vaadin’s UI components in this method.
Take a look at the definition of the init() method.
|
1 2 3 4 5 6 7 8 9 10 11 12 13 14 15 |
final VerticalLayout layout = new VerticalLayout(); final TextField name = new TextField(); name.setCaption("Type your name here:"); Button button = new Button("Click Me"); button.addClickListener(e -> { layout.addComponent(new Label("Thanks " + name.getValue() + ", it works!")); }); layout.addComponents(name, button); layout.setMargin(true); layout.setSpacing(true); setContent(layout); |
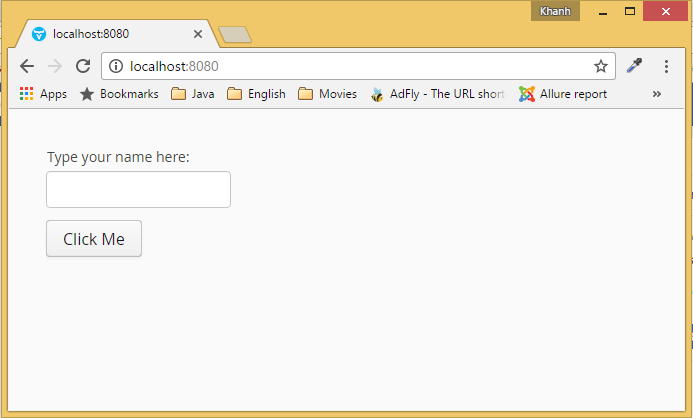
and results when running the application

Obviously, here you see, we have the following UI:
- A TextField.
- A Button.
- A label will be displayed when we press the Button.
And these UIs are contained in an object that is VerticalLayout.
We will go into more detail about the UI components and the VerticalLayout object in the upcoming tutorials, but generally you can understand as below.
The VerticalLayout object is a hidden component that helps us to sort the UI elements shown in the order in which is added first, then will be displayed first, in the order from top to bottom. In our init() method, the TextField is added first, followed by a Button:
|
1 |
layout.addComponents(name, button); |
and the last label displayed when we press the Button.
|
1 |
layout.addComponent(new Label("Thanks " + name.getValue() + ", it works!")); |
When you run the application, you also see that.
In the VerticalLayout object, we also use two methods, setMargin() and setSpacing(), to add some whitespace around the layout and between the UI elements contained in the VerticalLayout object.
The TextField object when generated would be an <input type=”text” tag in the HTML. We can add a text above it using the setCaption() method.
The Button object is the <input type=”button”> tag in the HTML. We can add text to this Button when initializing the Button object. To add an event when clicked, we use the addClickListener() method.
The Label object is similar to the <label> tag in HTML, which helps us to display some text.
Finally, we need to add the content to be returned to the user using the setContent() method:
|
1 |
setContent(layout); |


