Resource Server in OAuth2 is used to protect access to resources, APIs. It will validate the access token passed by the Client Application, with the Authorization Server to decide if the Client Application has access to the resources and APIs it wants. In this tutorial, I show you how to implement OAuth Resource Server using Spring Security OAuth2 Resource Server!
First, I will create a new Spring Boot project with Spring Web, Spring Security OAuth2 Resource Server as an example:
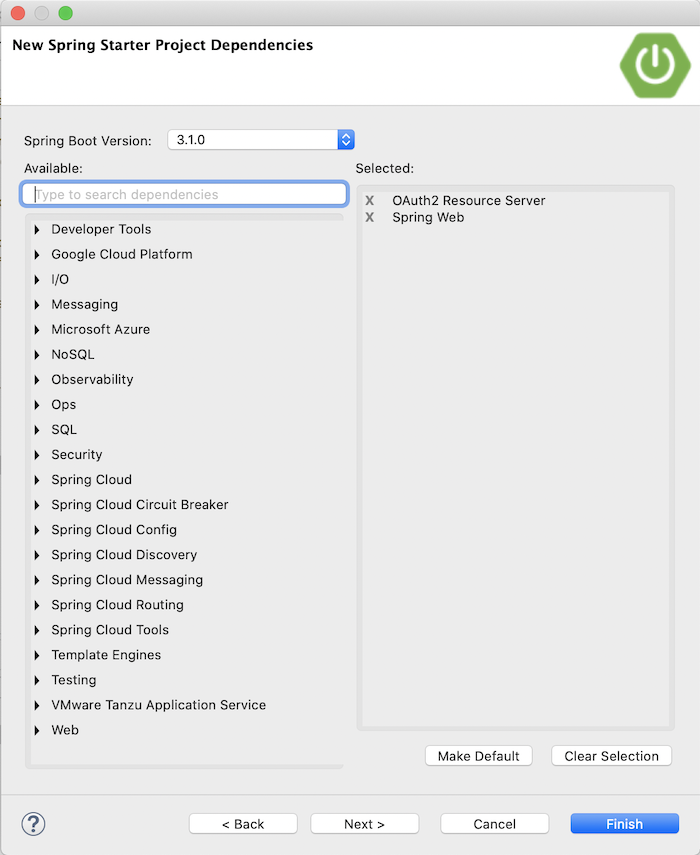
Result:
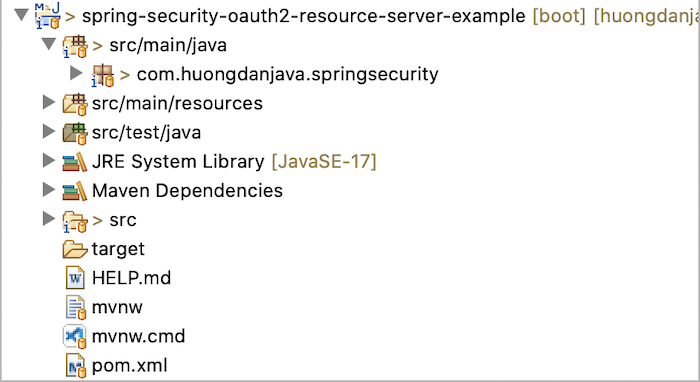
First, I will create a new RESTful API that acts as a resource that we need the resource server to protect. The content of this API is as simple as this:
|
1 2 3 4 5 6 7 8 9 10 11 12 13 14 |
package com.huongdanjava.springsecurity; import org.springframework.web.bind.annotation.GetMapping; import org.springframework.web.bind.annotation.RestController; @RestController public class HelloController { @GetMapping("/hello") public String hello() { return "Hello"; } } |
Now I will create a new class to configure Spring Security to protect for this RESTful API with the following initial content:
|
1 2 3 4 5 6 7 8 9 10 11 12 13 14 15 16 17 18 19 20 21 22 23 24 25 |
package com.huongdanjava.springsecurity; import org.springframework.context.annotation.Bean; import org.springframework.context.annotation.Configuration; import org.springframework.security.config.annotation.web.builders.HttpSecurity; import org.springframework.security.config.annotation.web.configuration.EnableWebSecurity; import org.springframework.security.web.SecurityFilterChain; @Configuration @EnableWebSecurity public class SpringSecurityConfiguration { @Bean public SecurityFilterChain filterChain(HttpSecurity http) throws Exception { // @formatter:off http .authorizeHttpRequests((authz) -> authz .anyRequest().authenticated() ); // @formatter:on return http.build(); } } |
With the above configuration, only the logged-in user can access all application requests and the user’s login information is stored in memory or a database system.
We won’t be able to request http://localhost:8080/hello right now:
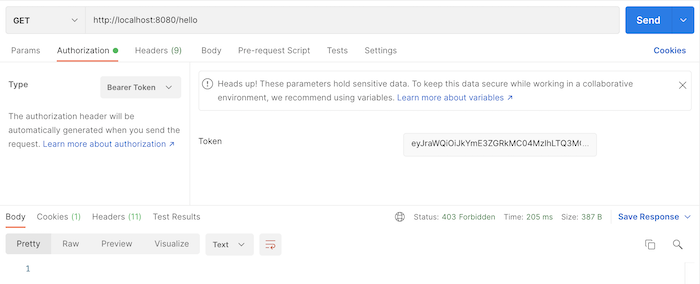
If you now need to implement the Resource Server to authenticate all requests to our application using the access token issued by the Authorization Server, you can add the following lines of code:
|
1 2 3 4 5 6 7 8 9 10 11 12 13 14 15 16 17 18 19 20 21 22 23 24 25 26 27 28 29 |
package com.huongdanjava.springsecurity; import org.springframework.context.annotation.Bean; import org.springframework.context.annotation.Configuration; import org.springframework.security.config.Customizer; import org.springframework.security.config.annotation.web.builders.HttpSecurity; import org.springframework.security.config.annotation.web.configuration.EnableWebSecurity; import org.springframework.security.web.SecurityFilterChain; @Configuration @EnableWebSecurity public class SpringSecurityConfiguration { @Bean public SecurityFilterChain filterChain(HttpSecurity http) throws Exception { // @formatter:off http .authorizeHttpRequests((authz) -> authz .anyRequest().authenticated() ) .oauth2ResourceServer(oauth2 -> oauth2 .jwt(Customizer.withDefaults()) ); // @formatter:on return http.build(); } } |
Resource Server will need the information of the Authorization Server so that it can check if the access token was issued by the Authorization Server? Therefore, you need to open the application.properties file to configure this Authorization Server information.
As an example for this tutorial, I will start the Authorization Server built using Spring Authorization Server in this tutorial. Then I will configure the Authorization Server information for this example as follows:
|
1 2 3 |
server.port=8081 spring.security.oauth2.resourceserver.jwt.issuer-uri=http://localhost:8080 |
I also change the port of the example application, so as not to conflict with the port of the Authorization Server.
Please note that we need to enable OpenID Connect support for Authorization Server because Resource Server, when we configure issuer-uri as above, will validate information about OpenID Provider using URL http://localhost:8080/ .well-known/openid-configuration. You can read more here https://docs.spring.io/spring-security/reference/servlet/oauth2/resource-server/jwt.html#_specifying_the_authorization_server.
You can enable OpenID Connect support for our Authorization Server by adding the following code in the AuthorizationServerConfiguration class:
|
1 2 3 4 5 6 7 8 9 10 11 |
@Bean @Order(Ordered.HIGHEST_PRECEDENCE) public SecurityFilterChain authorizationServerSecurityFilterChain(HttpSecurity http) throws Exception { OAuth2AuthorizationServerConfiguration.applyDefaultSecurity(http); http.getConfigurer(OAuth2AuthorizationServerConfigurer.class) .oidc(Customizer.withDefaults()); return http.formLogin(Customizer.withDefaults()).build(); } |
Now, suppose I have a RegisteredClient in the Authorization Server as follows:
|
1 2 3 4 5 6 7 8 9 |
// @formatter:off RegisteredClient registeredClient1 = RegisteredClient.withId(UUID.randomUUID().toString()) .clientId("huongdanjava1") .clientSecret("{noop}123") .clientAuthenticationMethod(ClientAuthenticationMethod.CLIENT_SECRET_POST) .authorizationGrantType(AuthorizationGrantType.CLIENT_CREDENTIALS) .tokenSettings(tokenSettings()) .build(); // @formatter:on |
Get this RegisteredClient’s access token:
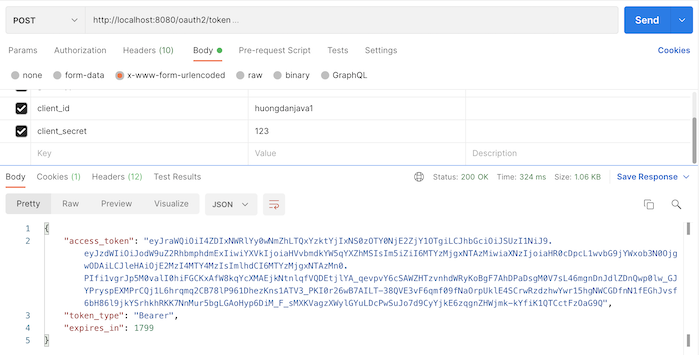
and request the URL http://localhost:8081/hello again with the access token passed in the Authorization Bearer, you will see the following results:
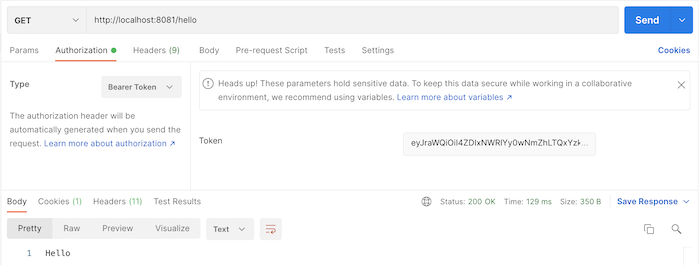
If you notice, with the above configuration of Spring Security, all access tokens issued by the Authorization Server can access APIs. In fact, we won’t do like that.
In the access token, there is a claim named scope and we will use it to determine that with this request URL, what scope the access token must have to access it.
If you decode the RegisteredClient’s access token above, you’ll see, currently, there is no claim scope at all:
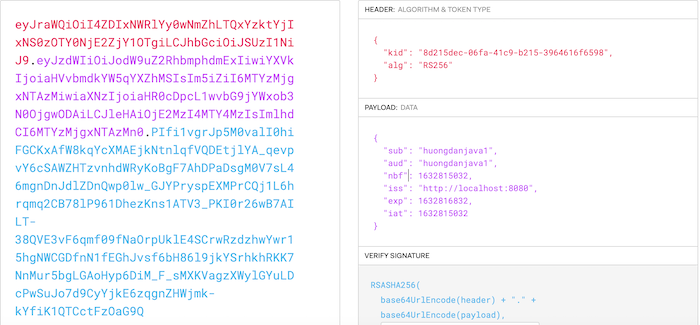
because we don’t configure a scope for this RegisteredClient.
Now, I will change the configuration of Spring Security to only accept requests with an access token whose scope is “access-hello” to access “/hello”, as follows:
|
1 2 3 4 5 6 7 8 9 10 11 12 13 14 15 16 17 18 19 20 21 22 23 24 25 26 27 28 29 30 |
package com.huongdanjava.springsecurity; import org.springframework.context.annotation.Bean; import org.springframework.context.annotation.Configuration; import org.springframework.security.config.Customizer; import org.springframework.security.config.annotation.web.builders.HttpSecurity; import org.springframework.security.config.annotation.web.configuration.EnableWebSecurity; import org.springframework.security.web.SecurityFilterChain; @Configuration @EnableWebSecurity public class SpringSecurityConfiguration { @Bean public SecurityFilterChain filterChain(HttpSecurity http) throws Exception { // @formatter:off http .authorizeHttpRequests((authz) -> authz .requestMatchers("/hello").hasAuthority("SCOPE_access-hello") .anyRequest().authenticated() ) .oauth2ResourceServer(oauth2 -> oauth2 .jwt(Customizer.withDefaults()) ); // @formatter:on return http.build(); } } |
We will use the hasAuthority() method with requestMachers for the “/hello” request. The parameter of the hasAuthority() method is a string that starts with SCOPE and following by the scope name that the RegisteredClient access token must have.
At this point, if you restart the example application, and request to “/hello” with the above RegisteredClient access token, you will see a 403 Forbidden error as follows:
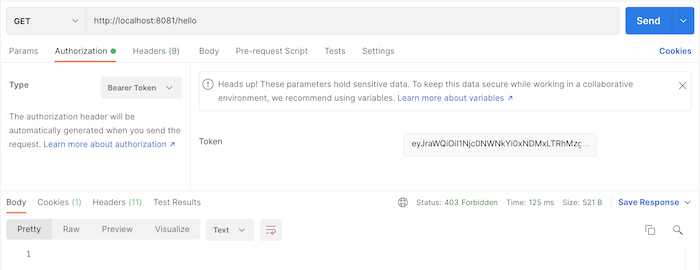
To configure the scope for RegisteredClient in the example above, I will edit the code as follows:
|
1 2 3 4 5 6 7 8 9 10 |
// @formatter:off RegisteredClient registeredClient1 = RegisteredClient.withId(UUID.randomUUID().toString()) .clientId("huongdanjava1") .clientSecret("{noop}123") .clientAuthenticationMethod(ClientAuthenticationMethod.CLIENT_SECRET_POST) .authorizationGrantType(AuthorizationGrantType.CLIENT_CREDENTIALS) .tokenSettings(tokenSettings()) .scope("access-hello") .build(); // @formatter:on |
As you can see, we will use the scope() method to do this.
Restart Authorization Server, get back the access token for this RegisteredClient, and then request again to “http://localhost:8081/hello”, you will see the result “Hello” is returned.
Decode access token, you will see the following result:
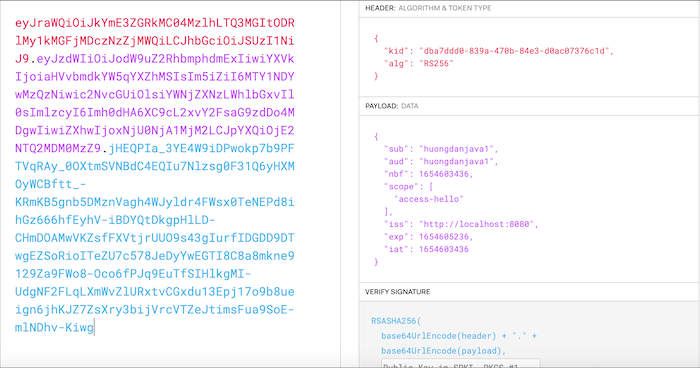


jack
hi what about if spring authorization server and resource server is in same server port?
Khanh Nguyen
You can do it if you want. Just configure the property spring.security.oauth2.resourceserver.jwt.issuer-uri pointing to correct URL.
Anurup
Hello I cloned your git repo and getting this error
org.springframework.beans.factory.BeanCreationException: Error creating bean with name ‘authorizationServerSecurityFilterChain’ defined in class path resource [com/huongdanjava/springauthorizationserver/AuthorizationServerConfiguration.class]: Bean instantiation via factory method failed; nested exception is org.springframework.beans.BeanInstantiationException: Failed to instantiate [org.springframework.security.web.SecurityFilterChain]: Factory method ‘authorizationServerSecurityFilterChain’ threw exception; nested exception is org.springframework.beans.factory.BeanCreationException: Error creating bean with name ‘jwkSource’ defined in class path resource [com/huongdanjava/springauthorizationserver/AuthorizationServerConfiguration.class]: Bean instantiation via factory method failed; nested exception is org.springframework.beans.BeanInstantiationException: Failed to instantiate [com.nimbusds.jose.jwk.source.JWKSource]: Factory method ‘jwkSource’ threw exception; nested exception is java.io.FileNotFoundException: src\main\resources\huongdanjava.pfx (The system cannot find the path specified)
Can you guide me?
Khanh Nguyen
How did you run the example?
Anurup
This was resolved, now I tried with the below token
{
“sub”: “sergey”,
“aud”: “client1”,
“nbf”: 1663344140,
“scope”: [
“read”
],
“roles”: [
“USER”
],
“iss”: “http://127.0.0.1:1001”,
“exp”: 1663344440,
“iat”: 1663344140
}
and also has the bean
@Bean
public SecurityFilterChain filterChain(HttpSecurity http) throws Exception {
// @formatter:off
http
.authorizeHttpRequests((authz) -> authz
.antMatchers(“/hello”).hasAuthority(“SCOPE_access-hello”)
.anyRequest().authenticated()
)
.oauth2ResourceServer().jwt();
// @formatter:on
return http.build();
}
but still able to access the URI. Ideally I should get 403
Sanam Udash
how can we access control on the basis of user role not the scope. please give me solution
Shanthi
These are really useful. When I try the resource server, although I have used your repo cloned directly, the resource server is saying unauthorized 403. What can the issue be?
Khanh Nguyen
Can you check your access token when requesting the resource? Did it contain the required scopes?
Shanthi
Hi Khanh Nguyen,
I generated tokens with required scope.
{
“access_token”: “eyJ4NXQjUzI1NiI6ImRBcDRlU3ZhU1ZHdVlZTDVib3d2eWFuZjNtTFJOLXRkcm8taGk5UnNISUUiLCJraWQiOiJodW9uZ2RhbmphdmEiLCJhbGciOiJSUzI1NiJ9.eyJzdWIiOiJodW9uZ2RhbmphdmExIiwiYXVkIjoiaHVvbmdkYW5qYXZhMSIsIm5iZiI6MTY0NjkxMzEyMiwic2NvcGUiOlsiYWNjZWVzLWhlbGxvIl0sImlzcyI6Imh0dHA6XC9cL2xvY2FsaG9zdDo4MDgwIiwiZXhwIjoxNjQ2OTE0OTIyLCJpYXQiOjE2NDY5MTMxMjJ9.JDX2LCbkhXtTtmHzFnPCXtGJehwC-gKXb3HzjDTxUevU6geEn-g2PK7-h4RcG3MPgtkTUNEts73rts1mlh3HWl2mRyXuUIWFiqzl8OvuQiEMqmvBSUQZ0IPySQNfxfh3J0Qdiio-aExIwrPPnhMQ5ac-jBwNWnyjn3rOXkc4Ni3VmvMbrlYl3VDswz4fQaTUgZhivdqDLIFUrR8XRoI9YT-_8gTlBEYaVmX5_br34dsaTRlPdpx5fGO0DoidJg7451_bdQ0ygL0elGgbxhFblPv5lST0R1ylw5I3PV3oGe1lV5VHUZ3oaBNxWm4gHYIQWupGDALH4DUmyzWEYRllBQ”,
“scope”: “accees-hello”,
“token_type”: “Bearer”,
“expires_in”: 1799
}
Still see the issue
Shanthi Raghunathan
Figured out the issue, the resource server checks for ” .antMatchers(“/hello”).hasAuthority(“SCOPE_access-hello”)” and the Authorization server was issuing token for ” .scope(“accees-hello”)
”
so corrected Authorization server to issue token for .scope(“access-hello”)
Khanh Nguyen
Thanks for reporting the issue. I fixed it.
Charan Vallala
Thanks for the articles. Your blog posts really helped me learning when I’m struggling to find something working. I looked at the custom oauth2 auth server implementation. It worked fine. I am able to get the auth token as well as access token. When i wanted to implemented and get resource server example working. I started to see an error regarding JwtDecoder. Below is the error msg that I am seeing here –
Description:
Method springSecurityFilterChain in org.springframework.security.config.annotation.web.configuration.WebSecurityConfiguration required a bean of type ‘org.springframework.security.oauth2.jwt.JwtDecoder’ that could not be found.
Action:
Consider defining a bean of type ‘org.springframework.security.oauth2.jwt.JwtDecoder’ in your configuration.
Can you please let me know what is that i am missing.
Charan Vallala
I think i figured it out. Looks like i added an extra spring-security dependency which is looking for some beans. I removed it and it worked fine. Thanks again for your wonderful blog posts.
Khanh Nguyen
Glad to hear that!