Like other servlets, in order for the DispatcherServlet to receive and process requests, we need to configure the web server container to initialize and map the URL to it. In this tutorial, I will show you how to initialize and configure the DispatcherServlet in Spring MVC!
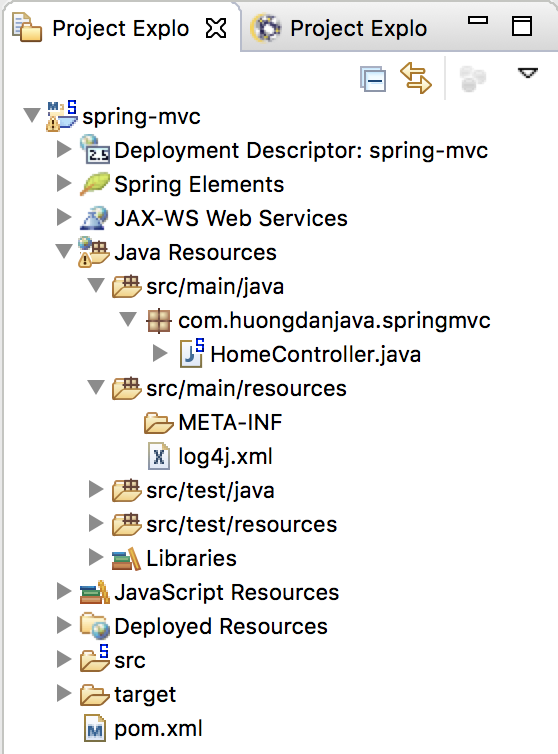
As an example, I will use the project that I created in the previous tutorial, the structure of my project as follows:

With Servlet 3.0, we have several ways to configure and register a servlet:
- Use the web.xml file.
- Use the web-fragment.xml file.
- Use javax.servlet.ServletContainerInitializer.
Spring MVC also allows us to use the org.springframework.web.WebApplicationInitializer to configure and register a servlet.
But in the example project, we are using the common way that is using a web.xml file so in this tutorial I just mentioned this way. The content of the web.xml file is as follows:
|
1 2 3 4 5 6 7 8 9 10 11 12 13 14 15 16 17 18 19 20 21 22 23 24 25 26 27 28 29 30 31 32 |
<?xml version="1.0" encoding="UTF-8"?> <web-app version="2.5" xmlns="http://java.sun.com/xml/ns/javaee" xmlns:xsi="http://www.w3.org/2001/XMLSchema-instance" xsi:schemaLocation="http://java.sun.com/xml/ns/javaee http://java.sun.com/xml/ns/javaee/web-app_2_5.xsd"> <!-- The definition of the Root Spring Container shared by all Servlets and Filters --> <context-param> <param-name>contextConfigLocation</param-name> <param-value>/WEB-INF/spring/root-context.xml</param-value> </context-param> <!-- Creates the Spring Container shared by all Servlets and Filters --> <listener> <listener-class>org.springframework.web.context.ContextLoaderListener</listener-class> </listener> <!-- Processes application requests --> <servlet> <servlet-name>appServlet</servlet-name> <servlet-class>org.springframework.web.servlet.DispatcherServlet</servlet-class> <init-param> <param-name>contextConfigLocation</param-name> <param-value>/WEB-INF/spring/appServlet/servlet-context.xml</param-value> </init-param> <load-on-startup>1</load-on-startup> </servlet> <servlet-mapping> <servlet-name>appServlet</servlet-name> <url-pattern>/</url-pattern> </servlet-mapping> </web-app> |
The steps to initialize and configure the DispatcherServlet include:
- Initialize the DispatcherServlet in the web server container and map the URL.
- After the initialization, DispatcherServlet will use org.springframework.web.context.WebApplicationContext to configure it.
We will go into detail step by step!
Initialization and URL mapping for DispatcherServlet
Assuming we do not have a web.xml file in our project, it is mandatory to create a web.xml file located in /src/webapp/WEB-INF. This is the file that will contain all the configuration of the web server container needed to initialize the servlet, listener or filter.
And to initialize and map the URL for the DispatcherServlet you just declare the following:
|
1 2 3 4 5 6 7 8 9 10 11 12 13 14 15 16 17 |
<?xml version="1.0" encoding="UTF-8"?> <web-app version="2.5" xmlns="http://java.sun.com/xml/ns/javaee" xmlns:xsi="http://www.w3.org/2001/XMLSchema-instance" xsi:schemaLocation="http://java.sun.com/xml/ns/javaee http://java.sun.com/xml/ns/javaee/web-app_2_5.xsd"> <!-- Processes application requests --> <servlet> <servlet-name>appServlet</servlet-name> <servlet-class>org.springframework.web.servlet.DispatcherServlet</servlet-class> <load-on-startup>1</load-on-startup> </servlet> <servlet-mapping> <servlet-name>appServlet</servlet-name> <url-pattern>/</url-pattern> </servlet-mapping> </web-app> |
By default, when DispatcherServlet is initialized, it will initialize an org.springframework.web.context.WebApplicationContext object with an implementation of org.springframework.web.context.support.XmlWebApplicationContext. This XmlWebApplicationContext object contains the configuration of all the beans we will define in Spring’s container. This object will use a Spring configuration file with the default name is [servlet-name]-servlet.xml located in the /src/webapp/WEB-INF directory.
If you do not define this Spring configuration file when running our web application, the error will occur:
|
1 2 3 4 5 6 7 8 9 10 11 12 13 14 15 16 17 18 19 |
Caused by: java.io.FileNotFoundException: Could not open ServletContext resource [/WEB-INF/appServlet-servlet.xml] at org.springframework.web.context.support.ServletContextResource.getInputStream(ServletContextResource.java:140) at org.springframework.beans.factory.xml.XmlBeanDefinitionReader.loadBeanDefinitions(XmlBeanDefinitionReader.java:328) at org.springframework.beans.factory.xml.XmlBeanDefinitionReader.loadBeanDefinitions(XmlBeanDefinitionReader.java:302) at org.springframework.beans.factory.support.AbstractBeanDefinitionReader.loadBeanDefinitions(AbstractBeanDefinitionReader.java:174) at org.springframework.beans.factory.support.AbstractBeanDefinitionReader.loadBeanDefinitions(AbstractBeanDefinitionReader.java:209) at org.springframework.beans.factory.support.AbstractBeanDefinitionReader.loadBeanDefinitions(AbstractBeanDefinitionReader.java:180) at org.springframework.web.context.support.XmlWebApplicationContext.loadBeanDefinitions(XmlWebApplicationContext.java:125) at org.springframework.web.context.support.XmlWebApplicationContext.loadBeanDefinitions(XmlWebApplicationContext.java:94) at org.springframework.context.support.AbstractRefreshableApplicationContext.refreshBeanFactory(AbstractRefreshableApplicationContext.java:131) at org.springframework.context.support.AbstractApplicationContext.obtainFreshBeanFactory(AbstractApplicationContext.java:522) at org.springframework.context.support.AbstractApplicationContext.refresh(AbstractApplicationContext.java:436) at org.springframework.web.servlet.FrameworkServlet.configureAndRefreshWebApplicationContext(FrameworkServlet.java:631) at org.springframework.web.servlet.FrameworkServlet.createWebApplicationContext(FrameworkServlet.java:588) at org.springframework.web.servlet.FrameworkServlet.createWebApplicationContext(FrameworkServlet.java:645) at org.springframework.web.servlet.FrameworkServlet.initWebApplicationContext(FrameworkServlet.java:508) at org.springframework.web.servlet.FrameworkServlet.initServletBean(FrameworkServlet.java:449) at org.springframework.web.servlet.HttpServletBean.init(HttpServletBean.java:133) |
Here, I will not define this file, as we can use the DispatcherServlet to define the Spring configuration file.
Configure DispatcherServlet
To add a Spring configuration file, you can use the contextConfigLocation property of the DispatcherServlet and configure it in the web.xml file as follows:
|
1 2 3 4 5 6 7 8 9 10 11 12 13 14 15 16 17 18 19 20 21 |
<?xml version="1.0" encoding="UTF-8"?> <web-app version="2.5" xmlns="http://java.sun.com/xml/ns/javaee" xmlns:xsi="http://www.w3.org/2001/XMLSchema-instance" xsi:schemaLocation="http://java.sun.com/xml/ns/javaee http://java.sun.com/xml/ns/javaee/web-app_2_5.xsd"> <!-- Processes application requests --> <servlet> <servlet-name>appServlet</servlet-name> <servlet-class>org.springframework.web.servlet.DispatcherServlet</servlet-class> <init-param> <param-name>contextConfigLocation</param-name> <param-value>/WEB-INF/spring/appServlet/servlet-context.xml</param-value> </init-param> <load-on-startup>1</load-on-startup> </servlet> <servlet-mapping> <servlet-name>appServlet</servlet-name> <url-pattern>/</url-pattern> </servlet-mapping> </web-app> |
The value of the contextConfigLocation property is the path to our Spring configuration file.
Configure the root servlet
Looking back at the web.xml file in our example project, you will wonder what the following configuration lines are for.
|
1 2 3 4 5 6 7 8 9 10 |
<!-- The definition of the Root Spring Container shared by all Servlets and Filters --> <context-param> <param-name>contextConfigLocation</param-name> <param-value>/WEB-INF/spring/root-context.xml</param-value> </context-param> <!-- Creates the Spring Container shared by all Servlets and Filters --> <listener> <listener-class>org.springframework.web.context.ContextLoaderListener</listener-class> </listener> |
As you know, we can define multiple servlets in a web.xml file. Each servlet can be initialized, mapped to different URLs. And so, we will have multiple Spring containers corresponding to each servlet, with different definitions.
In that case, some bean definitions can be repeated in many Spring containers. org.springframework.web.context.ContextLoaderListener was created to solve this repetitive problem by creating a root org.springframework.web.context.WebApplicationContext shared by all servlets. ContextLoaderListener will use the file defined in the contextConfigLocation of the <context-param> tag.
In the root-context.xml file, we will define the bean, the properties shared between the Spring containers, each Spring container in each servlet that will use the bean, these properties together with the beans, attributes defined for itself.


