Perhaps in you all, everyone knows and works with Object Oriented Programming (OOP), but with Aspect Oriented Programming (AOP), maybe someone does not know. In this tutorial, I will present the basic concepts of aspect-oriented programming so that you can better understand it.
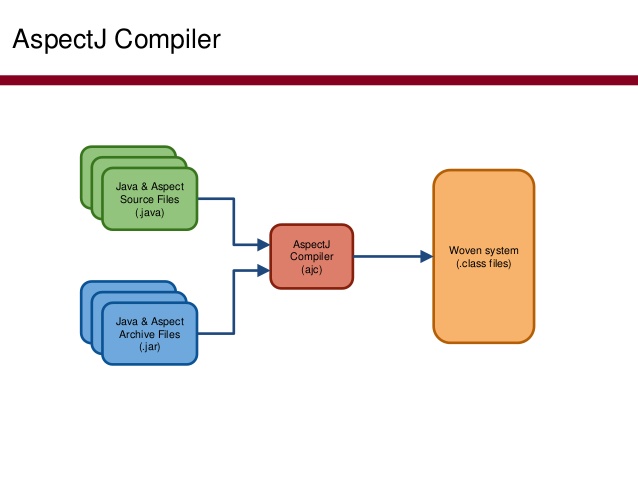
I do not go into length theory, aspect-oriented programming is kind of programming that allows us to add new processing code to existing applications without having to modify the code of that application.
For example, suppose you have an application, in this application is a class with the following content:
|
1 2 3 4 5 6 7 8 9 10 11 12 |
package com.huongdanjava.aspectjexample; public class Application { public int sum(int a, int b) { return a + b; } public int sub(int a, int b) { return a - b; } } |
Now, I want to add some code to all the methods of the Application class so that every time the application calls these methods, a log message is printed to the console. With object-oriented programming, we have to modify each of the methods of the Application class to achieve what we want. Aspect-oriented programming defines an easier way to do this without having to modify the code of the Application class.
With aspect-oriented programming, we will find out to each time the methods in the Application class are called, the program must call the code to print out our log message first.
We have many ways to implement the idea of aspect-oriented programming, one of which is to use existing libraries such as Spring AOP, AspectJ, … For more understanding, in this tutorial, I will use the AspectJ library to solve the problem that I have set.
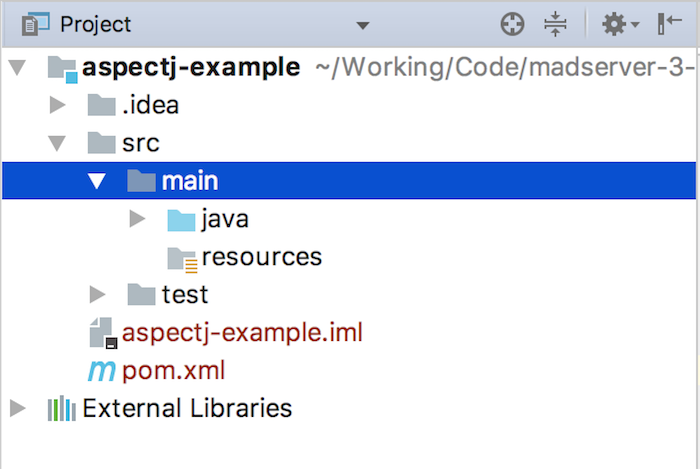
I will create a Maven project as an example:
Add AspectJ dependency:
|
1 2 3 4 5 |
<dependency> <groupId>org.aspectj</groupId> <artifactId>aspectjrt</artifactId> <version>1.8.13</version> </dependency> |
I will add a class with the main() method to use the Application class as follows:
|
1 2 3 4 5 6 7 8 9 10 11 12 13 14 |
package com.huongdanjava.aspectjexample; public class Example { public static void main(String[] args) { Application application = new Application(); int a = 10; int b = 3; System.out.println(application.sum(a, b)); System.out.println(application.sub(a, b)); } } |
Result:
Now, I will use AspectJ to add the log code whenever the sum() and sub() methods in the Application class are called:
First, I will create a new class and use the @Aspect annotation and @Before annotation of AspectJ as follows:
|
1 2 3 4 5 6 7 8 9 10 11 12 13 14 15 |
package com.huongdanjava.aspectjexample; import org.aspectj.lang.JoinPoint; import org.aspectj.lang.annotation.Aspect; import org.aspectj.lang.annotation.Before; @Aspect public class ApplicationAspect { @Before("execution (* com.huongdanjava.aspectjexample.Application.*(..))") public void allMethods(JoinPoint joinPoint) { System.out.println("Method name: " + joinPoint.getSignature().getName()); } } |
In the above method, we have defined a code that allows us to print out the log message with the content of the method name in the Application class which our program is calling. Here, @Aspect annotation is used to declare for AspectJ that we need to insert code into other classes and they will be declared in this class. I will detail each section about the @Before annotation and its value, about the parameters of the method allMethods(), … in the incoming tutorials.
Next, I will add some Maven plugins to run our application with AspectJ.
Why I did not run the application normally: select the Example class main and then select Run “Example.main()”? That’s because, for the sake of simplicity, we can test the result with just one Maven command 🙂
With aspect-oriented programming, we have three ways of implementing code insertion into an existing class, namely:
- Compile-Time Weaving: This is the simplest way. At compile source, we will have the code of the class that we want to insert the code and the code that we want to insert. Therefore, we only need to configure to combine these two source code together.
- Post-Compile Weaving: This method is used to insert code into Java’s .class files that have been compiled.
- Load-Time Weaving: This method is used to insert code when the class we want to insert is loaded into the JVM.
Specifically each way, I will guide you in the incoming tutorials, in this tutorial I use the simplest way, compile-time weaving.
In order to be able to insert the log message before calling the methods of the Application class, we will use a Maven plugin to do this. If you run it normally, the IDE only builds our class through the .class file to run without AspectJ’s intervention. Therefore, the results will not be as we expected.
The plugin is called aspectj-maven-plugin and I will declare it as follows:
|
1 2 3 4 5 6 7 8 9 10 11 12 13 14 15 16 17 18 19 |
<plugin> <groupId>org.codehaus.mojo</groupId> <artifactId>aspectj-maven-plugin</artifactId> <version>1.10</version> <configuration> <source>1.8</source> <target>1.8</target> </configuration> <executions> <execution> <goals> <goal>compile</goal> </goals> <configuration> <complianceLevel>1.8</complianceLevel> </configuration> </execution> </executions> </plugin> |
After we have built our application code using AspectJ plugin, we will use another Maven plugin to run the application. That plugin is called exec-maven-plugin and I will declare it like this:
|
1 2 3 4 5 6 7 8 9 10 11 12 13 14 15 16 |
<plugin> <groupId>org.codehaus.mojo</groupId> <artifactId>exec-maven-plugin</artifactId> <version>1.6.0</version> <executions> <execution> <phase>package</phase> <goals> <goal>java</goal> </goals> </execution> </executions> <configuration> <mainClass>com.huongdanjava.aspectjexample.Example</mainClass> </configuration> </plugin> |
Now, when running the Maven command with the command:
|
1 |
mvn clean install exec:java |
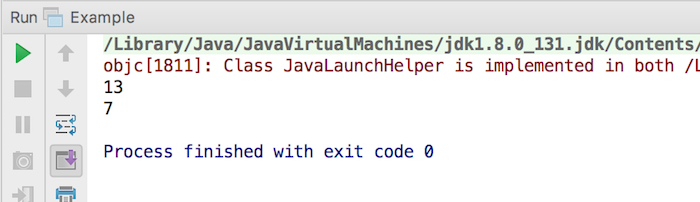
You will see the output as follows:
|
1 2 3 4 5 6 7 8 9 10 11 12 13 14 15 16 17 18 19 20 21 22 23 24 25 26 27 28 29 30 31 32 33 34 35 36 37 38 39 40 41 42 43 44 45 46 47 48 49 50 51 52 53 54 55 56 57 58 59 60 61 62 63 |
/Library/Java/JavaVirtualMachines/jdk1.8.0_131.jdk/Contents/Home/bin/java -Dmaven.multiModuleProjectDirectory=/Users/khanh/Working/Code/huongdanjava.com/aspectj-example "-Dmaven.home=/Applications/IntelliJ IDEA CE.app/Contents/plugins/maven/lib/maven3" "-Dclassworlds.conf=/Applications/IntelliJ IDEA CE.app/Contents/plugins/maven/lib/maven3/bin/m2.conf" "-javaagent:/Applications/IntelliJ IDEA CE.app/Contents/lib/idea_rt.jar=55055:/Applications/IntelliJ IDEA CE.app/Contents/bin" -Dfile.encoding=UTF-8 -classpath "/Applications/IntelliJ IDEA CE.app/Contents/plugins/maven/lib/maven3/boot/plexus-classworlds-2.5.2.jar" org.codehaus.classworlds.Launcher -Didea.version=2017.2.6 clean install exec:java objc[1816]: Class JavaLaunchHelper is implemented in both /Library/Java/JavaVirtualMachines/jdk1.8.0_131.jdk/Contents/Home/bin/java (0x10ace74c0) and /Library/Java/JavaVirtualMachines/jdk1.8.0_131.jdk/Contents/Home/jre/lib/libinstrument.dylib (0x10adaf4e0). One of the two will be used. Which one is undefined. [INFO] Scanning for projects... [INFO] [INFO] ------------------------------------------------------------------------ [INFO] Building aspectj-example 1.0-SNAPSHOT [INFO] ------------------------------------------------------------------------ [INFO] [INFO] --- maven-clean-plugin:2.5:clean (default-clean) @ aspectj-example --- [INFO] Deleting /Users/khanh/Working/Code/huongdanjava.com/aspectj-example/target [INFO] [INFO] --- maven-resources-plugin:2.6:resources (default-resources) @ aspectj-example --- [WARNING] Using platform encoding (UTF-8 actually) to copy filtered resources, i.e. build is platform dependent! [INFO] Copying 0 resource [INFO] [INFO] --- maven-compiler-plugin:3.1:compile (default-compile) @ aspectj-example --- [INFO] Changes detected - recompiling the module! [WARNING] File encoding has not been set, using platform encoding UTF-8, i.e. build is platform dependent! [INFO] Compiling 3 source files to /Users/khanh/Working/Code/huongdanjava.com/aspectj-example/target/classes [INFO] [INFO] --- aspectj-maven-plugin:1.10:compile (default) @ aspectj-example --- [INFO] Showing AJC message detail for messages of types: [error, warning, fail] [WARNING] bad version number found in /Users/khanh/.m2/repository/org/aspectj/aspectjrt/1.8.13/aspectjrt-1.8.13.jar expected 1.8.9 found 1.8.13 <unknown source file>:<no line information> [INFO] [INFO] --- maven-resources-plugin:2.6:testResources (default-testResources) @ aspectj-example --- [WARNING] Using platform encoding (UTF-8 actually) to copy filtered resources, i.e. build is platform dependent! [INFO] skip non existing resourceDirectory /Users/khanh/Working/Code/huongdanjava.com/aspectj-example/src/test/resources [INFO] [INFO] --- maven-compiler-plugin:3.1:testCompile (default-testCompile) @ aspectj-example --- [INFO] Nothing to compile - all classes are up to date [INFO] [INFO] --- maven-surefire-plugin:2.12.4:test (default-test) @ aspectj-example --- [INFO] No tests to run. [INFO] [INFO] --- maven-jar-plugin:2.4:jar (default-jar) @ aspectj-example --- [INFO] Building jar: /Users/khanh/Working/Code/huongdanjava.com/aspectj-example/target/aspectj-example-1.0-SNAPSHOT.jar [INFO] [INFO] --- exec-maven-plugin:1.6.0:java (default) @ aspectj-example --- Method name: sum 13 Method name: sub 7 [INFO] [INFO] --- maven-install-plugin:2.4:install (default-install) @ aspectj-example --- [INFO] Installing /Users/khanh/Working/Code/huongdanjava.com/aspectj-example/target/aspectj-example-1.0-SNAPSHOT.jar to /Users/Khanh/.m2/repository/com/huongdanjava/aspectj-example/1.0-SNAPSHOT/aspectj-example-1.0-SNAPSHOT.jar [INFO] Installing /Users/khanh/Working/Code/huongdanjava.com/aspectj-example/pom.xml to /Users/Khanh/.m2/repository/com/huongdanjava/aspectj-example/1.0-SNAPSHOT/aspectj-example-1.0-SNAPSHOT.pom [INFO] [INFO] --- exec-maven-plugin:1.6.0:java (default-cli) @ aspectj-example --- Method name: sum 13 Method name: sub 7 [INFO] ------------------------------------------------------------------------ [INFO] BUILD SUCCESS [INFO] ------------------------------------------------------------------------ [INFO] Total time: 3.805 s [INFO] Finished at: 2017-12-28T20:21:00+07:00 [INFO] Final Memory: 20M/252M [INFO] ------------------------------------------------------------------------ Process finished with exit code 0 |
Obviously, as you can see, the exec-maven-plugin plugin allows us to run the application using the Example class and do what we want:
|
1 2 3 4 5 |
[INFO] --- exec-maven-plugin:1.6.0:java (default-cli) @ aspectj-example --- Method name: sum 13 Method name: sub 7 |
Of course, use the Maven plugin exec-maven-plugin just to give a simple example for this tutorial. In actual applications, build into jar package to run, we do not need to use this plugin anymore.