In part 1, I introduced you to some information about the Helm chart and how to generate a Helm project. In this section, we will proceed to edit the configuration files for the Kubernetes objects, then use Helm to deploy the example application. You will imagine how we use Helm to manage the deployment for applications deployed using Kubernetes!
Now, we will review the contents of the deployment.yaml and service.yaml files to see what information we can configurable, and what information can be re-useable. What information is configurable, we will define them in values.yaml file, and what information can be re-useable, we will define them in _helpers.tpl file.
In our deployment.yaml file, information like replicas, Docker Image repository, Docker Image tag are the information we can extract to make them configurable. In the service.yaml file, we can extract the type and port information to make them configurable.
I can define the contents of the values.yaml file as follows:
|
1 2 3 4 5 6 7 8 9 10 11 12 13 |
replicaCount: 1 image: spring_boot_docker_compose: repository: spring-boot-docker-compose tag: 1.0.0 postgres: repository: postgres tag: 13.3 service: type: LoadBalancer port: 8080 |
To use these key, value pairs in the deployment.yaml and service.yaml files, we will declare the use with the following syntax:
|
1 |
{{ .Values.<key> }} |
with:
- <key> is the property name we use to declare the value.
- Values is Helm’s built-in object, which holds the information of all the properties that we declare in the values.yaml file.
The content of the file deployment.yaml and service.yaml after using the key and value pairs in the values.yaml file is as follows:
deployment.yaml
|
1 2 3 4 5 6 7 8 9 10 11 12 13 14 15 16 17 18 19 20 21 22 23 24 25 26 27 28 29 30 31 32 33 34 35 36 37 38 39 40 41 |
apiVersion: apps/v1 kind: Deployment metadata: name: spring-boot-docker-compose spec: replicas: {{ .Values.replicaCount }} selector: matchLabels: app: spring-boot-docker-compose template: metadata: labels: app: spring-boot-docker-compose spec: containers: - name: spring-boot-docker-compose image: "{{ .Values.image.spring_boot_docker_compose.repository }}:{{ .Values.image.spring_boot_docker_compose.tag }}" ports: - containerPort: 8080 env: - name: "DATABASE_USERNAME" value: "khanh" - name: "DATABASE_PASSWORD" value: "123456" - name: "DATABASE_HOST" value: "localhost" - name: "DATABASE_NAME" value: "test" - name: "DATABASE_PORT" value: "5432" - name: postgres image: "{{ .Values.image.postgres.repository }}:{{ .Values.image.postgres.tag }}" ports: - containerPort: 5432 env: - name: "POSTGRES_PASSWORD" value: "123456" - name: "POSTGRES_USER" value: "khanh" - name: "POSTGRES_DB" value: "test" |
service.yaml:
|
1 2 3 4 5 6 7 8 9 10 11 12 |
apiVersion: v1 kind: Service metadata: name: spring-boot-docker-compose-app-service spec: selector: app: spring-boot-docker-compose ports: - protocol: "TCP" port: {{ .Values.service.port }} targetPort: 8080 type: {{ .Values.service.type }} |
In the two files deployment.yaml and service.yaml, the label information is re-useable. We can define a template containing this label information in the _helpers.tpl file using Helm’s “define” action as follows:
|
1 2 3 |
{{- define "spring-boot-docker-compose.labels" }} app: spring-boot-docker-compose {{- end }} |
To use this “spring-boot-docker-compose.labels” template in our deployment.yaml and service.yaml files, we can declare using the include function as follows:
deployment.yaml:
|
1 2 3 4 5 6 7 8 9 10 11 12 13 14 15 16 17 18 19 20 21 22 23 24 25 26 27 28 29 30 31 32 33 34 35 36 37 38 39 40 41 |
apiVersion: apps/v1 kind: Deployment metadata: name: spring-boot-docker-compose spec: replicas: {{ .Values.replicaCount }} selector: matchLabels: {{- include "spring-boot-docker-compose.labels" . | indent 6 }} template: metadata: labels: {{- include "spring-boot-docker-compose.labels" . | indent 8 }} spec: containers: - name: spring-boot-docker-compose image: "{{ .Values.image.spring_boot_docker_compose.repository }}:{{ .Values.image.spring_boot_docker_compose.tag }}" ports: - containerPort: 8080 env: - name: "DATABASE_USERNAME" value: "khanh" - name: "DATABASE_PASSWORD" value: "123456" - name: "DATABASE_HOST" value: "localhost" - name: "DATABASE_NAME" value: "test" - name: "DATABASE_PORT" value: "5432" - name: postgres image: "{{ .Values.image.postgres.repository }}:{{ .Values.image.postgres.tag }}" ports: - containerPort: 5432 env: - name: "POSTGRES_PASSWORD" value: "123456" - name: "POSTGRES_USER" value: "khanh" - name: "POSTGRES_DB" value: "test" |
service.yaml
|
1 2 3 4 5 6 7 8 9 10 11 12 |
apiVersion: v1 kind: Service metadata: name: spring-boot-docker-compose-app-service spec: selector: {{- include "spring-boot-docker-compose.labels" . | indent 4 }} ports: - protocol: "TCP" port: {{ .Values.service.port }} targetPort: 8080 type: {{ .Values.service.type }} |
As you can see, all declarations using Helm’s template, we use the opening pair “{{” and closing “}}”. And depending on the need, the declaration inside the pair “{{” and “}}” will be different.
Here, I also declare the indent keyword. Before I talk about this keyword, I also want to emphasize to you that we are working with the Helm chart template. It is not the final file used for deployment. Helm will help us, based on the template we define to generate the final output for deployment. The indent keyword helps us to format the text that will be generated. “indent 4” when generating output, this line will be backed into 4 space characters! Similarly “indent 8” will be 8 space characters. Using indent makes our output easier to read and maintain.
At this point, I have finished applying the Helm template to the configuration files for Kubernetes objects.
You can verify whether there is a problem with the configuration for our Helm chart, using the command:
|
1 |
helm lint <path-to-helm-project-root-folder> |
with:
- path-to-helm-project-root-folder is the path to the root directory of the Helm project.
For example, I can run the command “helm lint” for my example application as follows:
|
1 |
helm lint . |
Result:

So the Helm chart that I configured has no errors at all.
To see how Helm will generate output based on the template, you can run the command:
|
1 |
helm template <template-name> <path-to-helm-project-root-folder> |
with:
- template-name is the name of the template we set for the Helm chart
- path-to-helm-project-root-folder is similar to what I said above.
Result when I run the command “helm template” for my example:
|
1 |
helm template spring-boot-docker-compose . |
as follows:
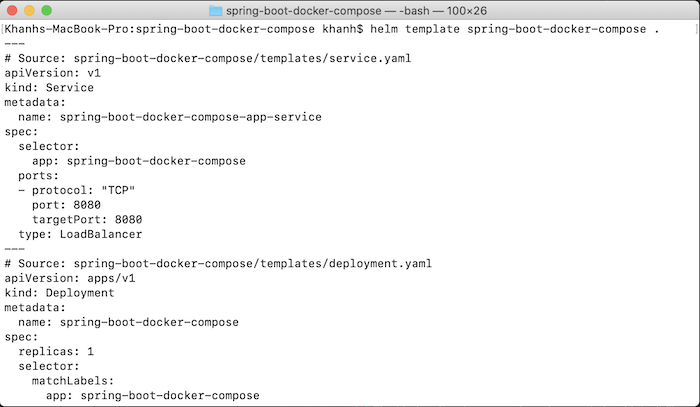
As you can see, the information in the deployment.yaml and service.yaml files has been replaced with the values I defined in the values.yaml and _helpers.tpl files.
At this point, you can deploy the application to Kubernetes using Helm’s install command as follows:
|
1 |
helm install <release-name> <path-to-helm-project-root-folder> |
with:
- release-name is the release name of the application
Result when I run install command:
|
1 |
helm install spring-boot-docker-compose . |
as follows:

Check all the deployments in the Kubernetes cluster, you will see the following results:
![]()
Check all services, you will see the following results:

Now access the address http://localhost:8080/hello, you will see the results as I said in the previous tutorial.
You can check all chart releases using list command as follows:
|
1 |
helm list |
The result when I run this list command is as follows:
![]()