Helm is a tool that helps us manage applications deployed using Kubernetes. You can imagine that to deploy an application using Kubernetes we will need many different configuration files such as Deployment, Service, Ingress, … Each time we deploy, the information of these configuration files will be different. How to manage them? Helm will help us solve this problem. Every time we deploy, Helm will help us pack all the necessary configuration files into a file called chart (I don’t know why they call that), save this chart in the Charts repository like the Maven repository and deploy the application using the configuration files in that chart. How is it in detail? In this tutorial, I will introduce you to the basics of Helm so that you can use it for deploying applications using Kubernetes!
Example application
I will use the example application in the introductory article about Docker Compose as an example for this tutorial. If you do not have time to read that article, I would like to summarize it like this: the example application in that article simply exposes an endpoint “/hello”, returning the idle connection to a database is PostgreSQL only!
Dockerfile for this application, I also created. For details, you can skim through that article, and find the content of the Dockerfile file if you want! (I don’t include it here because I may update this post later, so this post won’t be updated!)
To deploy this example application with Kubernetes, I will define the files: deployment.yaml and service.yaml as follows:
deployment.yaml:
|
1 2 3 4 5 6 7 8 9 10 11 12 13 14 15 16 17 18 19 20 21 22 23 24 25 26 27 28 29 30 31 32 33 34 35 36 37 38 39 40 41 |
apiVersion: apps/v1 kind: Deployment metadata: name: spring-boot-docker-compose spec: replicas: 1 selector: matchLabels: app: spring-boot-docker-compose template: metadata: labels: app: spring-boot-docker-compose spec: containers: - name: spring-boot-docker-compose image: spring-boot-docker-compose:1.0.0 ports: - containerPort: 8080 env: - name: "DATABASE_USERNAME" value: "khanh" - name: "DATABASE_PASSWORD" value: "123456" - name: "DATABASE_HOST" value: "localhost" - name: "DATABASE_NAME" value: "test" - name: "DATABASE_PORT" value: "5432" - name: postgres image: postgres:13.3 ports: - containerPort: 5432 env: - name: "POSTGRES_PASSWORD" value: "123456" - name: "POSTGRES_USER" value: "khanh" - name: "POSTGRES_DB" value: "test" |
service.yaml
|
1 2 3 4 5 6 7 8 9 10 11 12 |
apiVersion: v1 kind: Service metadata: name: spring-boot-docker-compose-app-service spec: selector: app: spring-boot-docker-compose ports: - protocol: "TCP" port: 8080 targetPort: 8080 type: LoadBalancer |
After running the command “apply” with the above 2 configuration files:
|
1 |
kubectl apply -f deployment.yaml |
and:
|
1 |
kubectl apply -f service.yaml |
and then request to the address http://localhost:8080/hello, you will see the following results:

Now, we will use the Helm chart to manage the deployment using Kubernetes for this example application.
Helm project
If you have not installed Helm, you can refer here.
To use Helm to manage your deployment using Kubernetes, create a new Helm project using the “create” command as follows:
|
1 |
helm create <project-name> |
with:
- project-name is the name of the project you want to create.
For example, I can create a new Helm project for my example application as follows:
|
1 |
helm create spring-boot-docker-compose |
Result:

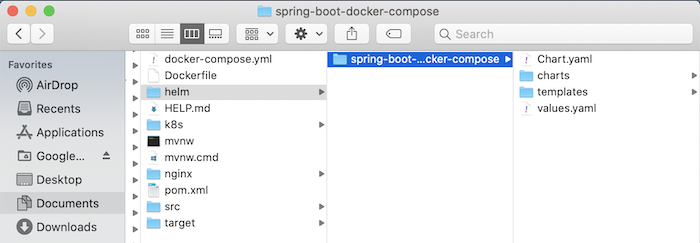
Check the folder where you just ran the “create” command above, you will see that this folder has created some new files and folders as follows:
Please open the Chart.yaml file, you will see that it is used to define the chart’s information including the name (name attribute), description (description attribute), chart type (type attribute), version of the chart (the version property), and the version of the application (the appVersion property). This is just basic information, this Chart.yaml file can also define a lot of other information, you can see more here.
The type attribute defines the type of chart we are declaring. There are 2 types of charts, application, and library, the difference between them is that the chart application can be deployed, and the chart library is not!
I will define chart information for my example application as follows:
|
1 2 3 4 5 6 7 8 9 |
apiVersion: v2 name: spring-boot-docker-compose description: A Helm chart for Kubernetes to deploy spring-boot-docker-compose application type: application version: 0.1.0 appVersion: "1.0.0" |
The charts folder will contain other charts that your chart needs to use.
For simplicity, I will not use other charts for the chart of the example application in this tutorial, guys!
The templates directory is an important directory, we will define the configuration files for the Kubernetes objects in this directory.
By default, when the Helm project is generated, you will see a lot of configuration files for Kubernetes objects like deployment.yaml, service.yaml, … were generated in this directory:
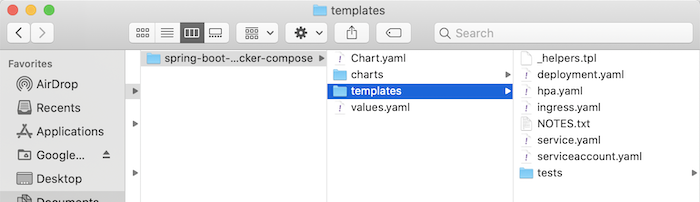
The files deployment.yaml, hpa.yaml, ingress.yaml, service.yaml, serviceaccount.yaml are information definitions for the Deployment, Horizontal Pod Autoscaling, Ingress, Service, and Service Account objects respectively. Kubernetes. The _helpers.tpl file will contain the template definitions and can be reused in many places in our chart. The file NOTES.txt defines the lines of text that will be displayed when we run Helm commands like helm install, … The tests folder contains the test-related configurations for our chart.
To deploy my example application, as I did above, I just need to configure the Deployment and Service objects. So for simplicity, except for _helpers.tpl, deployment.yaml and service.yaml files, I will delete all remaining files and folders, in this templates folder, as follows:
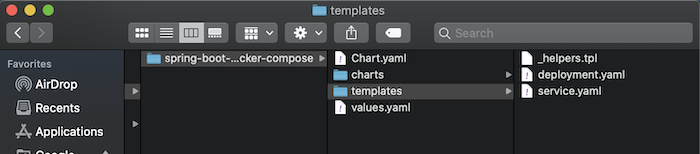
The content of the files: deployment.yaml and service.yaml, I will replace it with the content above and I will also delete the contents of the _helpers.tpl file!
The values.yaml file in the Helm project’s home directory is used to define key and value pairs and we can declare to use these key-value pairs in the chart’s configuration files.
I will also delete the content of this file, to rewrite it from scratch, for you to better visualize. Because the generated file contains a lot of information.
At this point, I would like to end part 1 of this tutorial. We will start editing, and applying the Helm template to the configuration files for Kubernetes objects in the next part!