In the previous tutorial, I introduced to you all an overview of JPA Query Language to manipulate database types using entities. Whenever you need information from the database, you will use the SELECT or UPDATE, or DELETE statements and the entity name to build into the query, then retrieve the Query object from the Entity Manager using this query, and finally, call the appropriate method according to your needs from this query object to get the result you want. Many steps need to do, don’t you? If you use JPA with Spring framework in your project then just try to use Spring Data JPA! It will help you minimize the work to be done in some cases. How is it in detail? In this tutorial, let’s learn about Spring Data JPA.
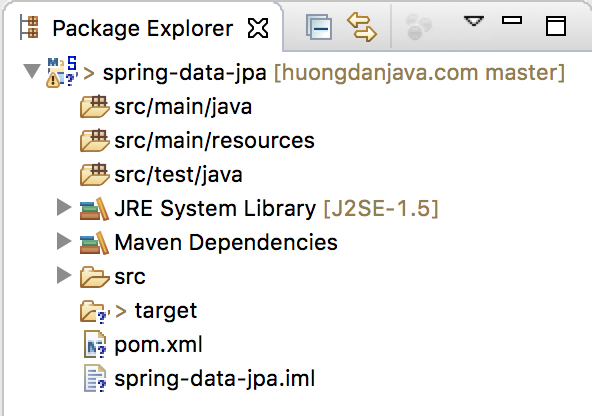
First, I will create a new Maven project as an example:

We will use Java 17 for this example:
|
1 2 3 4 |
<properties> <maven.compiler.source>17</maven.compiler.source> <maven.compiler.target>17</maven.compiler.target> </properties> |
Spring Data JPA dependency:
|
1 2 3 4 5 |
<dependency> <groupId>org.springframework.data</groupId> <artifactId>spring-data-jpa</artifactId> <version>3.1.1</version> </dependency> |
Here, I will use JPA with the implementation of Hibernate so I will add Hibernate dependency as follows:
|
1 2 3 4 5 |
<dependency> <groupId>org.hibernate</groupId> <artifactId>hibernate-core</artifactId> <version>6.2.6.Final</version> </dependency> |
Project Lombok:
|
1 2 3 4 5 6 |
<dependency> <groupId>org.projectlombok</groupId> <artifactId>lombok</artifactId> <version>1.18.28</version> <scope>provided</scope> </dependency> |
In this tutorial, I will use the MySQL database:
|
1 2 3 4 5 |
<dependency> <groupId>mysql</groupId> <artifactId>mysql-connector-java</artifactId> <version>8.0.33</version> </dependency> |
For simplicity, I just defined a table containing student information with 2 columns as follows:
|
1 2 3 4 5 |
CREATE TABLE `student` ( `id` bigint(20) NOT NULL AUTO_INCREMENT, `name` varchar(50) DEFAULT NULL, PRIMARY KEY (`id`) ) ENGINE=InnoDB AUTO_INCREMENT=2 DEFAULT CHARSET=latin1; |
The entity of this table:
|
1 2 3 4 5 6 7 8 9 10 11 12 13 14 15 16 17 18 19 20 21 22 23 24 25 26 27 |
package com.huongdanjava.springdatajpa; import jakarta.persistence.Column; import jakarta.persistence.Entity; import jakarta.persistence.GeneratedValue; import jakarta.persistence.Id; import jakarta.persistence.Table; import java.io.Serializable; import lombok.Getter; import lombok.Setter; @Table(name = "student") @Entity @Getter @Setter public class Student implements Serializable { private static final long serialVersionUID = 1L; @Id @GeneratedValue private Long id; @Column private String name; } |
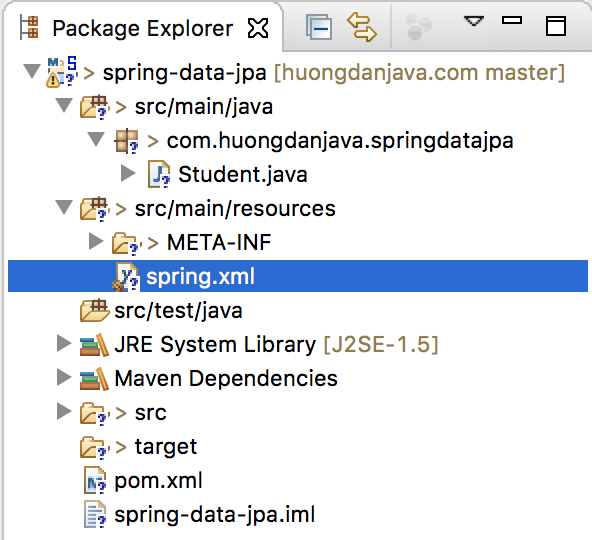
To work with JPA, we need a persistence.xml configuration file for it. Let’s create a new file called persistence.xml located in /src/main/resources/META-INF.
The contents of this file are as follows:
|
1 2 3 4 5 6 7 8 9 10 11 12 13 14 15 16 17 18 |
<?xml version="1.0" encoding="UTF-8" standalone="no"?> <persistence version="2.1" xmlns="http://xmlns.jcp.org/xml/ns/persistence" xmlns:xsi="http://www.w3.org/2001/XMLSchema-instance" xsi:schemaLocation="http://xmlns.jcp.org/xml/ns/persistence http://xmlns.jcp.org/xml/ns/persistence/persistence_2_1.xsd"> <persistence-unit name="springdataPU" transaction-type="RESOURCE_LOCAL"> <provider>org.hibernate.jpa.HibernatePersistenceProvider</provider> <class>com.huongdanjava.springdatajpa.Student</class> <exclude-unlisted-classes/> <properties> <property name="hibernate.show_sql" value="true"/> <property name="hibernate.format_sql" value="false"/> <property name="hibernate.dialect" value="org.hibernate.dialect.MySQLDialect"/> <property name="hibernate.connection.driver_class" value="com.mysql.cj.jdbc.Driver"/> <property name="javax.persistence.validation.mode" value="none"/> </properties> </persistence-unit> </persistence> |
Declaring EntityManagerFactory in Spring container:
|
1 2 3 4 5 6 7 |
<bean id="entityManagerFactory" class="org.springframework.orm.jpa.LocalContainerEntityManagerFactoryBean"> <property name="dataSource" ref="dataSource" /> <property name="persistenceUnitName" value="springdataPU" /> <property name="jpaVendorAdapter"> <bean class="org.springframework.orm.jpa.vendor.HibernateJpaVendorAdapter" /> </property> </bean> |
with datasource:
|
1 2 3 4 5 6 |
<bean id="dataSource" class="org.springframework.jdbc.datasource.DriverManagerDataSource"> <property name="driverClassName" value="com.mysql.cj.jdbc.Driver" /> <property name="url" value="jdbc:mysql://localhost:3306/jpa_example" /> <property name="username" value="root" /> <property name="password" value="123456" /> </bean> |
OK, so we have just finished preparing.

You can refer to the tutorial about JPA and Spring framework here.
Now we go to the main topic of this tutorial.
First of all, you need to know that Spring Data JPA is a small module in a large project called Spring Data project. The purpose of the Spring Data project is to minimize the repetitive code involved in accessing and manipulating data management systems when developing applications that use the Spring framework. In addition to Spring Data JPA support JPA for minimizing code to access and manipulate database management systems, we also have Spring Data JDBC (like Spring Data JPA), Spring Data LDAP (support Spring LDAP), Spring Data MongoDB (support for MongoDB), etc. You can find all Spring Data modules here.
In order to achieve the purpose of minimizing code, Spring Data defines the main interface called Repository, which is part of the Spring Data Common module, and will be used for all the other modules in the Spring Data project. The content of this interface is as simple as:
|
1 2 3 4 5 6 7 8 |
package org.springframework.data.repository; import org.springframework.stereotype.Indexed; @Indexed public interface Repository<T, ID> { } |
This interface uses two generic types:
- T is the domain class that the repository will manage.
- ID is the data type of the ID of the domain class that the repository manages.
Because this interface is so simple, it must have other interfaces that extend it to represent what the Spring Data project does for you. 😀
Here, we will have more interfaces that extend from the Repository interface depending on the module we use, but since we are discussing the Spring Data JPA then I will only list here an interface that extends the Repository interface in which Spring Data JPA is in use. That’s the CrudRepository interface.
CrudRepository interface with the meaning of creating, reading, updating, and deleting allows us to perform basic operations on data systems, data systems here you have to understand in broad meaning that it is not just a database.
To support paging and sorting for Spring Data JPA, we have to mention another interface called PagingAndSortingRepository.
All of the above-mentioned interfaces are in the Spring Data Common module.
In Spring Data JPA, we have only one interface, the JpaRepository interface that inherits the PagingAndSortingRepository interface. With extending from the PagingAndSortingRepository interface, you can also imagine that the Spring Data JPA can help us minimize the code for database-related operations, right? These include: creating, reading, updating, deleting, paging, and sorting. 😀
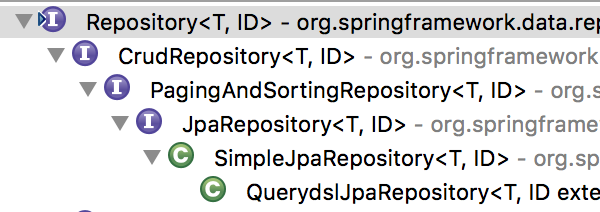
You can clearly see the extended structure for these interfaces in the following image:

OK, so let’s take an example with the JpaRepository interface to see how it works.
Now we will create an interface called HelloRepository extend from JpaRepository with the following content:
|
1 2 3 4 5 6 7 |
package com.huongdanjava.springdatajpa; import org.springframework.data.jpa.repository.JpaRepository; public interface HelloRepository extends JpaRepository<Student, Long> { } |
The domain class here is the Student entity and Long is the data type of the properties in the Student mapping entity with the primary key column in our student table.
Now we will declare this interface in the Spring container as follows:
|
1 2 3 4 5 6 7 8 9 10 11 12 13 14 15 16 17 18 19 20 21 22 23 24 25 26 27 28 29 |
<beans xmlns="http://www.springframework.org/schema/beans" xmlns:xsi="http://www.w3.org/2001/XMLSchema-instance" xmlns:jpa="http://www.springframework.org/schema/data/jpa" xmlns:context="http://www.springframework.org/schema/context" xsi:schemaLocation="http://www.springframework.org/schema/beans http://www.springframework.org/schema/beans/spring-beans.xsd http://www.springframework.org/schema/data/jpa http://www.springframework.org/schema/data/jpa/spring-jpa.xsd http://www.springframework.org/schema/context https://www.springframework.org/schema/context/spring-context.xsd"> <jpa:repositories base-package="com.huongdanjava.springdatajpa"/> <context:annotation-config/> <bean id="entityManagerFactory" class="org.springframework.orm.jpa.LocalContainerEntityManagerFactoryBean"> <property name="dataSource" ref="dataSource"/> <property name="persistenceUnitName" value="springdataPU"/> <property name="jpaVendorAdapter"> <bean class="org.springframework.orm.jpa.vendor.HibernateJpaVendorAdapter"/> </property> </bean> <bean id="dataSource" class="org.springframework.jdbc.datasource.DriverManagerDataSource"> <property name="driverClassName" value="com.mysql.cj.jdbc.Driver"/> <property name="url" value="jdbc:mysql://localhost:3306/jpa_example"/> <property name="username" value="root"/> <property name="password" value="123456"/> </bean> </beans> |
Here, I use the java namespace jpa:repositories with the base package com.huongdanjava.springdatajpa to scan the HelloRepository interface. With this declaration, the Spring Data JPA automatically retrieves the object that implements the HelloRepository interface, SimpleJpaRepository, as you see in the image above to initialize this object in the Spring container.
One point that you guys should note is that we need to declare the <context:annotation-config/> tag as I did above so that Spring can configure the object of the EntityPathResolver class when initializing the bean for the JpaRepositoryFactoryBean class! Otherwise, you will get the error “EntityPathResolver must not be null”. You can see the setEntityPathResolver() method with the @Autowired annotation in the JpaRepositoryFactoryBean class to better understand this.
Since the object SimpleJpaRepository uses transaction, you need to declare more transactionManager bean into the Spring container.
|
1 2 3 4 5 6 7 8 9 10 11 12 13 14 15 16 17 18 19 20 21 22 23 24 25 26 27 28 29 30 31 32 33 34 35 36 37 38 |
<beans xmlns="http://www.springframework.org/schema/beans" xmlns:xsi="http://www.w3.org/2001/XMLSchema-instance" xmlns:jpa="http://www.springframework.org/schema/data/jpa" xmlns:tx="http://www.springframework.org/schema/tx" xmlns:context="http://www.springframework.org/schema/context" xsi:schemaLocation="http://www.springframework.org/schema/beans http://www.springframework.org/schema/beans/spring-beans.xsd http://www.springframework.org/schema/data/jpa http://www.springframework.org/schema/data/jpa/spring-jpa.xsd http://www.springframework.org/schema/tx http://www.springframework.org/schema/tx/spring-tx.xsd http://www.springframework.org/schema/context https://www.springframework.org/schema/context/spring-context.xsd"> <jpa:repositories base-package="com.huongdanjava.springdatajpa"/> <context:annotation-config/> <bean id="entityManagerFactory" class="org.springframework.orm.jpa.LocalContainerEntityManagerFactoryBean"> <property name="dataSource" ref="dataSource"/> <property name="persistenceUnitName" value="springdataPU"/> <property name="jpaVendorAdapter"> <bean class="org.springframework.orm.jpa.vendor.HibernateJpaVendorAdapter"/> </property> </bean> <bean id="dataSource" class="org.springframework.jdbc.datasource.DriverManagerDataSource"> <property name="driverClassName" value="com.mysql.cj.jdbc.Driver"/> <property name="url" value="jdbc:mysql://localhost:3306/jpa_example"/> <property name="username" value="root"/> <property name="password" value="123456"/> </bean> <tx:annotation-driven proxy-target-class="true" transaction-manager="transactionManager"/> <bean id="transactionManager" class="org.springframework.jdbc.datasource.DataSourceTransactionManager"> <property name="dataSource" ref="dataSource"/> </bean> </beans> |
OK, here we have completed the necessary configurations. Now, let’s try it out.
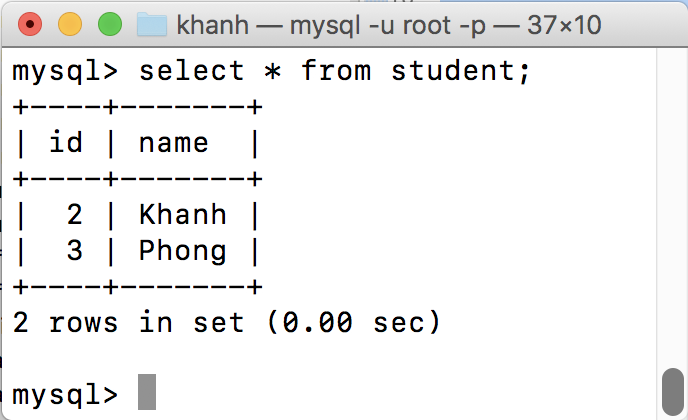
Suppose in the database you have the following data:

then when running the following example:
|
1 2 3 4 5 6 7 8 9 10 11 12 13 14 15 16 |
package com.huongdanjava.springdatajpa; import org.springframework.context.ApplicationContext; import org.springframework.context.support.ClassPathXmlApplicationContext; public class Application { public static void main(String[] args) { ApplicationContext ac = new ClassPathXmlApplicationContext("spring.xml"); HelloRepository helloRepository = (HelloRepository) ac.getBean("helloRepository"); Student student = helloRepository.findById(new Long(2)).get(); System.out.println(student.getName()); } } |
The result will be:

Suppose, we now add a method in the HelloRepository interface with the following contents:
|
1 2 3 4 5 6 7 8 9 |
package com.huongdanjava.springdatajpa; import org.springframework.data.jpa.repository.JpaRepository; public interface HelloRepository extends JpaRepository<Student, Long> { public Student findByName(String name); } |
then when running the following example:
|
1 2 3 4 5 6 7 8 9 10 11 12 13 14 15 16 17 |
package com.huongdanjava.springdatajpa; import org.springframework.context.ApplicationContext; import org.springframework.context.support.ClassPathXmlApplicationContext; public class Application { public static void main(String[] args) { ApplicationContext ac = new ClassPathXmlApplicationContext("spring.xml"); HelloRepository helloRepository = (HelloRepository) ac.getBean("helloRepository"); Student student = helloRepository.findByName("Phong"); System.out.println(student.getId()); } } |
the result will be:

As you can see, although no class implements the HelloRepository interface, we still query the student table by column name. Reduce a lot of code that we need to do, don’t you?


