In the tutorial JDBC transaction management in Spring, I showed you how to configure transaction management using an XML file. We can also use Java code to do this with the @EnableTransactionManagement annotation. How is it in detail? We will find out together in this tutorial!
First, I will create a new Maven project as an example:
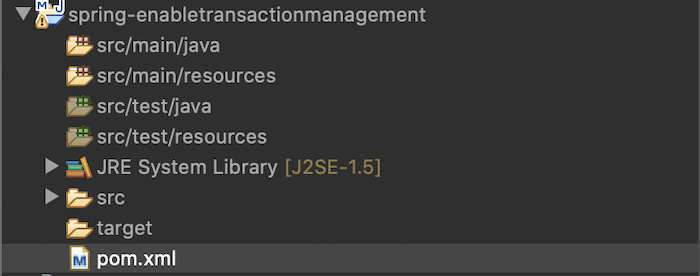
We will use Java 21 for this project:
|
1 2 3 4 |
<properties> <maven.compiler.target>21</maven.compiler.target> <maven.compiler.source>17</maven.compiler.source> </properties> |
Spring Context and Spring JDBC are as follows:
|
1 2 3 4 5 6 7 8 9 10 |
<dependency> <groupId>org.springframework</groupId> <artifactId>spring-context</artifactId> <version>6.1.10</version> </dependency> <dependency> <groupId>org.springframework</groupId> <artifactId>spring-jdbc</artifactId> <version>6.1.10</version> </dependency> |
I will use MySQL database as an example:
|
1 2 3 4 5 |
<dependency> <groupId>com.mysql</groupId> <artifactId>mysql-connector-j</artifactId> <version>9.0.0</version> </dependency> |
To compare the configuration with the XML file, in this tutorial, I also created a small banking application that allows us to transfer money from account A to account B. This transfer process will include 2 steps: deduct money from account A and add money to account B. If any exception occurs during money transferring, all operations will be rolled back. Similar to the previous post.
I also define a table with the following structure:
|
1 2 3 4 5 |
CREATE TABLE account ( id INT AUTO_INCREMENT PRIMARY KEY, name VARCHAR(45) NOT NULL, amount DECIMAL ); |
The AccountDAO interface and its implementation AccountDAOImpl to work with the account table, the AccountService interface and its implementation AccountServiceImpl to work with the application’s business, has the following content:
|
1 2 3 4 5 6 7 8 9 10 |
package com.huongdanjava.spring; import java.math.BigDecimal; public interface AccountDAO { BigDecimal getCurrentAmount(int id); void updateAmount(int id, BigDecimal amount); } |
|
1 2 3 4 5 6 7 8 9 10 11 12 13 14 15 16 17 18 19 20 21 22 23 24 25 26 27 28 29 30 31 32 33 34 35 36 37 38 |
package com.huongdanjava.spring; import java.math.BigDecimal; import java.sql.ResultSet; import java.sql.SQLException; import org.springframework.beans.factory.annotation.Autowired; import org.springframework.dao.DataAccessException; import org.springframework.jdbc.core.JdbcTemplate; import org.springframework.jdbc.core.ResultSetExtractor; import org.springframework.stereotype.Repository; @Repository public class AccountDAOImpl implements AccountDAO { @Autowired private JdbcTemplate jdbcTemplate; @Override public BigDecimal getCurrentAmount(int id) { String sql = "SELECT amount FROM account WHERE id=" + id; return jdbcTemplate.query(sql, new ResultSetExtractor<BigDecimal>() { @Override public BigDecimal extractData(ResultSet resultSet) throws SQLException, DataAccessException { resultSet.next(); return BigDecimal.valueOf(resultSet.getInt("amount")); } }); } @Override public void updateAmount(int id, BigDecimal amount) { String sql = String.format("UPDATE account SET amount=%f WHERE id=%d", amount, id); jdbcTemplate.execute(sql); } } |
|
1 2 3 4 5 6 7 8 |
package com.huongdanjava.spring; import java.math.BigDecimal; public interface AccountService { void transfer(int sourceId, int destId, BigDecimal amount) throws Exception; } |
|
1 2 3 4 5 6 7 8 9 10 11 12 13 14 15 16 17 18 19 20 21 22 23 24 25 26 27 28 |
package com.huongdanjava.spring; import java.math.BigDecimal; import org.springframework.beans.factory.annotation.Autowired; import org.springframework.stereotype.Service; @Service public class AccountServiceImpl implements AccountService { @Autowired private AccountDAO accountDAO; @Override public void transfer(int sourceId, int destId, BigDecimal amount) throws Exception { BigDecimal sourceAmount = accountDAO.getCurrentAmount(sourceId); BigDecimal destAmount = accountDAO.getCurrentAmount(destId); // Update source account BigDecimal subtractAmount = sourceAmount.subtract(amount); accountDAO.updateAmount(sourceId, subtractAmount); if (subtractAmount.compareTo(BigDecimal.valueOf(80)) <= 0) { throw new Exception("Not allow send money if current amount is less than 80$"); } // Update dest account accountDAO.updateAmount(destId, destAmount.add(amount)); } } |
As you can see, after deducting money from account A, if the remaining amount of account A is less than $80, I will not allow the transfer anymore and throw an Exception.
Now, I will create a new class to configure the application:
|
1 2 3 4 5 6 7 8 9 10 11 12 13 14 15 16 17 18 19 20 21 22 23 24 25 26 27 28 29 30 |
package com.huongdanjava.spring; import javax.sql.DataSource; import org.springframework.context.annotation.Bean; import org.springframework.context.annotation.ComponentScan; import org.springframework.context.annotation.Configuration; import org.springframework.jdbc.core.JdbcTemplate; import org.springframework.jdbc.datasource.DriverManagerDataSource; @Configuration @ComponentScan public class ApplicationConfiguration { @Bean public DataSource dataSource() { DriverManagerDataSource dataSource = new DriverManagerDataSource(); dataSource.setDriverClassName("com.mysql.cj.jdbc.Driver"); dataSource.setUrl("jdbc:mysql://localhost:3306/jpaexample"); dataSource.setUsername("root"); dataSource.setPassword("123456"); return dataSource; } @Bean public JdbcTemplate jdbcTemplate(DataSource dataSource) { return new JdbcTemplate(dataSource); } } |
In this ApplicationConfiguration class, I use the @ComponentScan annotation for Spring to scan and initialize beans for all classes working with the table account that I created above. I also initialized beans for the DataSource and JdbcTemplate objects for these classes to use.
For example, now in my database, there are 2 accounts A and B with the following information:
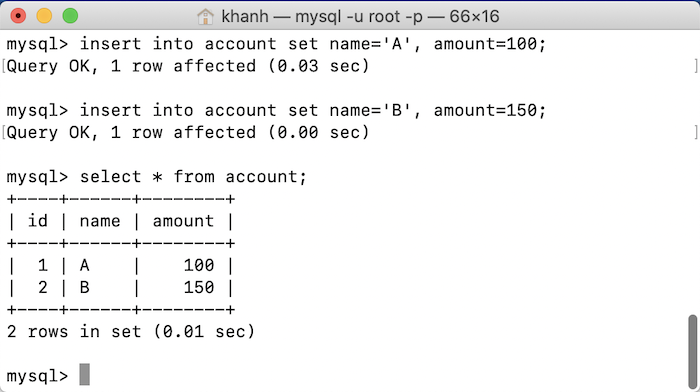
Now I will write code to make the transfer of 20$ from account A to account B. The content of the Application class will be as follows:
|
1 2 3 4 5 6 7 8 9 10 11 12 13 14 15 16 |
package com.huongdanjava.spring; import java.math.BigDecimal; import org.springframework.context.ApplicationContext; import org.springframework.context.annotation.AnnotationConfigApplicationContext; public class Application { public static void main(String[] args) throws Exception { ApplicationContext ctx = new AnnotationConfigApplicationContext(ApplicationConfiguration.class); AccountService as = (AccountService) ctx.getBean("accountServiceImpl"); as.transfer(1, 2, BigDecimal.valueOf(20)); } } |
Now, if I run this application, you will see the following error:
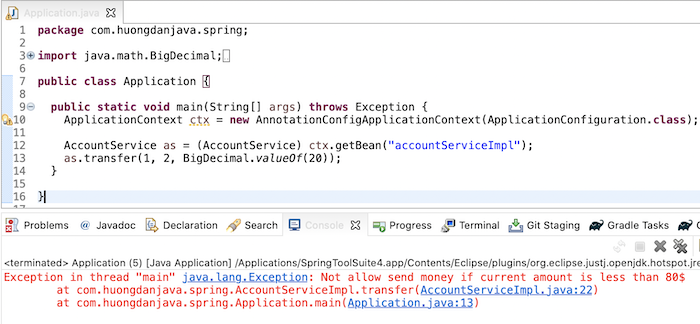
Account A is deducted but account B does not receive money:
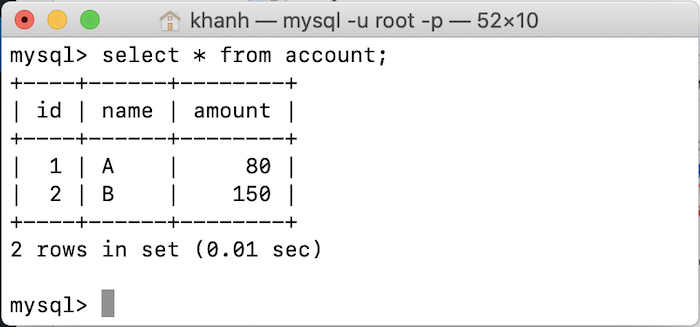
To enable transaction management for this application with the @EnableTransactionManagement annotation, please declare the @EnableTransactionManagement annotation and a TransactionManager bean in the application’s configuration class:
|
1 2 3 4 5 6 7 8 9 10 11 12 13 14 15 16 17 18 19 20 21 22 23 24 25 26 27 28 29 30 31 32 33 34 35 36 37 38 39 40 41 42 |
package com.huongdanjava.spring; import javax.sql.DataSource; import org.springframework.context.annotation.Bean; import org.springframework.context.annotation.ComponentScan; import org.springframework.context.annotation.Configuration; import org.springframework.jdbc.core.JdbcTemplate; import org.springframework.jdbc.datasource.DataSourceTransactionManager; import org.springframework.jdbc.datasource.DriverManagerDataSource; import org.springframework.transaction.PlatformTransactionManager; import org.springframework.transaction.annotation.EnableTransactionManagement; @Configuration @ComponentScan @EnableTransactionManagement public class ApplicationConfiguration { @Bean public DataSource dataSource() { DriverManagerDataSource dataSource = new DriverManagerDataSource(); dataSource.setDriverClassName("com.mysql.cj.jdbc.Driver"); dataSource.setUrl("jdbc:mysql://localhost:3306/jpaexample"); dataSource.setUsername("root"); dataSource.setPassword("123456"); return dataSource; } @Bean public JdbcTemplate jdbcTemplate(DataSource dataSource) { return new JdbcTemplate(dataSource); } @Bean public PlatformTransactionManager transactionManager() { DataSourceTransactionManager transactionManager = new DataSourceTransactionManager(); transactionManager.setDataSource(dataSource()); return transactionManager; } } |
and annotate the transfer() method of the AccountServiceImpl class with the @Transactional annotation as in the previous post:
|
1 2 3 4 5 6 7 8 9 10 11 12 13 14 15 16 17 18 19 20 21 22 23 24 25 26 27 28 29 30 |
package com.huongdanjava.spring; import java.math.BigDecimal; import org.springframework.beans.factory.annotation.Autowired; import org.springframework.stereotype.Service; import org.springframework.transaction.annotation.Transactional; @Service public class AccountServiceImpl implements AccountService { @Autowired private AccountDAO accountDAO; @Override @Transactional(rollbackFor = Exception.class) public void transfer(int sourceId, int destId, BigDecimal amount) throws Exception { BigDecimal sourceAmount = accountDAO.getCurrentAmount(sourceId); BigDecimal destAmount = accountDAO.getCurrentAmount(destId); // Update source account BigDecimal subtractAmount = sourceAmount.subtract(amount); accountDAO.updateAmount(sourceId, subtractAmount); if (subtractAmount.compareTo(BigDecimal.valueOf(80)) <= 0) { throw new Exception("Not allow send money if current amount is less than 80$"); } // Update dest account accountDAO.updateAmount(destId, destAmount.add(amount)); } } |
Talking about the @EnableTransactionManagement annotation, it is equivalent to the <tx:annotation-driven/> declaration that I mentioned in the previous tutorial! This annotation has attributes that define how our application will manage transactions.

The adviceMode attribute defines how we apply aspect-oriented programming using a Java proxy, the CGLIB library, or the AspectJ library. By default, Spring uses PROXY!
Attribute proxyTargetClass used only for activeMode is PROXY and if its value is true then CGLIB library will be used. Otherwise, if the value of this attribute is false then the Java proxy will be used.
@Transactional annotation, I mentioned it to you in the previous post. The declaration of the @Transactional annotation, the class level or the method level, will help Spring know what level we need to manage the transaction.
Interface TransactionManager has 2 sub-interfaces, PlatformTransactionManager and ReactiveTransactionManager.
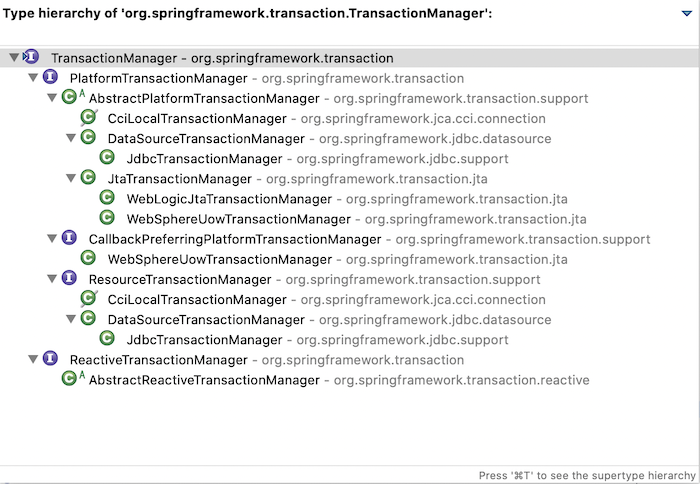
PlatformTransactionManager is for manipulating the database in an imperative way, and ReactiveTransactionManager is for reactive style! You can use the appropriate implementations of each of these sub-interfaces for your application. In the example of this tutorial, I am using PlatformTransactionManager with the implementation of DataSourceTransactionManager!
Update the database again so that the amount of account A is back to $ 100 and then run the application again, you will see that an error has occurred but account A is not deducted anymore!


