Spring Cloud Stream provides the spring-cloud-stream-test-binder dependency, allowing us to easily write unit tests for applications using Spring Cloud Stream without having to call actual message brokers.
You can declare and use this spring-cloud-stream-test-binder dependency as follows:
|
1 2 3 4 5 |
<dependency> <groupId>org.springframework.cloud</groupId> <artifactId>spring-cloud-stream-test-binder</artifactId> <scope>test</scope> </dependency> |
I’ll use the example project from the previous tutorial as an illustration!
To write unit tests for Spring Cloud Stream, we’ll annotate the test class with the annotation @EnableTestBinder:
|
1 2 3 4 5 6 7 8 9 10 |
package com.huongdanjava.springcloudstream; import org.springframework.boot.test.context.SpringBootTest; import org.springframework.cloud.stream.binder.test.EnableTestBinder; @SpringBootTest @EnableTestBinder class SpringCloudStreamRabbitmqExampleApplicationTests { } |
The @EnableTestBinder annotation will prompt Spring to create two beans, InputDestination and OutputDestination, allowing us to simulate sending and receiving messages to a message broker with Spring Cloud Stream. InputDestination will simulate receiving messages from the message broker to the application, while OutputDestination will simulate sending messages from the application to the message broker.
I will create a new application.yml file in the src/test/resources directory to use for this testing!
InputDestination
As I mentioned above, the bean of the InputDestination class will simulate receiving messages from a message broker to the application.
Currently, in the example project, I have defined a bean of the Consumer interface to receive messages from the message broker:
|
1 2 3 4 5 6 |
@Bean public Consumer<String> receiveConsumer() { return message -> { System.out.println("Received: " + message); }; } |
For testing, to illustrate the assertion, I will add a new class MessageStore with the annotation @Component:
|
1 2 3 4 5 6 7 8 9 10 11 12 13 14 15 16 17 |
package com.huongdanjava.springcloudstream; import org.springframework.stereotype.Component; @Component public class MessageStore { private String lastMessage; public void setLastMessage(String message) { this.lastMessage = message; } public String getLastMessage() { return lastMessage; } } |
So that when it receives a message from the message broker, this MessageStore class will record that message as follows:
|
1 2 3 4 5 6 7 |
@Bean public Consumer<String> receiveConsumer(MessageStore store) { return message -> { store.setLastMessage(message); System.out.println("Received: " + message); }; } |
I will define the binding for the Consumer interface in the application.yml file in the src/test/resources directory as follows:
|
1 2 3 4 5 6 7 |
spring: cloud: stream: bindings: receiveConsumer-in-0: destination: message.exchange group: huongdanjava |
In the unit test, we will ingest the bean of the InputDestination class, send a message to the destination, and assert the result as follows:
|
1 2 3 4 5 6 7 8 9 10 11 12 13 14 15 16 17 18 19 20 21 22 23 24 25 26 27 28 29 30 31 32 33 34 |
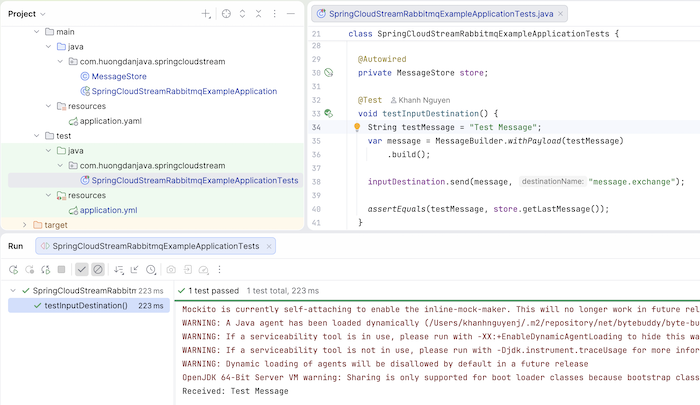
package com.huongdanjava.springcloudstream; import static org.junit.jupiter.api.Assertions.assertEquals; import org.junit.jupiter.api.Test; import org.springframework.beans.factory.annotation.Autowired; import org.springframework.boot.test.context.SpringBootTest; import org.springframework.cloud.stream.binder.test.EnableTestBinder; import org.springframework.cloud.stream.binder.test.InputDestination; import org.springframework.messaging.support.MessageBuilder; @SpringBootTest @EnableTestBinder class SpringCloudStreamRabbitmqExampleApplicationTests { @Autowired private InputDestination inputDestination; @Autowired private MessageStore store; @Test void testInputDestination() { String testMessage = "Test Message"; var message = MessageBuilder.withPayload(testMessage) .build(); inputDestination.send(message, "message.exchange"); assertEquals(testMessage, store.getLastMessage()); } } |
The send() method of the InputDestination class has two parameters. The first parameter is the message we want to send, and the second parameter is the name of the Exchange in RabbitMQ or the name of the Topic in Apache Kafka that the application will receive the message from. This InputDestination class also has several other send() methods, but I recommend using the send() method with two parameters as shown above, so that the test can work in any case.
Run this test, and you will see the following pass result:
OutputDestination
The OutputDestination class will simulate sending messages from the application to the message broker.
For example, you can define a bean of the Supplier interface as I did in the previous tutorial:
|
1 2 3 4 |
@Bean public Supplier<String> sendSupplier() { return () -> "Hello World"; } |
Định nghĩa binding cho nó:
|
1 2 3 4 5 6 7 8 9 10 11 |
spring: cloud: function: definition: receiveConsumer;sendSupplier stream: bindings: receiveConsumer-in-0: destination: message.exchange group: huongdanjava sendSupplier-out-0: destination: message.exchange |
And you can write tests using the OutputDestination class as follows:
|
1 2 3 4 5 6 7 8 9 10 11 12 13 14 15 16 17 18 19 20 21 22 23 24 25 26 27 28 29 30 31 32 33 34 35 36 37 38 39 40 41 42 43 44 45 46 47 48 |
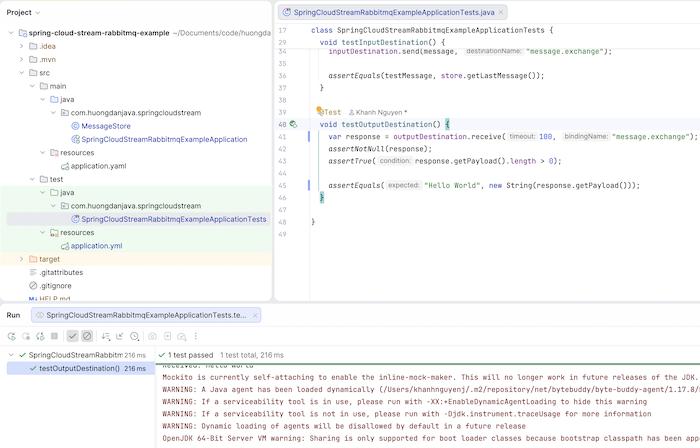
package com.huongdanjava.springcloudstream; import static org.junit.jupiter.api.Assertions.assertEquals; import static org.junit.jupiter.api.Assertions.assertNotNull; import static org.junit.jupiter.api.Assertions.assertTrue; import org.junit.jupiter.api.Test; import org.springframework.beans.factory.annotation.Autowired; import org.springframework.boot.test.context.SpringBootTest; import org.springframework.cloud.stream.binder.test.EnableTestBinder; import org.springframework.cloud.stream.binder.test.InputDestination; import org.springframework.cloud.stream.binder.test.OutputDestination; import org.springframework.messaging.support.MessageBuilder; @SpringBootTest @EnableTestBinder class SpringCloudStreamRabbitmqExampleApplicationTests { @Autowired private InputDestination inputDestination; @Autowired private OutputDestination outputDestination; @Autowired private MessageStore store; @Test void testInputDestination() { String testMessage = "Test Message"; var message = MessageBuilder.withPayload(testMessage) .build(); inputDestination.send(message, "message.exchange"); assertEquals(testMessage, store.getLastMessage()); } @Test void testOutputDestination() { var response = outputDestination.receive(100, "message.exchange"); assertNotNull(response); assertTrue(response.getPayload().length > 0); assertEquals("Hello World", new String(response.getPayload())); } } |
The receive() method of the OutputDestination class has two parameters: a timeout and the name of the Exchange or Topic that will receive the message. Similar to the InputDestination class, the OutputDestination class also has several other receive() methods, but I recommend using the receive() method with two parameters as shown above, so that the test can work in any case.
The results of running this test will be as follows:
So, in this tutorial, I’ve shown you how to use the InputDestination and OutputDestination classes to write unit tests in applications using Spring Cloud Stream. Not having to call the external message broker when running unit tests will be very helpful!
You can watch the video here: