JBoss WildFly uses Java JNDI to configure Datasource information, allowing deployed applications to use this Datasource information to connect and work with the database. If you use JBoss WildFly standalone, you can configure this Datasource information in the standalone.xml file of JBoss WildFly. If you use the WildFly Maven Plugin during development, how will you configure this Datasource information? We will find out together in this tutorial!
Before going into the Datasource configuration, you need to do one more step, which is: to see whether the Datasource information has been configured in the JBoss WildFly server or not, using the Management Console, please configure the user information for WildFly Maven Plugin first. My example is as follows:
|
1 2 3 4 5 6 7 8 9 10 11 12 13 14 15 16 |
<plugin> <groupId>org.wildfly.plugins</groupId> <artifactId>wildfly-maven-plugin</artifactId> <version>4.2.1.Final</version> <configuration> <version>27.0.1.Final</version> <add-user> <users> <user> <username>khanh</username> <password>123456</password> </user> </users> </add-user> </configuration> </plugin> |
Now, we will start configuring Datasource!
First, we need to add the JDBC Driver for the database that your application will use into JBoss WildFly.
In this example, I will use the PostgreSQL database!
To do this, we will need to declare the dependency for the database JDBC Driver that you will use in the project. I will declare the PostgreSQL JDBC Driver as follows:
|
1 2 3 4 5 |
<dependency> <groupId>org.postgresql</groupId> <artifactId>postgresql</artifactId> <version>42.7.0</version> </dependency> |
Next, we will use the WildFly Maven Plugin’s “deploy-artifact” goal to add the JDBC Driver to JBoss WildFly as follows:
|
1 2 3 4 5 6 7 8 9 10 11 12 13 14 15 16 17 18 19 20 21 22 23 24 25 26 27 28 29 30 31 |
<plugin> <groupId>org.wildfly.plugins</groupId> <artifactId>wildfly-maven-plugin</artifactId> <version>4.2.1.Final</version> <configuration> <version>27.0.1.Final</version> <add-user> <users> <user> <username>khanh</username> <password>123456</password> </user> </users> </add-user> </configuration> <executions> <execution> <id>deploy-driver</id> <phase>install</phase> <configuration> <groupId>org.postgresql</groupId> <artifactId>postgresql</artifactId> <name>postgresql.jar</name> </configuration> <goals> <goal>deploy-artifact</goal> </goals> </execution> </executions> </plugin> |
We only need to declare the groupId and artifactId of the JDBC Driver, no version is needed! The goal “deploy-artifact” of WildFly Maven Plugin will be executed in the “install” phase, which means when you run “mvn install”!
Now we can use the WildFly Maven Plugin’s “add-resource” goal to add Datasource to JBoss WildFly.
You can add a new execution as follows:
|
1 2 3 4 5 6 7 8 9 10 11 12 13 14 15 16 17 18 19 20 21 22 23 |
<execution> <id>add-datasource</id> <phase>install</phase> <configuration> <address>subsystem=datasources,data-source=huongdanjavaDatasource</address> <resources> <resource> <properties> <connection-url>jdbc:postgresql://localhost/example</connection-url> <jndi-name>java:/huongdanjavaDatasource</jndi-name> <enabled>true</enabled> <user-name>postgres</user-name> <password>123456</password> <driver-name>postgresql.jar</driver-name> <use-ccm>false</use-ccm> </properties> </resource> </resources> </configuration> <goals> <goal>add-resource</goal> </goals> </execution> |
The information in the <address> tag will help us tell WildFly Maven Plugin that we need to add to the “datasources” subsystem, a new Datasource, with information about the database configured in the <properties> tag.
Tag <driver-name>, you declare the driver name we configured above. The <use-ccm> tag is related to the Cache Connection Manager feature of JBoss WildFly. This Datasource information can be used by applications through Java JNDI!
You can declare and use the WildFly Maven Plugin’s “deploy” goal to deploy the application when running the “mvn install” command. For example:
|
1 2 3 4 5 6 7 |
<execution> <id>deploy</id> <phase>install</phase> <goals> <goal>deploy</goal> </goals> </execution> |
At this point, we have completed configuring Datasource using the WildFly Maven Plugin!
Now, you can run the application with the command:
|
1 |
mvn clean wildfly:start install -f pom.xml |
We need to execute goal “wildfly:start” to start a JBoss WildFly first. Because we must have the JBoss WildFly server started first before we can add the JDBC Driver and configure the Datasource.
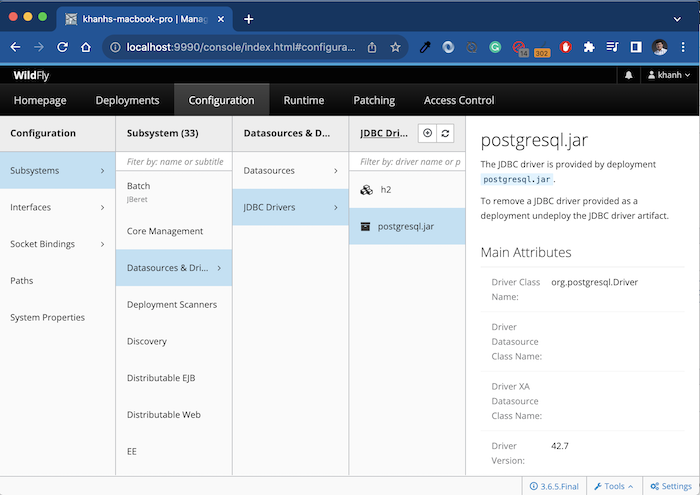
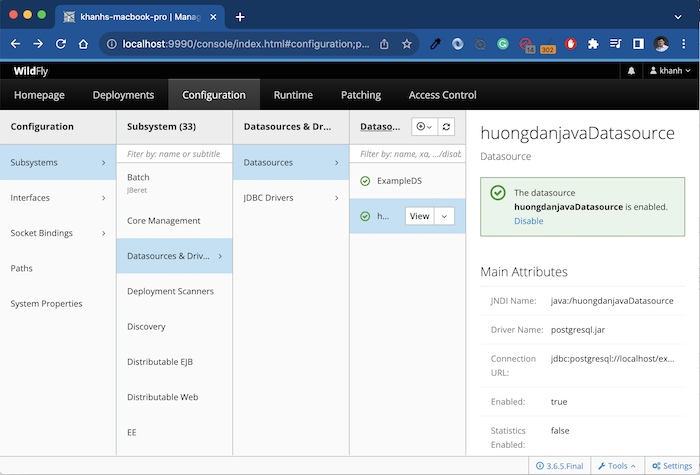
After the Maven command finishes running, go to the Management Console page of JBoss WildFly at http://localhost:9990/, then go to the Configuration section, check Subsystems -> Datasources & JDBC Drivers, you will see the results like this:
JDBC Drivers:
Datasources:
So we have successfully configured Datasource using WildFly Maven Plugin!