HttpServlet là một trong những đối tượng của Jakarta EE Servlet giúp chúng ta có thể xây dựng các ứng dụng chạy trên nền web với Java. Cụ thể như thế nào? Chúng ta hãy cùng nhau tìm hiểu trong bài viết này nhé các bạn!
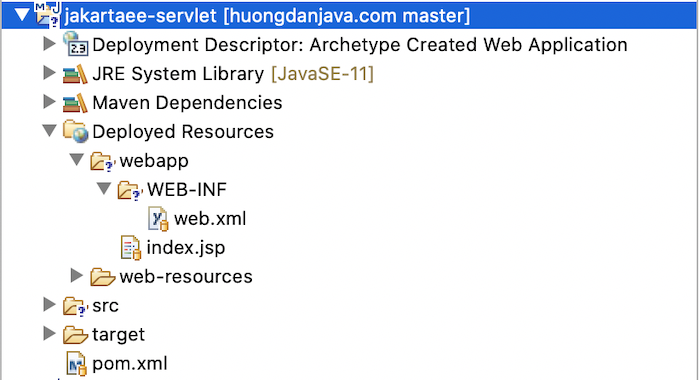
Đầu tiên, mình sẽ tạo mới một Maven project cho ứng dụng Jakarta EE để làm ví dụ, như sau:

Điều đầu tiên mà các bạn cần phải biết về HttpServlet thì nó là một abstract class nằm trong package jakarta.servlet.http của Jakarta EE Servlet API. Nó extends từ một abstract class khác tên là GenericServlet và class GenericServlet này là đối tượng implement interface Servlet, interface chính để định nghĩa servlet của Jakarta EE Servlet API.
Sử dụng đối tượng HttpServlet này, chúng ta có thể xây dựng các ứng dụng Java web để handle các request từ client với các HTTP method như GET, POST, HEAD, PUT, DELETE, TRACE và OPTIONS. Khi client send một request tới web server container, method service() trong đối tượng HttpServlet sẽ process request này. Phụ thuộc vào HTTP method mà client gửi, việc xử lý tiếp theo sẽ do các method doGet(), doPost(), doHead(), doPut(), doDelete(), doTrace() và doOptions() của đối tượng này đảm nhận.
Chúng ta có thể override lại các method doGet(), doPost(), doHead(), doPut(), doDelete(), doTrace() hoặc doOptions() để process request theo ý chúng ta muốn. Hãy thử apply điều này cho ví dụ của chúng ta nhé các bạn.
Bây giờ, mình sẽ thêm một class mới tên là HelloWorldServlet nằm trong package com.huongdanjava.jakartaee.servlet, với nội dung như sau:
|
1 2 3 4 5 6 7 8 9 10 11 12 13 14 15 16 17 18 19 20 21 22 23 |
package com.huongdanjava.jakartaee.servlet; import java.io.IOException; import java.io.PrintWriter; import jakarta.servlet.ServletException; import jakarta.servlet.http.HttpServlet; import jakarta.servlet.http.HttpServletRequest; import jakarta.servlet.http.HttpServletResponse; public class HelloWorldServlet extends HttpServlet { private static final long serialVersionUID = 1L; @Override protected void doGet(HttpServletRequest req, HttpServletResponse resp) throws ServletException, IOException { // Setting up the content type of web page resp.setContentType("text/html"); // Writing the message on the web page PrintWriter out = resp.getWriter(); out.println("<h1>Hello World from Huong Dan Java</h1>"); } } |
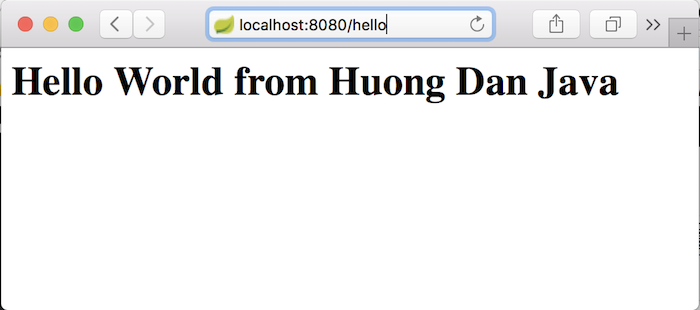
Như các bạn thấy, class HelloWorldServlet của mình đã extends từ class HttpServlet và trong class HelloWorldServlet này, mình đã override lại phương thức doGet() để process cho request với HTTP method là GET. Đơn giản chỉ là return lại cho client một trong trang HTML với nội dung là “<h1>Hello World from Huong Dan Java</h1>” mà thôi.
Để khai báo Servlet này với web container, chúng ta có 2 cách:
- Khai báo sử dụng annotation @WebServlet của Jakarta EE Servlet API trong class Servlet này.
- Khai báo Servlet này trong tập tin Deployment Descriptor cho ứng dụng web, web.xml nằm trong thư mục /src/main/webapp/WEB-INF.
Độ ưu tiên mà web container sẽ process trước đó là cấu hình mà chúng ta khai báo trong tập tin web.xml nha các bạn, sau đó mới tới cấu hình của annotation @WebServlet. Mình sẽ nói thêm về 2 cách này trong những bài viết sau các bạn nhé!
Để đơn giản, mình sẽ khai báo sử dụng annotation @WebServlet trong class HelloWorldServlet như sau:
|
1 2 3 4 5 6 7 8 9 10 11 12 13 14 15 16 17 18 19 20 21 22 23 24 25 |
package com.huongdanjava.jakartaee.servlet; import java.io.IOException; import java.io.PrintWriter; import jakarta.servlet.ServletException; import jakarta.servlet.annotation.WebServlet; import jakarta.servlet.http.HttpServlet; import jakarta.servlet.http.HttpServletRequest; import jakarta.servlet.http.HttpServletResponse; @WebServlet("/hello") public class HelloWorldServlet extends HttpServlet { private static final long serialVersionUID = 1L; @Override protected void doGet(HttpServletRequest req, HttpServletResponse resp) throws ServletException, IOException { // Setting up the content type of web page resp.setContentType("text/html"); // Writing the message on the web page PrintWriter out = resp.getWriter(); out.println("<h1>Hello World from Huong Dan Java</h1>"); } } |
Lúc này, nếu các bạn chạy ứng dụng, các bạn sẽ thấy kết quả như sau:


