Trong bài viết trước, mình đã giới thiệu với các bạn tổng quan về Spring Data JPA và đã làm một ví dụ sử dụng phương thức findById() có sẵn trong interface JpaRepository để truy vấn database lấy dữ liệu theo cột primary key và phương thức findByName() để lấy thông tin sinh viên theo tên. Tuyệt nhiên không có bất kỳ một class nào implement interface HelloRepository nhưng chúng ta vẫn truy vấn được các thông tin chúng ta muốn. Đó là một tính năng rất hay của Spring Data JPA phải không các bạn? 😀 Để làm được như vậy, các bạn phải tuân theo cú pháp của Spring Data JPA trong việc đặt tên method. Cụ thể như thế nào? Chúng ta hãy cùng nhau tìm hiểu trong bài viết này các bạn nhé!
Đầu tiên, mình cũng sẽ tạo một Maven project để làm ví dụ:

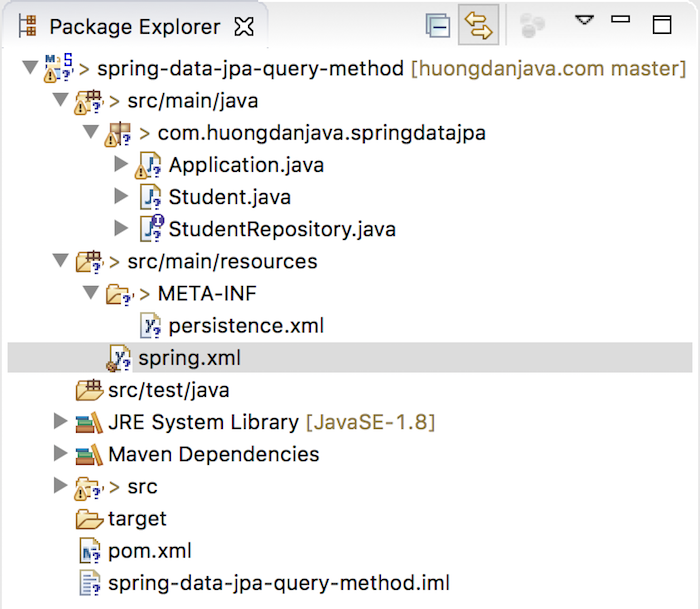
Cấu trúc của project này tương tự như các bước chuẩn bị mình đã làm trong bài viết Tổng quan về Spring Data JPA nha các bạn!
Chúng ta sẽ sử dụng Java 17 cho ví dụ này:
|
1 2 3 4 |
<properties> <maven.compiler.source>17</maven.compiler.source> <maven.compiler.target>17</maven.compiler.target> </properties> |
Maven dependencies:
|
1 2 3 4 5 6 7 8 9 10 11 12 13 14 15 16 17 18 19 20 21 |
<dependency> <groupId>org.springframework.data</groupId> <artifactId>spring-data-jpa</artifactId> <version>3.1.1</version> </dependency> <dependency> <groupId>org.projectlombok</groupId> <artifactId>lombok</artifactId> <version>1.18.28</version> <scope>provided</scope> </dependency> <dependency> <groupId>mysql</groupId> <artifactId>mysql-connector-java</artifactId> <version>8.0.33</version> </dependency> <dependency> <groupId>org.hibernate</groupId> <artifactId>hibernate-core</artifactId> <version>6.2.6.Final</version> </dependency> |
spring.xml:
|
1 2 3 4 5 6 7 8 9 10 11 12 13 14 15 16 17 18 19 20 21 22 23 24 25 26 27 28 29 30 31 32 33 34 35 36 37 38 |
<beans xmlns="http://www.springframework.org/schema/beans" xmlns:xsi="http://www.w3.org/2001/XMLSchema-instance" xmlns:jpa="http://www.springframework.org/schema/data/jpa" xmlns:tx="http://www.springframework.org/schema/tx" xmlns:context="http://www.springframework.org/schema/context" xsi:schemaLocation="http://www.springframework.org/schema/beans http://www.springframework.org/schema/beans/spring-beans.xsd http://www.springframework.org/schema/data/jpa http://www.springframework.org/schema/data/jpa/spring-jpa.xsd http://www.springframework.org/schema/tx http://www.springframework.org/schema/tx/spring-tx.xsd http://www.springframework.org/schema/context https://www.springframework.org/schema/context/spring-context.xsd"> <jpa:repositories base-package="com.huongdanjava.springdatajpa"/> <context:annotation-config/> <bean id="entityManagerFactory" class="org.springframework.orm.jpa.LocalContainerEntityManagerFactoryBean"> <property name="dataSource" ref="dataSource"/> <property name="persistenceUnitName" value="springdataPU"/> <property name="jpaVendorAdapter"> <bean class="org.springframework.orm.jpa.vendor.HibernateJpaVendorAdapter"/> </property> </bean> <bean id="dataSource" class="org.springframework.jdbc.datasource.DriverManagerDataSource"> <property name="driverClassName" value="com.mysql.cj.jdbc.Driver"/> <property name="url" value="jdbc:mysql://localhost:3306/jpa_example"/> <property name="username" value="root"/> <property name="password" value="123456"/> </bean> <tx:annotation-driven proxy-target-class="true" transaction-manager="transactionManager"/> <bean id="transactionManager" class="org.springframework.jdbc.datasource.DataSourceTransactionManager"> <property name="dataSource" ref="dataSource"/> </bean> </beans> |
persistence.xml:
|
1 2 3 4 5 6 7 8 9 10 11 12 13 14 15 16 17 18 |
<?xml version="1.0" encoding="UTF-8" standalone="no"?> <persistence version="2.1" xmlns="http://xmlns.jcp.org/xml/ns/persistence" xmlns:xsi="http://www.w3.org/2001/XMLSchema-instance" xsi:schemaLocation="http://xmlns.jcp.org/xml/ns/persistence http://xmlns.jcp.org/xml/ns/persistence/persistence_2_1.xsd"> <persistence-unit name="springdataPU" transaction-type="RESOURCE_LOCAL"> <provider>org.hibernate.jpa.HibernatePersistenceProvider</provider> <class>com.huongdanjava.springdatajpa.Student</class> <exclude-unlisted-classes/> <properties> <property name="hibernate.show_sql" value="true"/> <property name="hibernate.format_sql" value="false"/> <property name="hibernate.dialect" value="org.hibernate.dialect.MySQLDialect"/> <property name="hibernate.connection.driver_class" value="com.mysql.cj.jdbc.Driver"/> <property name="javax.persistence.validation.mode" value="none"/> </properties> </persistence-unit> </persistence> |
Table student:
|
1 2 3 4 5 6 |
CREATE TABLE `student` ( `id` bigint(20) NOT NULL AUTO_INCREMENT, `name` varchar(50) DEFAULT NULL, `clazz` varchar(20) DEFAULT NULL, PRIMARY KEY (`id`) ) ENGINE=InnoDB AUTO_INCREMENT=2 DEFAULT CHARSET=latin1; |
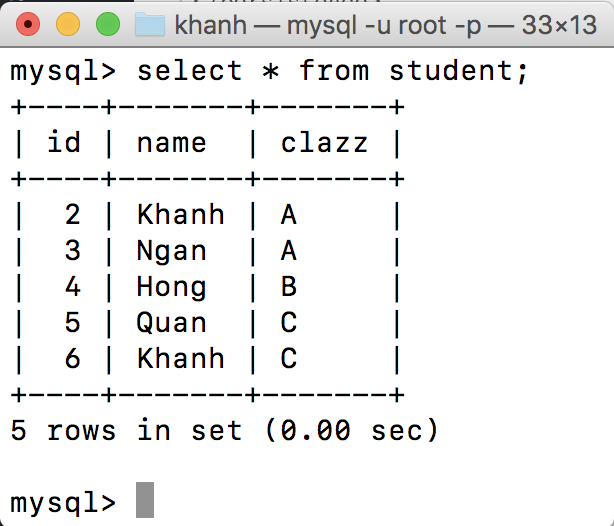
Database hiện tại đang có những thông tin sinh viên như sau:

Entity Student:
|
1 2 3 4 5 6 7 8 9 10 11 12 13 14 15 16 17 18 19 20 21 22 23 24 25 26 27 28 29 30 |
package com.huongdanjava.springdatajpa; import jakarta.persistence.Column; import jakarta.persistence.Entity; import jakarta.persistence.GeneratedValue; import jakarta.persistence.Id; import jakarta.persistence.Table; import java.io.Serializable; import lombok.Getter; import lombok.Setter; @Table(name = "student") @Entity @Getter @Setter public class Student implements Serializable { private static final long serialVersionUID = 1L; @Id @GeneratedValue private Long id; @Column private String name; @Column private String clazz; } |
StudentRepository class có nội dung ban đầu như sau:
|
1 2 3 4 5 6 7 |
package com.huongdanjava.springdatajpa; import org.springframework.data.jpa.repository.JpaRepository; public interface StudentRepository extends JpaRepository<Student, Long> { } |
Application class cũng có nội dung ban đầu như sau:
|
1 2 3 4 5 6 7 8 9 10 11 12 13 |
package com.huongdanjava.springdatajpa; import org.springframework.context.ApplicationContext; import org.springframework.context.support.ClassPathXmlApplicationContext; public class Application { public static void main(String[] args) { ApplicationContext ac = new ClassPathXmlApplicationContext("spring.xml"); StudentRepository studentRepository = (StudentRepository) ac.getBean("studentRepository"); } } |
OK, các bước chuẩn bị đã xong, giờ chúng ta đi vào chủ đề chính của bài viết này các bạn nhé!
Bây giờ, mình sẽ liệt kê tất cả các quy tắc để đặt tên method trong Spring Data JPA giúp chúng ta không cần phải implement interface mà vẫn lấy được dữ liệu chúng ta cần.
Đầu tiên thì tên của method, các bạn phải viết nó bắt đầu với một trong các tên như sau: find…By, read…By, query…By, count…By, và get…By. Và theo sau đó là tên thuộc tính của entity mà các bạn muốn tìm.
Giả sử bây giờ mình tìm thông tin sinh viên theo lớp như sau:
|
1 2 3 4 5 6 7 8 9 10 |
package com.huongdanjava.springdatajpa; import java.util.List; import org.springframework.data.jpa.repository.JpaRepository; public interface StudentRepository extends JpaRepository<Student, Long> { public List<Student> readByClazz(String clazz); } |
thì khi chạy, các bạn sẽ thấy kết quả như sau:

Hoặc tìm số sinh viên tên Khanh như sau:
|
1 2 3 4 5 6 7 8 |
package com.huongdanjava.springdatajpa; import org.springframework.data.jpa.repository.JpaRepository; public interface StudentRepository extends JpaRepository<Student, Long> { public Integer countByName(String name); } |
|
1 2 3 4 5 6 7 8 9 10 11 12 13 14 15 |
package com.huongdanjava.springdatajpa; import org.springframework.context.ApplicationContext; import org.springframework.context.support.ClassPathXmlApplicationContext; public class Application { public static void main(String[] args) { ApplicationContext ac = new ClassPathXmlApplicationContext("spring.xml"); StudentRepository studentRepository = (StudentRepository) ac.getBean("studentRepository"); Integer countByName = studentRepository.countByName("Khanh"); System.out.println(countByName); } } |
Kết quả:

Nếu các bạn muốn giới hạn số record trả về thì các bạn có thể thêm từ First hoặc Top kèm với số record mà các bạn muốn trả về vào trước từ By trong tên của phương thức theo cú pháp trên.
Nếu không có số record thì mặc định chỉ có 1 record được trả về nha các bạn.
Ví dụ như:
|
1 2 3 4 5 6 7 8 |
package com.huongdanjava.springdatajpa; import org.springframework.data.jpa.repository.JpaRepository; public interface StudentRepository extends JpaRepository<Student, Long> { public Student findFirstByName(String name); } |
|
1 2 3 4 5 6 7 8 9 10 11 12 13 14 15 |
package com.huongdanjava.springdatajpa; import org.springframework.context.ApplicationContext; import org.springframework.context.support.ClassPathXmlApplicationContext; public class Application { public static void main(String[] args) { ApplicationContext ac = new ClassPathXmlApplicationContext("spring.xml"); StudentRepository studentRepository = (StudentRepository) ac.getBean("studentRepository"); Student student = studentRepository.findFirstByName("Khanh"); System.out.println(student.getId()); } } |
Kết quả:

Nếu các bạn muốn tìm theo nhiều điều kiện khác nhau thì tên của phương thức phải kèm theo nhiều tên thuộc tính của entity và ứng với đó các bạn phải có nhiều parameter cho phương thức.
Các parameter này phải theo thứ tự như thứ tự của tên thuộc tính trong tên phương thức nha các bạn.
Ví dụ giả sử các bạn tìm theo tên và lớp của sinh viên thì tên phương thức của các bạn cần phải là findByNameAndClazz(String name, String clazz), 2 parameter name và clazz phải cùng thứ tự như tên phương thức.
|
1 2 3 4 5 6 7 8 9 10 |
package com.huongdanjava.springdatajpa; import java.util.List; import org.springframework.data.jpa.repository.JpaRepository; public interface StudentRepository extends JpaRepository<Student, Long> { public List<Student> findByNameAndClazz(String name, String clazz); } |
|
1 2 3 4 5 6 7 8 9 10 11 12 13 14 15 16 17 |
package com.huongdanjava.springdatajpa; import java.util.List; import org.springframework.context.ApplicationContext; import org.springframework.context.support.ClassPathXmlApplicationContext; public class Application { public static void main(String[] args) { ApplicationContext ac = new ClassPathXmlApplicationContext("spring.xml"); StudentRepository studentRepository = (StudentRepository) ac.getBean("studentRepository"); List<Student> students = studentRepository.findByNameAndClazz("Khanh", "C"); System.out.println(students.size()); } } |
Kết quả:

Chúng ta còn có thể order kết quả trả về bằng cách thêm từ OrderBy…Asc (tăng dần) hoặc OrderBy…Desc (giảm dần) vào cuối tên phương thức.
Trong dấu 3 chấm sẽ là tên thuộc tính của entity mà chúng ta sử dụng để order nha các ban.
Ví dụ:
|
1 2 3 4 5 6 7 8 9 10 |
package com.huongdanjava.springdatajpa; import java.util.List; import org.springframework.data.jpa.repository.JpaRepository; public interface StudentRepository extends JpaRepository<Student, Long> { public List<Student> findByClazzOrderByNameDesc(String clazz); } |
|
1 2 3 4 5 6 7 8 9 10 11 12 13 14 15 16 17 |
package com.huongdanjava.springdatajpa; import java.util.List; import org.springframework.context.ApplicationContext; import org.springframework.context.support.ClassPathXmlApplicationContext; public class Application { public static void main(String[] args) { ApplicationContext ac = new ClassPathXmlApplicationContext("spring.xml"); StudentRepository studentRepository = (StudentRepository) ac.getBean("studentRepository"); List<Student> students = studentRepository.findByClazzOrderByNameDesc("A"); students.forEach(s -> System.out.println(s.getName())); } } |
Kết quả:

Các bạn để ý là: đối với mỗi ví dụ ở trên của mình, các bạn đều thấy câu lệnh SQL mà Spring Data JPA đã generate. Nhìn vào đó, các bạn có thể hiểu thêm cách mà Spring Data JPA đã làm phải không? 😀


AnhPT
Anh @Khanh Nguyen ơi, cho em hỏi: nếu muốn nhóm kết quả (group by) thì dùng câu lệnh như thế nào a? Mình có thể custom được câu lệnh truy vấn không?