Khi xây dựng một ứng dụng bất kỳ, việc handle tất cả các behavior có thể xảy ra khi người dùng sử dụng ứng dụng của chúng ta là điều cần thiết. Một trong những trường hợp các bạn sẽ thường phải đối mặt khi làm việc với các ứng dụng Spring MVC đó là request data mà người dùng truyền tới sẽ không đúng expectation để ứng dụng của chúng ta có thể handle. Để tránh những trường hợp này, các bạn có thể sử dụng Bean Validation với Spring MVC để chặn những request data như thế. Cụ thể như thế nào? Chúng ta hãy cùng nhau tìm hiểu trong bài viết này các bạn nhé!
Đầu tiên, mình sẽ tạo mới một Spring Boot project với Web Starter dependency để làm ví dụ:
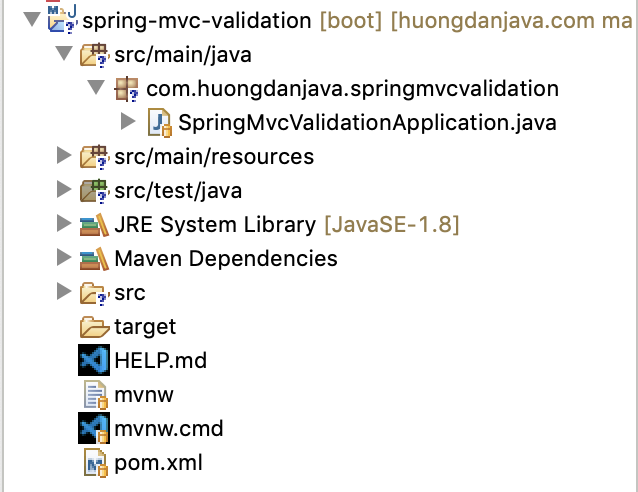
Bây giờ mình sẽ tạo mới một controller với một request đơn giản như sau:
|
1 2 3 4 5 6 7 8 9 10 11 12 13 14 15 |
package com.huongdanjava.springmvcvalidation; import org.springframework.web.bind.annotation.GetMapping; import org.springframework.web.bind.annotation.RequestParam; import org.springframework.web.bind.annotation.RestController; @RestController public class HelloController { @GetMapping("/hello") public String hello(@RequestParam Integer id) { return id + ""; } } |
Việc validate kiểu dữ liệu của request parameter “id” trong ví dụ trên thì mặc định Spring MVC đã handle rồi:
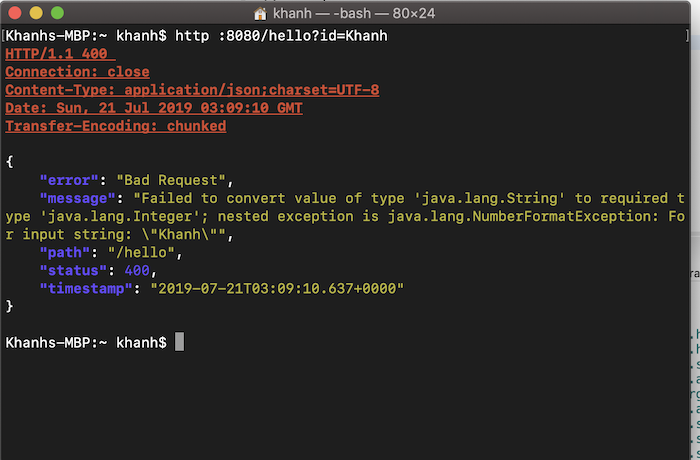
Trong request trên, mình truyền giá trị cho request parameter id là “Khanh” nhưng kiểu dữ liệu của parameter này phải là Integer nên Spring MVC sẽ response lại error message.
Thế nhưng trong trường hợp, chúng ta cần giá trị của request parameter id từ người dùng phải lớn hơn hoặc bằng 10 chẳng hạn, Spring MVC mặc định không giúp chúng ta được việc này. Trong trường hợp đó, chúng ta có thể sử dụng code để làm điều này, ví dụ như:
|
1 2 3 4 5 6 7 8 9 10 11 12 13 14 15 16 17 18 19 |
package com.huongdanjava.springmvcvalidation; import org.springframework.web.bind.annotation.GetMapping; import org.springframework.web.bind.annotation.RequestParam; import org.springframework.web.bind.annotation.RestController; @RestController public class HelloController { @GetMapping("/hello") public String hello(@RequestParam Integer id) { if (id < 10) { return "Not valid id"; } return id + ""; } } |
hoặc sử dụng Bean Validation của Java như sau:
|
1 2 3 4 5 6 7 8 9 10 11 12 13 14 15 16 17 18 19 |
package com.huongdanjava.springmvcvalidation; import javax.validation.constraints.Min; import org.springframework.validation.annotation.Validated; import org.springframework.web.bind.annotation.GetMapping; import org.springframework.web.bind.annotation.RequestParam; import org.springframework.web.bind.annotation.RestController; @RestController @Validated public class HelloController { @GetMapping("/hello") public String hello(@RequestParam @Min(10) Integer id) { return id + ""; } } |
Trong đoạn code trên, mình đã sử dụng annotation @Min của Java Bean Validation để khai báo ràng buộc cho giá trị của request parameter id phải lớn hơn hoặc bằng 10 và một điều bắt buộc nữa là các bạn phải khai báo annotation @Validated của Spring.
Kết quả nếu mình request với giá trị của request parameter id lớn hơn 10 sẽ như sau:
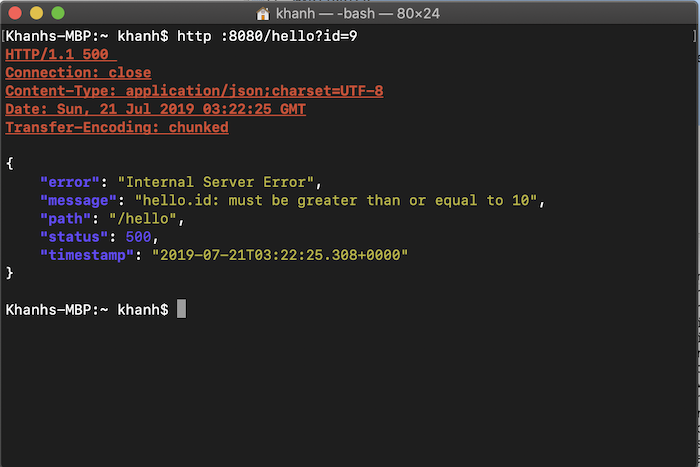
Tương tự như các request với request parameter, nếu ứng dụng của các bạn sử dụng path variable:
|
1 2 3 4 5 6 7 8 9 10 11 12 13 14 15 |
package com.huongdanjava.springmvcvalidation; import org.springframework.web.bind.annotation.GetMapping; import org.springframework.web.bind.annotation.PathVariable; import org.springframework.web.bind.annotation.RestController; @RestController public class HelloController { @GetMapping("/{id}") public String hello(@PathVariable Integer id) { return id + ""; } } |
thì các bạn cũng có thể sử dụng Java Bean Validation với annotation @Validated của Spring như sau:
|
1 2 3 4 5 6 7 8 9 10 11 12 13 14 15 16 17 18 19 |
package com.huongdanjava.springmvcvalidation; import javax.validation.constraints.Min; import org.springframework.validation.annotation.Validated; import org.springframework.web.bind.annotation.GetMapping; import org.springframework.web.bind.annotation.PathVariable; import org.springframework.web.bind.annotation.RestController; @RestController @Validated public class HelloController { @GetMapping("/{id}") public String hello(@PathVariable @Min(10) Integer id) { return id + ""; } } |
Kết quả:
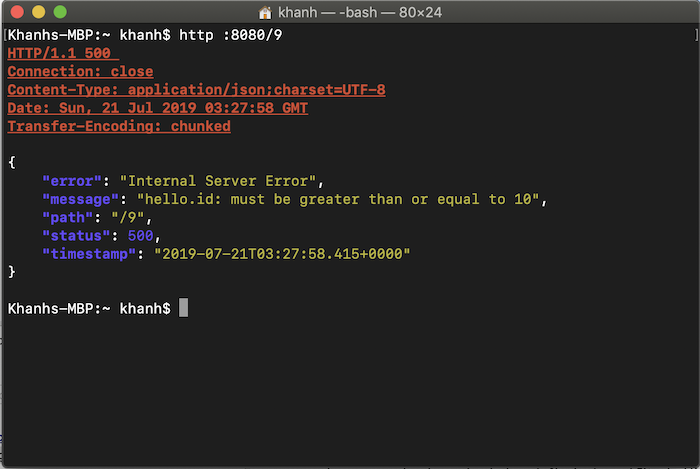
Đối với các request mà request data nằm trong body như POST request chẳng hạn, thì chúng ta cũng có thể apply Bean Validation cho đối tượng hold thông tin của request data.
Ví dụ như mình có một POST request truyền thông tin sinh viên:
|
1 2 3 4 5 6 7 8 9 10 11 12 13 14 15 |
package com.huongdanjava.springmvcvalidation; import org.springframework.web.bind.annotation.PostMapping; import org.springframework.web.bind.annotation.RequestBody; import org.springframework.web.bind.annotation.RestController; @RestController public class HelloController { @PostMapping("/student") public String student(@RequestBody Student student) { return student.getName(); } } |
với thông tin sinh viên được định nghĩa sử dụng Bean Validation như sau:
|
1 2 3 4 5 6 7 8 9 10 11 12 13 14 15 16 17 18 19 20 21 22 23 24 25 26 27 28 29 30 31 |
package com.huongdanjava.springmvcvalidation; import javax.validation.constraints.Min; import javax.validation.constraints.NotNull; public class Student { @NotNull private String name; @Min(value = 18) private int age; public String getName() { return name; } public void setName(String name) { this.name = name; } public int getAge() { return age; } public void setAge(int age) { this.age = age; } } |
Với định nghĩa trên, mình đang muốn thì thông tin sinh viên sẽ phải có name và age phải lớn hơn hoặc bằng 18.
Để enable Bean Validation trong Spring MVC với các request mà data nằm trong phần body, chúng ta sẽ sử dụng annotation @Valid của Bean Validation như sau:
|
1 2 3 4 5 6 7 8 9 10 11 12 13 14 15 16 17 |
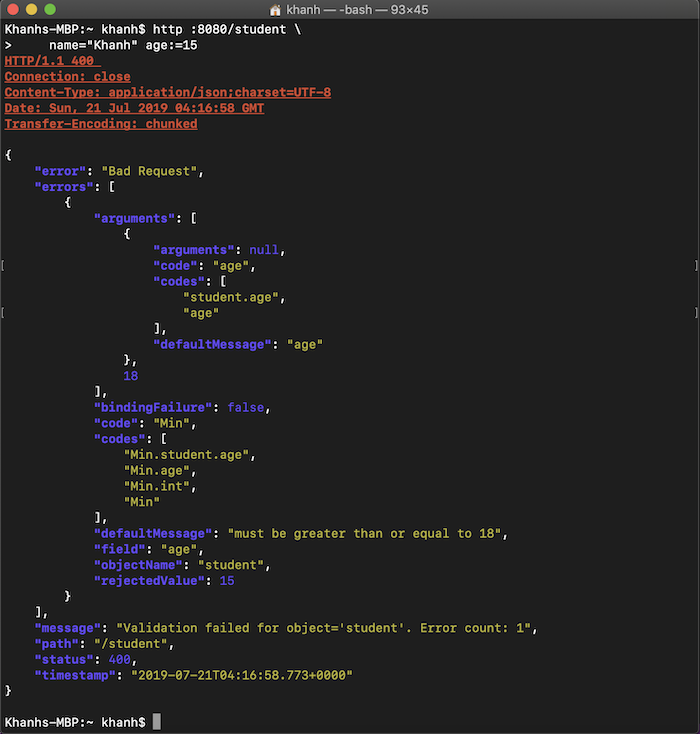
package com.huongdanjava.springmvcvalidation; import javax.validation.Valid; import org.springframework.web.bind.annotation.PostMapping; import org.springframework.web.bind.annotation.RequestBody; import org.springframework.web.bind.annotation.RestController; @RestController public class HelloController { @PostMapping("/student") public String student(@Valid @RequestBody Student student) { return student.getName(); } } |
Kết quả nếu mình request invalid data sẽ như sau:


duong
có cách nào để truyền request data trong request bằng form không ạ
duong
như trong ví dụ cuối của bài này ý ạ
Khanh Nguyen
Em đang xây dựng form bằng gì thế?