Xem toàn bộ series bài viết hướng dẫn xây dựng ứng dụng Questions Management tại đây.
Để cập nhập một question trong phần Frontend của ứng dụng Questions Management, đầu tiên mình sẽ cần thêm mới trong class QuestionsService một phương thức cho phép chúng ta có thể gọi tới API cập nhập question của API Question Service để truyền thông tin về question mà chúng ta cần cập nhập.
Cụ thể method này như sau:
|
1 2 3 |
updateQuestion(question: Question) { return this.http.put("/question/" + question.id, JSON.stringify(question), { headers: this.headers }).toPromise(); } |
Bởi vì chúng ta truyền nội dung của question dưới dạng JSON nên như các bạn thấy, mình đã sử dụng một biến headers với khai báo:
|
1 |
private headers = new HttpHeaders({ 'Content-Type': 'application/json' }); |
để thực hiện việc này.
Tiếp theo chúng ta sẽ xây dựng form để cập nhập question.
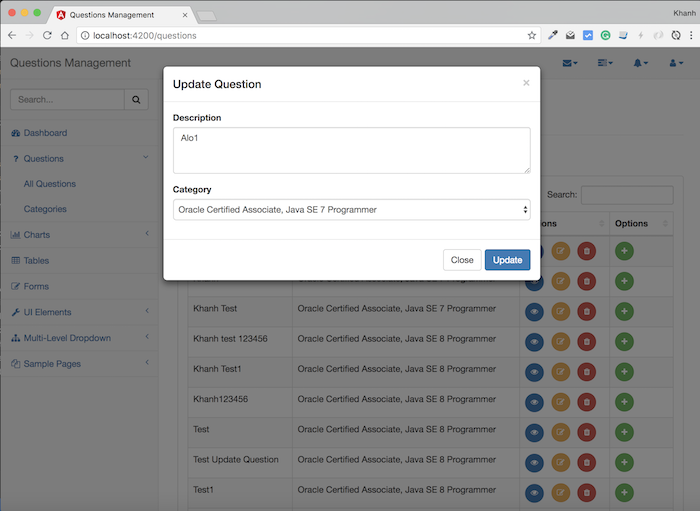
Trong trang All Questions, khi người dùng click vào nút Edit của mỗi dòng tương ứng với một question trong bảng, mình sẽ cho popup một cửa sổ sử dụng Bootstrap Modal cho phép người dùng có thể cập nhập thông tin của question này. Có 2 thông tin trong cửa sổ này đó chính là description về câu hỏi và Category mà câu hỏi này thuộc về.
Để làm được những điều trên, trong tập tin all_questions_component.html trong thư mục src/app/questions/all_questions, mình sẽ thêm mới phần Bootstrap Modal này sau “<!– /.panel –>” với nội dung như sau:
|
1 2 3 4 5 6 7 8 9 10 11 12 13 14 15 16 17 18 19 20 21 22 23 24 25 26 27 28 29 30 |
<!-- Modal --> <div class="modal fade" id="editQuestionModal" tabindex="-1" role="dialog" aria-hidden="true"> <div class="modal-dialog"> <div class="modal-content"> <div class="modal-header"> <button type="button" class="close" data-dismiss="modal" aria-hidden="true">×</button> <h4 class="modal-title">Update Question</h4> </div> <div class="modal-body"> <div class="form-group"> <label>Description</label> <textarea class="form-control" rows="3" [(ngModel)]="currentEditDescription" name="currentEditDescription"></textarea> </div> <div class="form-group"> <label>Category</label> <select [compareWith]="byCategory" [(ngModel)]="selectedCategory" class="form-control"> <option *ngFor="let c of categories" [ngValue]="c"> {{ c.name }} </option> </select> </div> </div> <div class="modal-footer"> <button type="button" class="btn btn-default" data-dismiss="modal">Close</button> <button type="button" class="btn btn-primary" (click)="updateQuestion()">Update</button> </div> </div> <!-- /.modal-content --> </div> <!-- /.modal-dialog --> </div> <!-- /.modal --> |
Để hiển thị popup này lên mình sẽ sửa lại code cho phần button “Edit”, từ:
|
1 |
<button type="button" class="btn btn-warning btn-circle"><i class="fa fa-edit"></i></button> |
thành:
|
1 |
<button type="button" class="btn btn-warning btn-circle" data-toggle="modal" data-target="#editQuestionModal" (click)=editQuestion(c)><i class="fa fa-edit"></i></button> |
Như các bạn thấy, id của Bootstrap Modal này là “editQuestionModal”. Mình đã định nghĩa thêm biến currentEditDescription trong class AllQuestionsComponent để giữ thông tin về description của question mà chúng ta đang muốn cập nhập:
|
1 |
currentEditDescription: string; |
Còn phần Category thì mình cũng định nghĩa một biến currentEditCategory để nắm giữ thông tin Category của question cần cập nhập:
|
1 |
currentEditCategory: Category; |
Khi người dùng click vào nút “Edit” thì ứng dụng của chúng ta sẽ gọi tới phương thức editQuestion() trong class AllQuestionsComponent với tham số là đối tượng CompositeQuestion của question cần cập nhập. Bên trong phương thức editQuestion(), chúng ta cần khởi tạo một đối tượng Question để nắm giữa thông tin mới của question cần cập nhập và gán giá trị cho currentEditDescription, currentEditCategory như sau:
|
1 2 3 4 5 6 7 8 9 10 11 12 |
editQuestion(compositeQuestion: CompositeQuestion) { this.editedQuestion = new Question(); this.editedQuestion.id = compositeQuestion.id; this.currentEditDescription = compositeQuestion.description; this.currentEditCategory = compositeQuestion.category; this.selectedCategory = compositeQuestion.category; this.categoriesService.findAllCategories().then(r => { this.categories = r; }); } |
Như các bạn thấy, mình cũng đã định nghĩa một biến là categories:
|
1 |
categories: Category[]; |
và lấy tất cả Category có trong hệ thống để hiển thị bằng cách sử dụng CategoriesService.
|
1 2 3 |
constructor(private questionsService: QuestionsService, private categoriesService: CategoriesService) { } |
Để giữ thông tin về Category mà chúng ta chọn cho question mới này, mình sử dụng biến selectedCategory trong class AllQuestionsComponent
|
1 |
selectedCategory: Category; |
Khi popup hiện lên, chúng ta cần select Category hiện tại mà question này thuộc về nên mình đã khai báo sử dụng directive compareWith của Angular trong thẻ <select> với giá trị là tên phương thức byCategory() được định nghĩa trong class AllQuestionsComponent như sau:
|
1 2 3 |
byCategory(category1: Category, category2: Category){ return category1.id === category2.id; } |
Khi người dùng nhấn vào nút “Update”, phương thức updateQuestion() trong class AllQuestionsComponent sẽ được gọi để thực hiện việc cập nhập question như sau:
|
1 2 3 4 5 6 7 8 9 10 11 12 13 14 15 16 |
updateQuestion() { this.editedQuestion.description = this.currentEditDescription this.editedQuestion.categoryId = this.selectedCategory.id; this.questionsService.updateQuestion(this.editedQuestion) .then(r => { alert("Success"); this.currentEditDescription = ""; this.currentEditCategory = null; $('#editQuestionModal').modal('hide'); this.destroyDatatable(); this.showAllQuestions(); }) .catch(this.handleError); } |
với phương thức destroyDatatable() và handleError() có nội dung như sau:
|
1 2 3 4 5 6 7 8 9 10 |
private handleError(error: any): Promise<any> { alert('An error occurred' + error); return Promise.reject(error.message || error); } destroyDatatable() { $('#dataTables-questions').DataTable({ "retrieve": true }).destroy(); } |
OK, vậy là chúng ta đã hiện thực xong phần cập nhập question trong phần Frontend của ứng dụng Questions Management rồi đó các bạn. Thử test xem sao nhé!
Trong trang All Questions, mình nhấn vào nút “Edit” của một question bất kỳ, một cửa sổ sẽ hiện ra như sau:

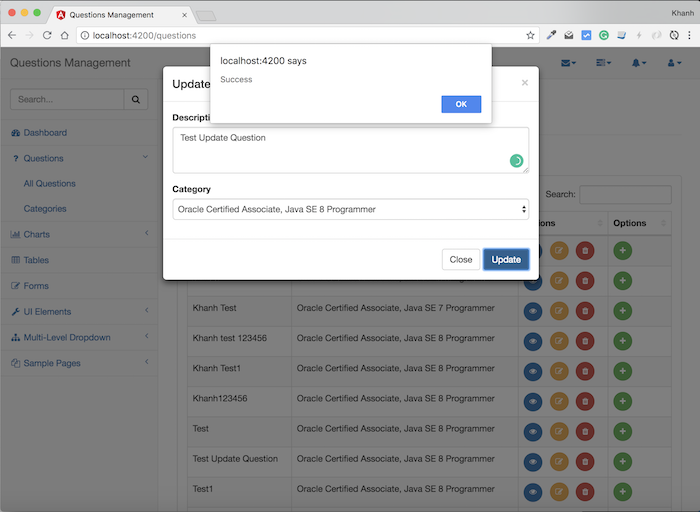
Sau khi sửa nội dung của question này, các bạn nhấn nút Update thì kết quả sẽ như sau:


