Xem toàn bộ series bài viết hướng dẫn xây dựng ứng dụng Questions Management tại đây.
Trong bài viết trước, chúng ta đã chuẩn bị các thông tin cần thiết để xây dựng phần thêm mới category trong phần Frontend của ứng dụng Questions Management của chúng ta như: một CategoriesService dùng để thao tác gọi tới API Category Service, một đối tượng Category dùng để chứa thông tin của một category. Bây giờ chúng ta sẽ đi vào chi tiết việc xây dựng phần thêm mới category này các bạn nhé!
Đầu tiên, mình sẽ thêm mới một method trong class CategoriesService để gọi tới API Category Service thực hiện việc thêm mới category như sau:
|
1 2 3 |
addCategory(category: Category) { return this.http.post("/category/add", JSON.stringify(category), { headers: this.headers }).toPromise(); } |
với biến headers được khai báo như sau:
|
1 |
private headers = new HttpHeaders({ 'Content-Type': 'application/json' }); |
Có 3 thông tin mà một category cần có là name, code và description và 2 trong số đó là name và code là những thông tin mà chúng ta cần phải nhập, nên mình sẽ thêm mới một phương thức createNewCategory() trong CategoriesComponent để thực hiện việc thêm mới Category thoả mãn những yêu cầu trên như sau:
|
1 2 3 4 5 6 7 8 9 10 11 12 13 14 15 16 17 18 19 20 21 22 23 24 25 26 27 28 29 30 31 32 33 34 35 36 37 38 39 40 41 42 43 44 45 46 47 48 49 50 51 |
name: string; code: string; description: string; newCategory: Category; isEmpty(val) { return val === undefined || val == null || val.length <= 0; } createNewCategory() { if (this.isEmpty(this.name)) { alert("Name cannot be empty."); return; } if (this.isEmpty(this.code)) { alert("Code cannot be empty."); return; } this.newCategory = new Category(); this.newCategory.name = this.name; this.newCategory.code = this.code; this.newCategory.description = this.description; this.categoriesService.addCategory(this.newCategory) .then(r => { alert("Success"); this.name = ""; this.code = ""; this.description = ""; this.destroyDatatable(); this.showAllCategories(); }) .catch(this.handleError); } private handleError(error: any): Promise<any> { alert('An error occurred' + error); return Promise.reject(error.message || error); } destroyDatatable() { $('#dataTables-categories').DataTable({ "retrieve": true }).destroy(); } |
Bây giờ thì chúng ta có thể sửa lại form thêm mới category trong tập tin category.component.html để thực hiện việc thêm mới category như sau:
|
1 2 3 4 5 6 7 8 9 10 11 12 13 14 15 16 17 18 |
<form role="form"> <div class="form-group"> <label>Name</label> <input class="form-control" [(ngModel)]="name" name="name"/> <p class="help-block">The name of the category.</p> </div> <div class="form-group"> <label>Code</label> <input class="form-control" [(ngModel)]="code" name="code"/> <p class="help-block">The code of this category.</p> </div> <div class="form-group"> <label>Description</label> <textarea class="form-control" rows="3" [(ngModel)]="description" name="description"></textarea> <p class="help-block">The description about this category.</p> </div> <button type="submit" class="btn btn-primary" (click)="createNewCategory()">Add New Category</button> </form> |
Để sử dụng được các directive form của Angular, các bạn cần import FormModule trong QuestionsModule như sau:
|
1 2 3 4 5 6 7 8 9 10 11 12 13 14 15 16 17 18 19 20 |
import { NgModule } from "@angular/core"; import { CategoriesComponent } from "./categories/categories.component"; import { CommonModule } from "@angular/common"; import { FormsModule } from '@angular/forms'; @NgModule({ declarations: [ CategoriesComponent ], imports: [ CommonModule, FormsModule ], exports: [ CategoriesComponent ] }) export class QuestionsModule { } |
Đến đây thì chúng ta đã hoàn thành việc xây dựng phần thêm mới category cho phần Frontend của ứng dụng QuestionsManagement. Chạy test thử xem sao các bạn.
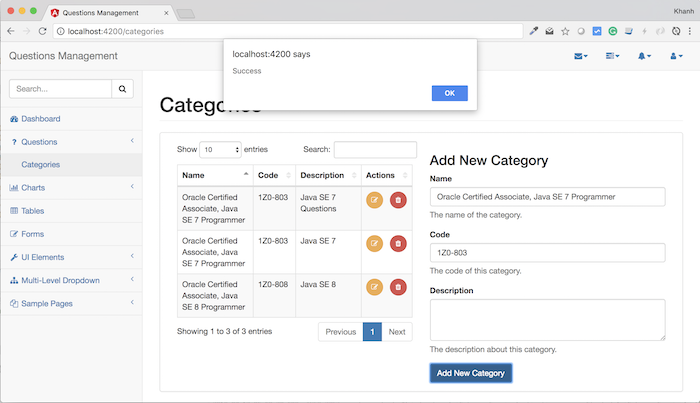
Giả sử bây giờ mình thêm mới thành công category thì kết quả sẽ như sau:

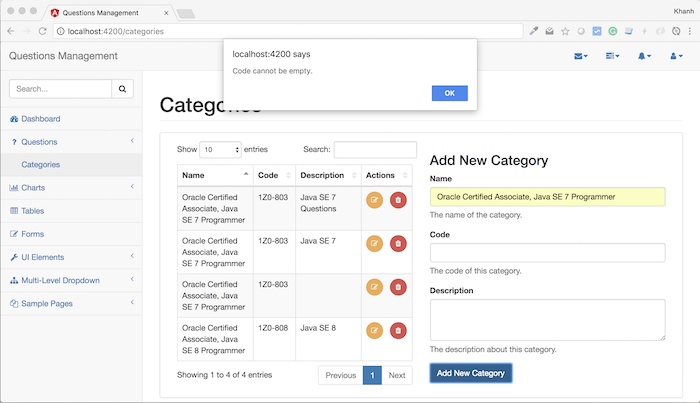
Thêm mới category nhưng không nhập code.

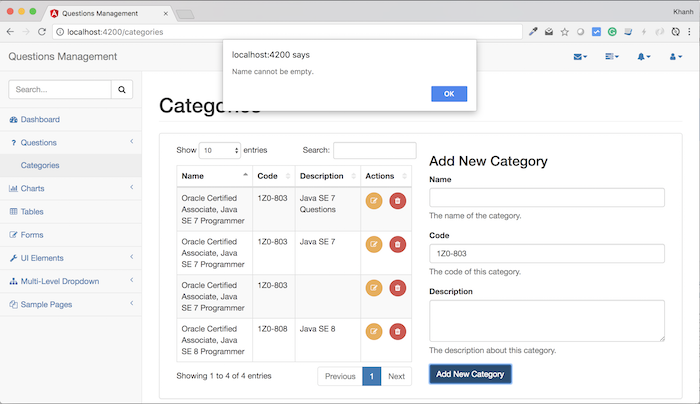
Thêm mới category nhưng không nhập name:


